Learn more about the broadcasting world, with step by step guides to stream Grid View, Overlays and to simultaneously stream to YouTube, LinkedIn, and Facebook with Webex.
Webex stream to YouTube.
Do you listen to podcasts? Watch YouTube or even Twitch? Then let me take you behind the scenes into the world of the tools used in live streaming. In this article, you will learn how to use the video meetings application, Webex, and set up virtual backgrounds, live stream in grid view, add overlays, and even stream to multiple platforms simultaneously. There are more things to learn when it comes to streaming, but this article is meant to get you comfortable with live streaming as a broadcaster. If you want to learn the simple way to live stream, check out this blog.
Below is a diagram of the various streaming workflows and applications you can use to achieve the broadcast of your choice. This guide is broken down into three sections: Live Speaker Overview & Setup, Broadcast Software Setup, and Streaming Platform Setup. Each section will go over the installation and configuration process to set up your live broadcast.
Live streaming tools and application workflow.
If you are new to streaming, check out this blog first on how to plan and set up your first Webex live stream.
Présentation : Broadcast & streaming platform features
There are many other applications out there that can achieve your use case. This guide is not meant to be the ultimate solution, but more of a way to get your feet wet on streaming. Once you have decided what you want your broadcast to look like and how you want to stream it, this feature matrix helps break down various broadcasting software features from VBrick, REC.VC, OBS, and Restream.
Streaming Tools Feature Breakdown.
Étape 2 : Live speaker overview & install
Section Topics 1. User 1 — Host: Install OBS, Loopback; Webex Tips & Tricks 2. User 2+ — Panelists and Virtual Background
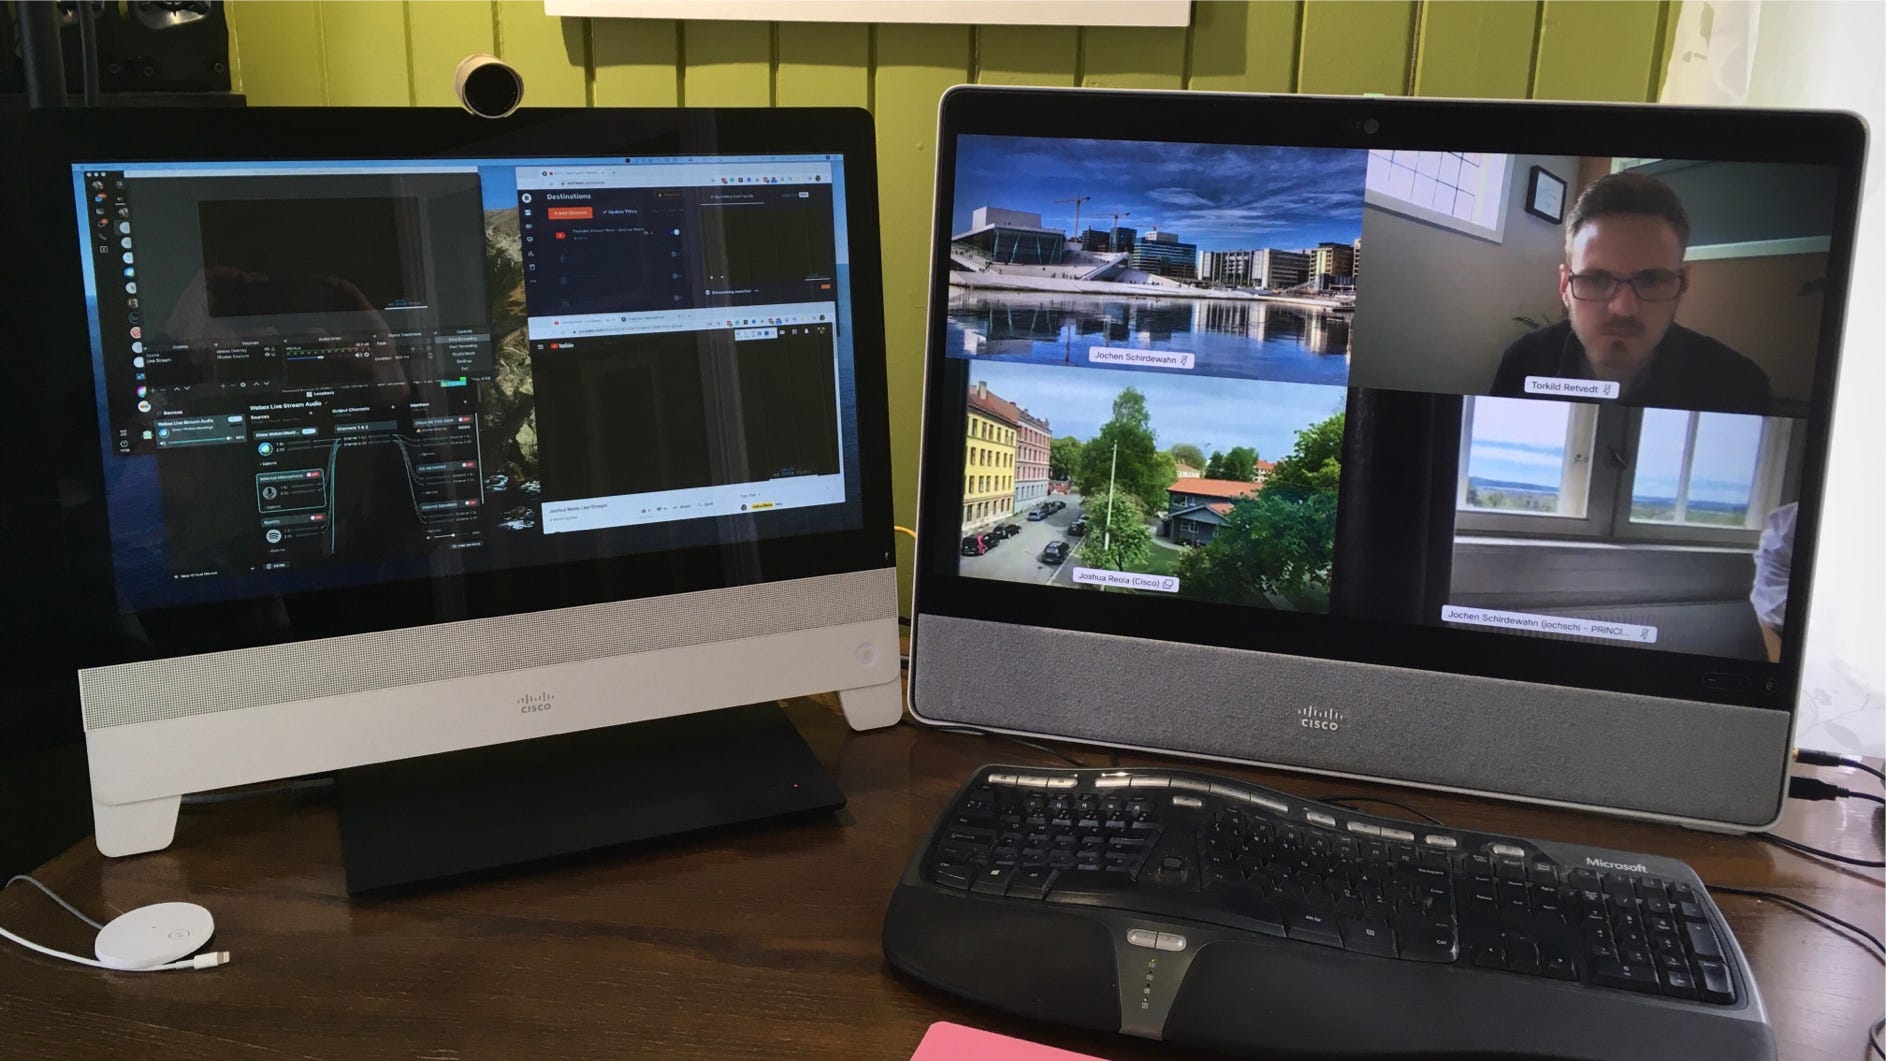
Participer à une session d’entraînement. Webex Desk Pro (right) and Webex DX80 (left).
We will now break down the first column of the live streaming workflow. This section will go over OBS, Loopback, and Webex tips and tricks for the host and also tools that panelists can use for virtual backgrounds.
You can refer User 1 as part of the studio crew or the video producer. They have three main tasks. They are to run OBS, Loopback, and manage the Webex panelists. The Webex host won’t participate in the video feed. This user will only manage the panelists, push users in and out of the Lobby, remove the floating icons, mute users, and pin the main video users in the grid view. Below is a short list of things the Host has to do.
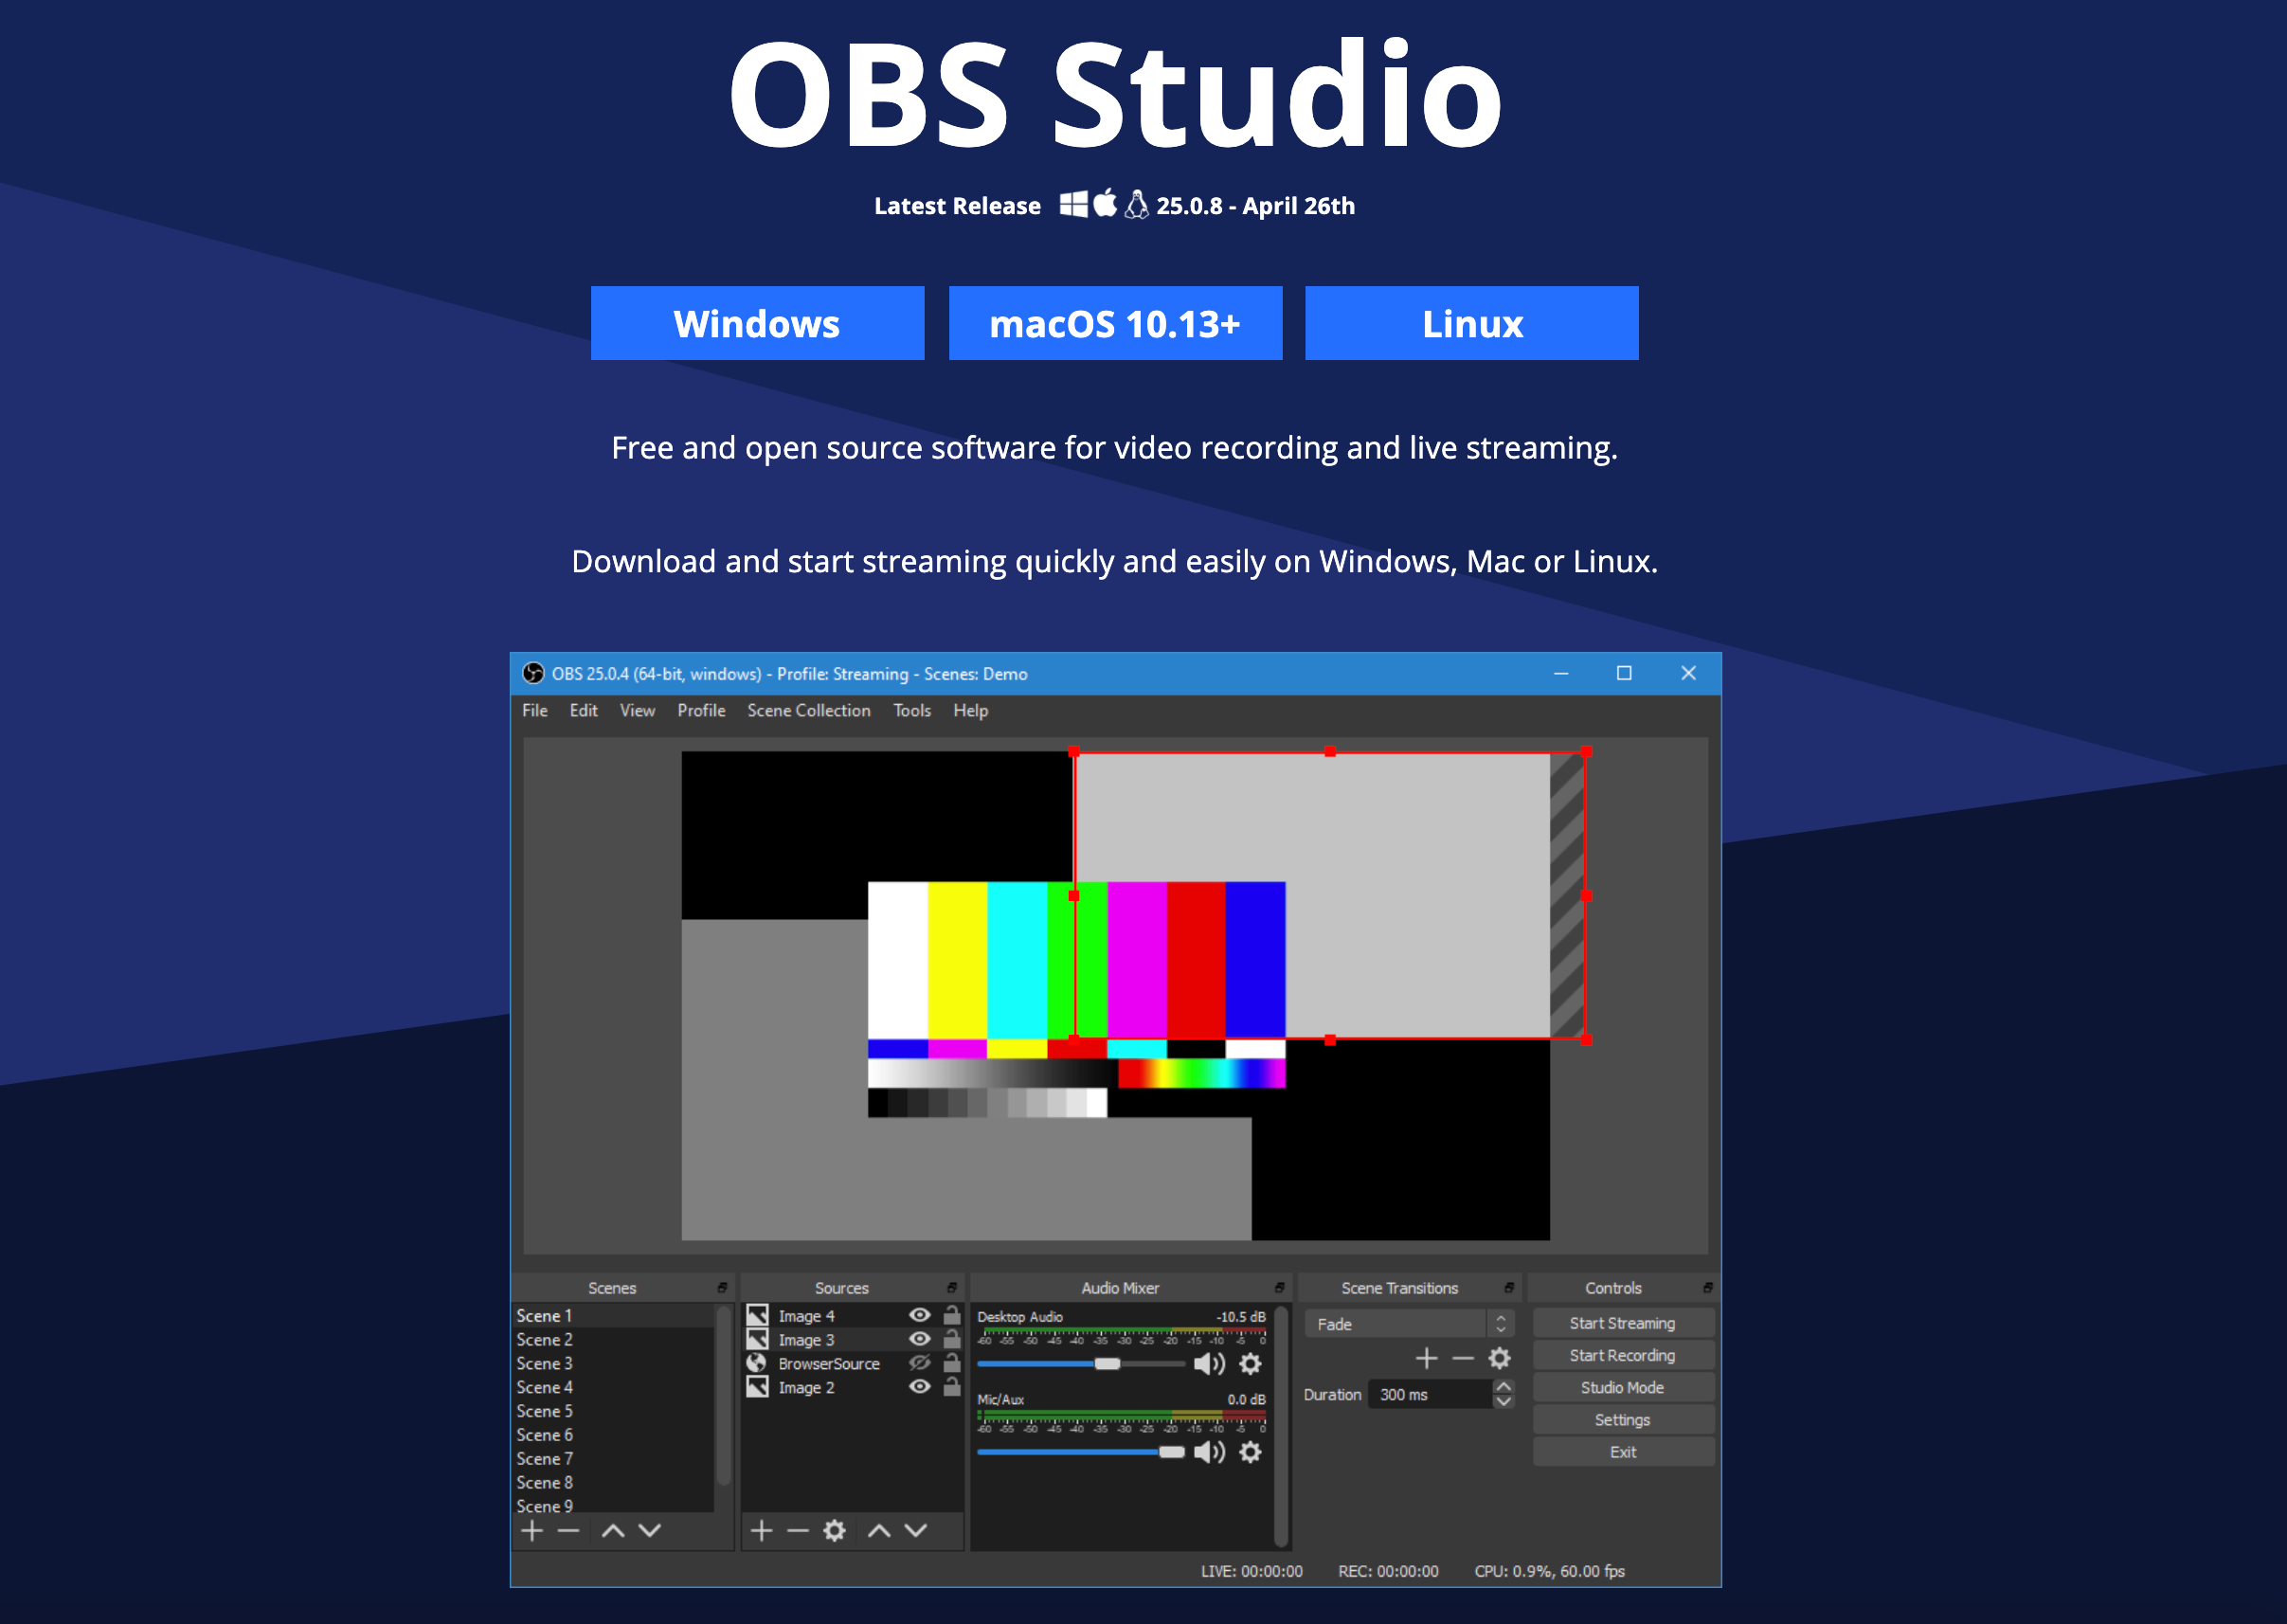
Install OBS To minimize Murphy’s law, make User 1, the dedicated machine to run OBS or Open Broadcaster Software . User 1 will have a dedicated laptop to stream to the various platforms like YouTube. This must be a very high-end device as it will be streaming 1080p, which can max out its x264 encoder or GPU. Without a good laptop or machine, there can be a huge impact on the system, causing the framerates of your video to suffer and making the whole experience unenjoyable for the viewer. This software will provide the Grid View, or some would like to say Hollywood Squares or the Brady Bunch view. Basically, OBS is your desktop screen capture application that will send a stream out to your platform of choice. The Broadcast Software section will go over the setup process of OBS.
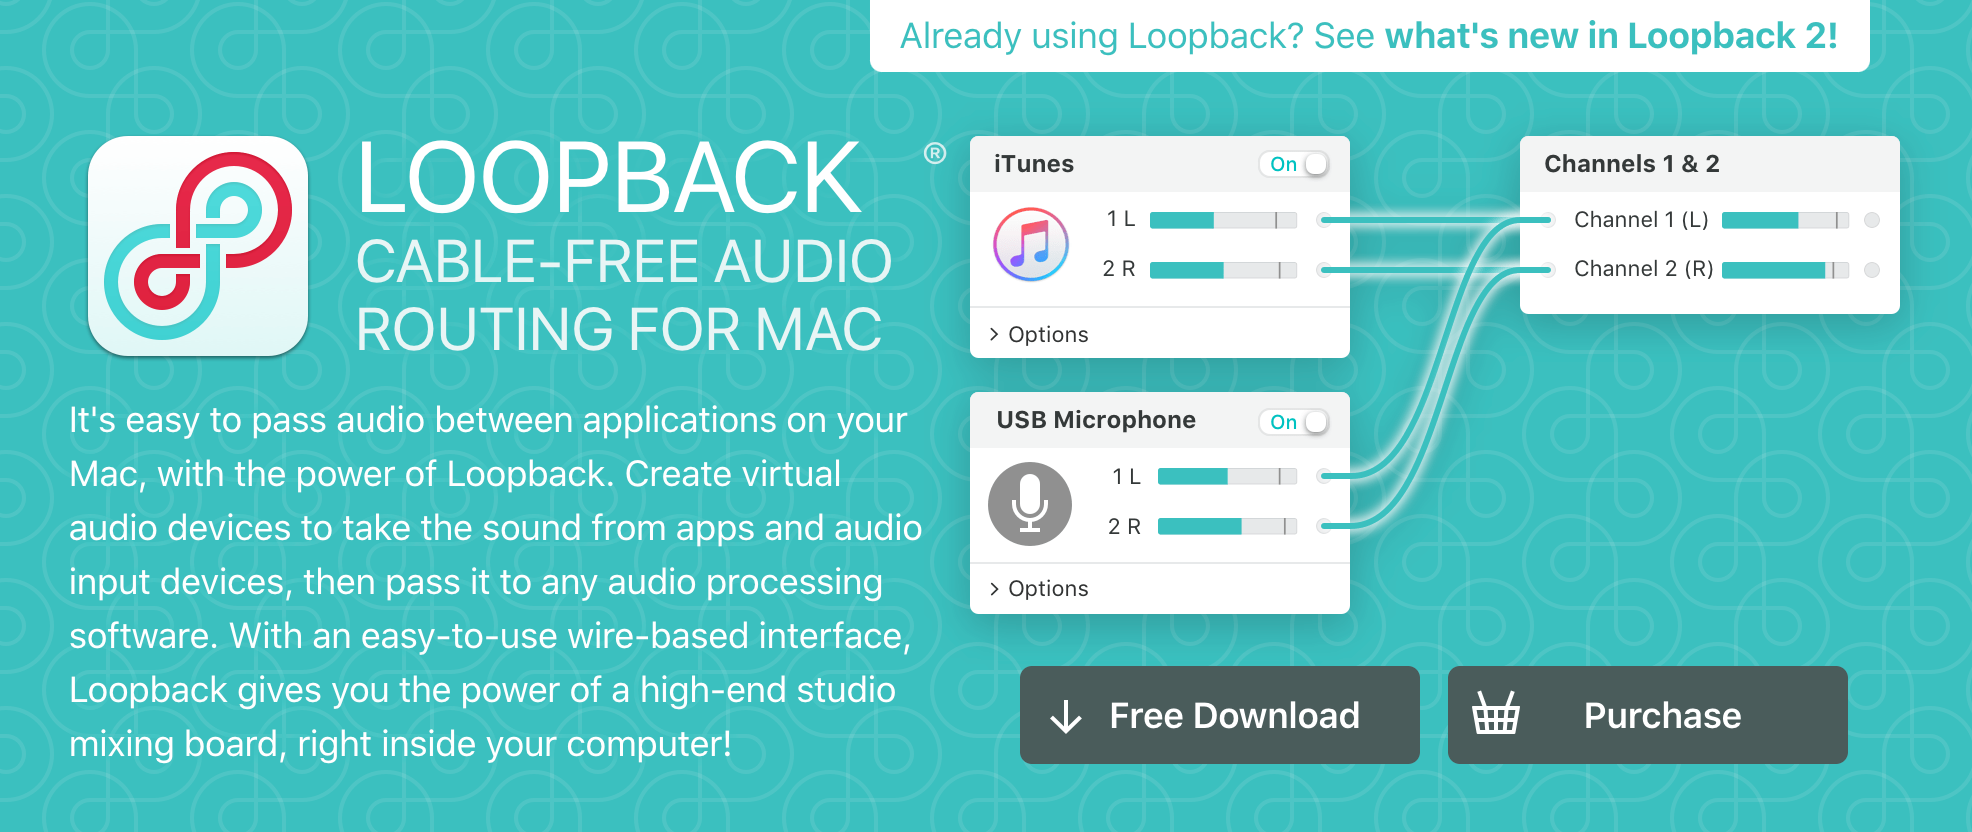
Install Loopback Next, install Loopback from Rogue Amoeba. This is not a free application and it is a Mac app that reroutes audio from one piece of hardware or software to another. It’s best to think of it as a software pipe that pretends it has a hardware device on each end: audio input on one and audio output on the other. This application will be used to reroute audio from Webex to OBS. I also use this to also stream Spotify into the meeting and use my Cisco Headset 730 to monitor the session. We will go over the setup of this in the next section. Remarque : There’s a lot of other free virtual audio drivers out there, and for non-Mac users, you can use VB Cable or Virtual Audio Cable.
Webex Tips & Tricks There are a lot of things to think about now that you are a broadcaster. A few things to be aware of: CPU – Shut down unnecessary applications as OBS will consume a lot of CPU resources especially if you don’t have a dedicated GPU on your machine. It’s best to use devices with an NVENC H.264 New (GPU Encoding for Nvidia Graphics Cards) or an AMD H.264 (GPU Encoding for AMD GPUs). LAN – Avoid WiFi. Hardwire if necessary as this is a live stream. Disable VPN – You want to remove as much latency as possible.
Improve and control your meeting experience. Follow these steps to set up your stream. Here, you want to Mute users joining your meeting and disable sharing in the event someone accidentally shares their desktop. Once you have your Webex Meeting desktop application open, proceed with these settings.
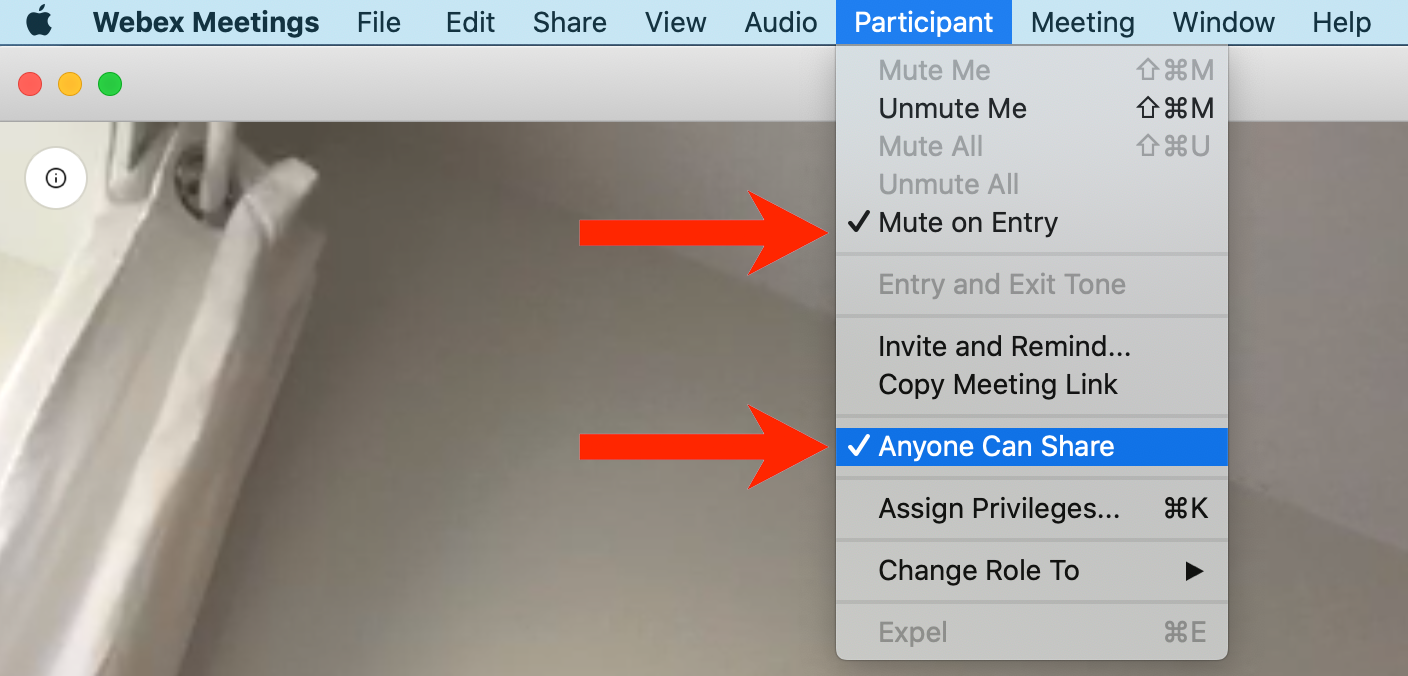
Étape 1 : Go to Participant -> Mute on Entry and enable it and also de-select “ Anyone Can Share. »
Enable Mute on Entry & Uncheck Anyone Can Share.
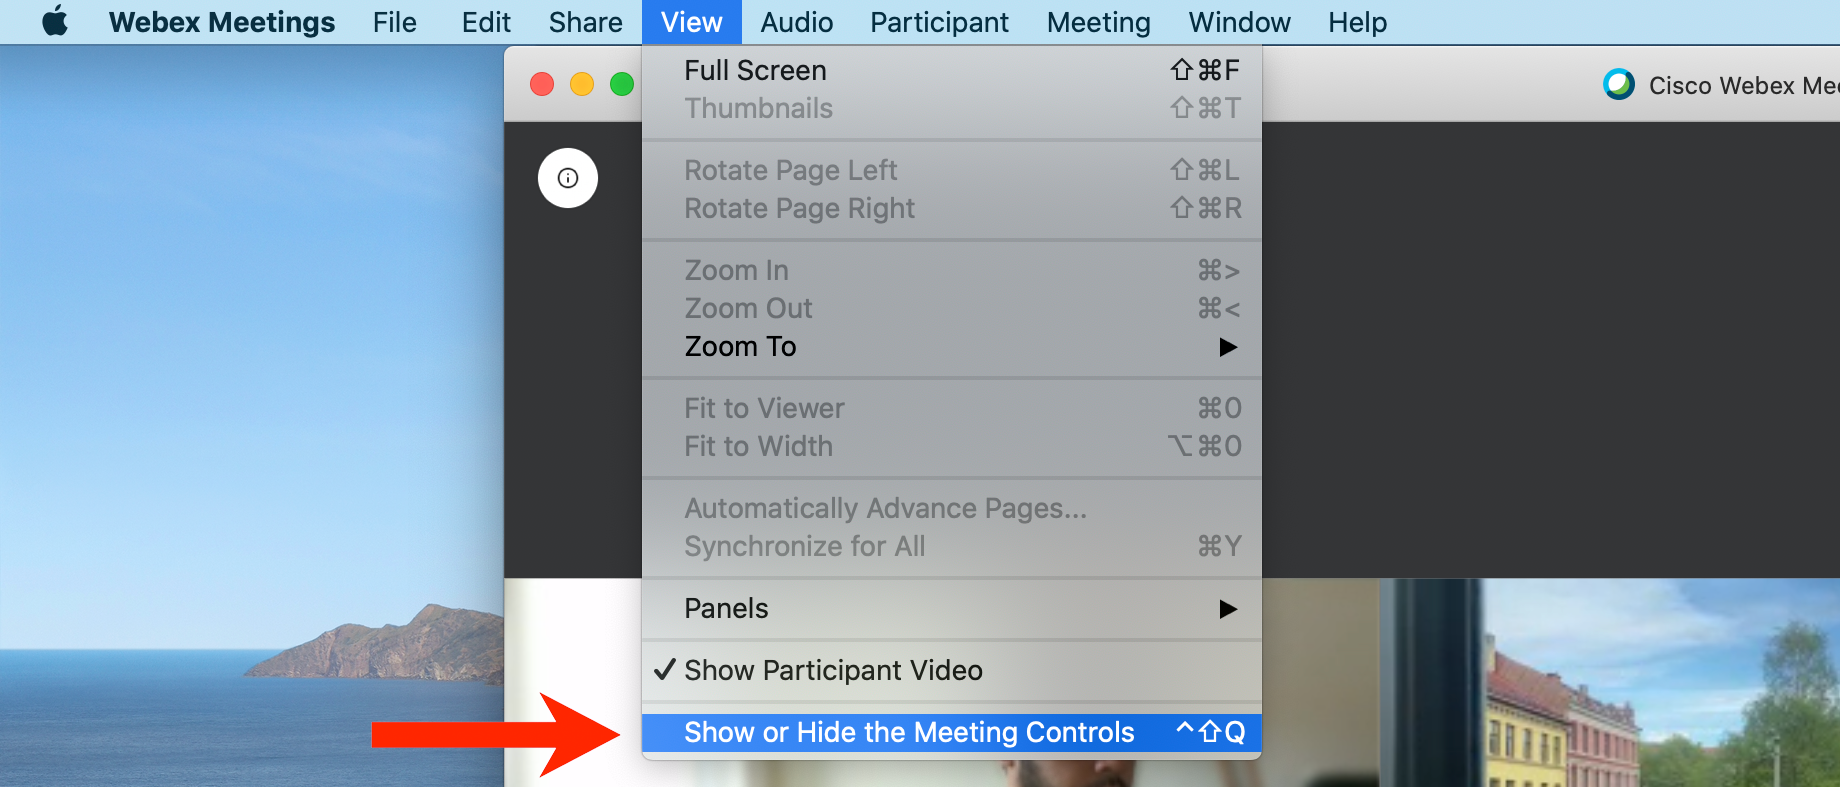
Étape 2 : Go to View -> Show or Hide Meeting Controls. You want to enable this. In the following picture, you’ll see the meeting controls. You want to hide that during your broadcast.
Uncheck to Hide the Meetings Controls.
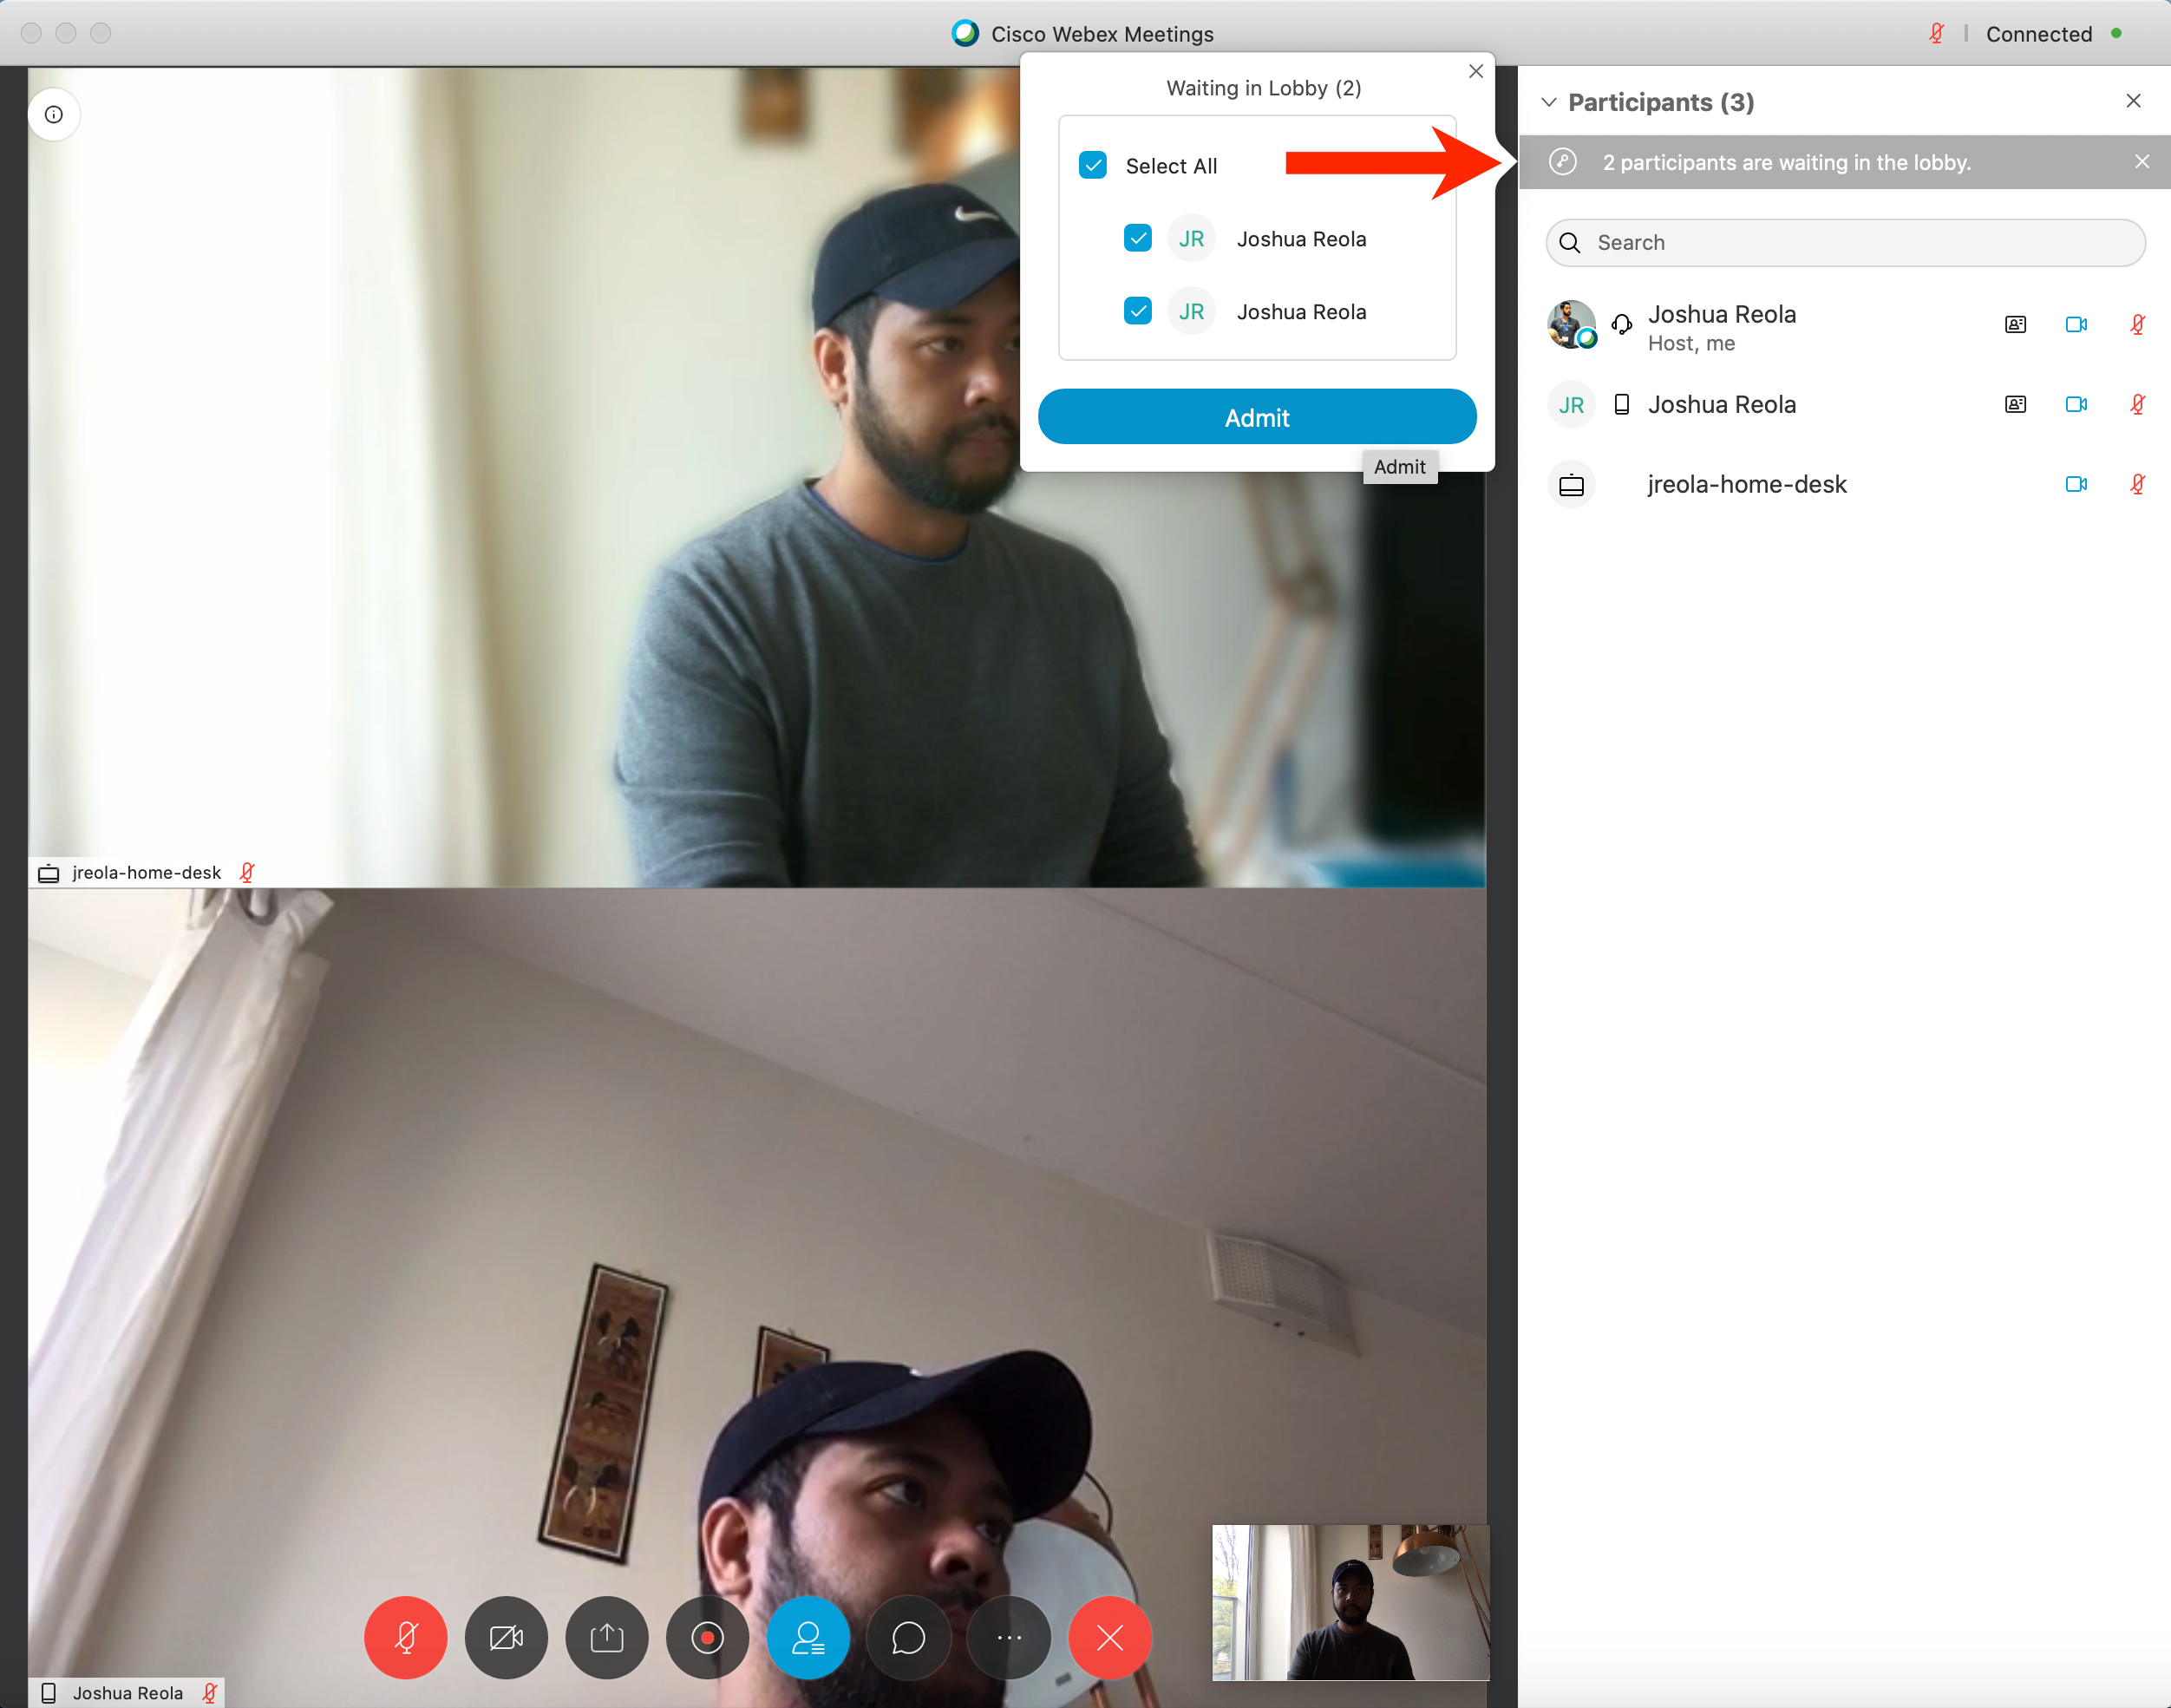
Étape 2 : Understand the Host Lobby feature.Here as you can have speakers rotate in and out of your call and you can control who is showing up on the video grid by pushing them into the Lobby.
Waiting in the Lobby function.
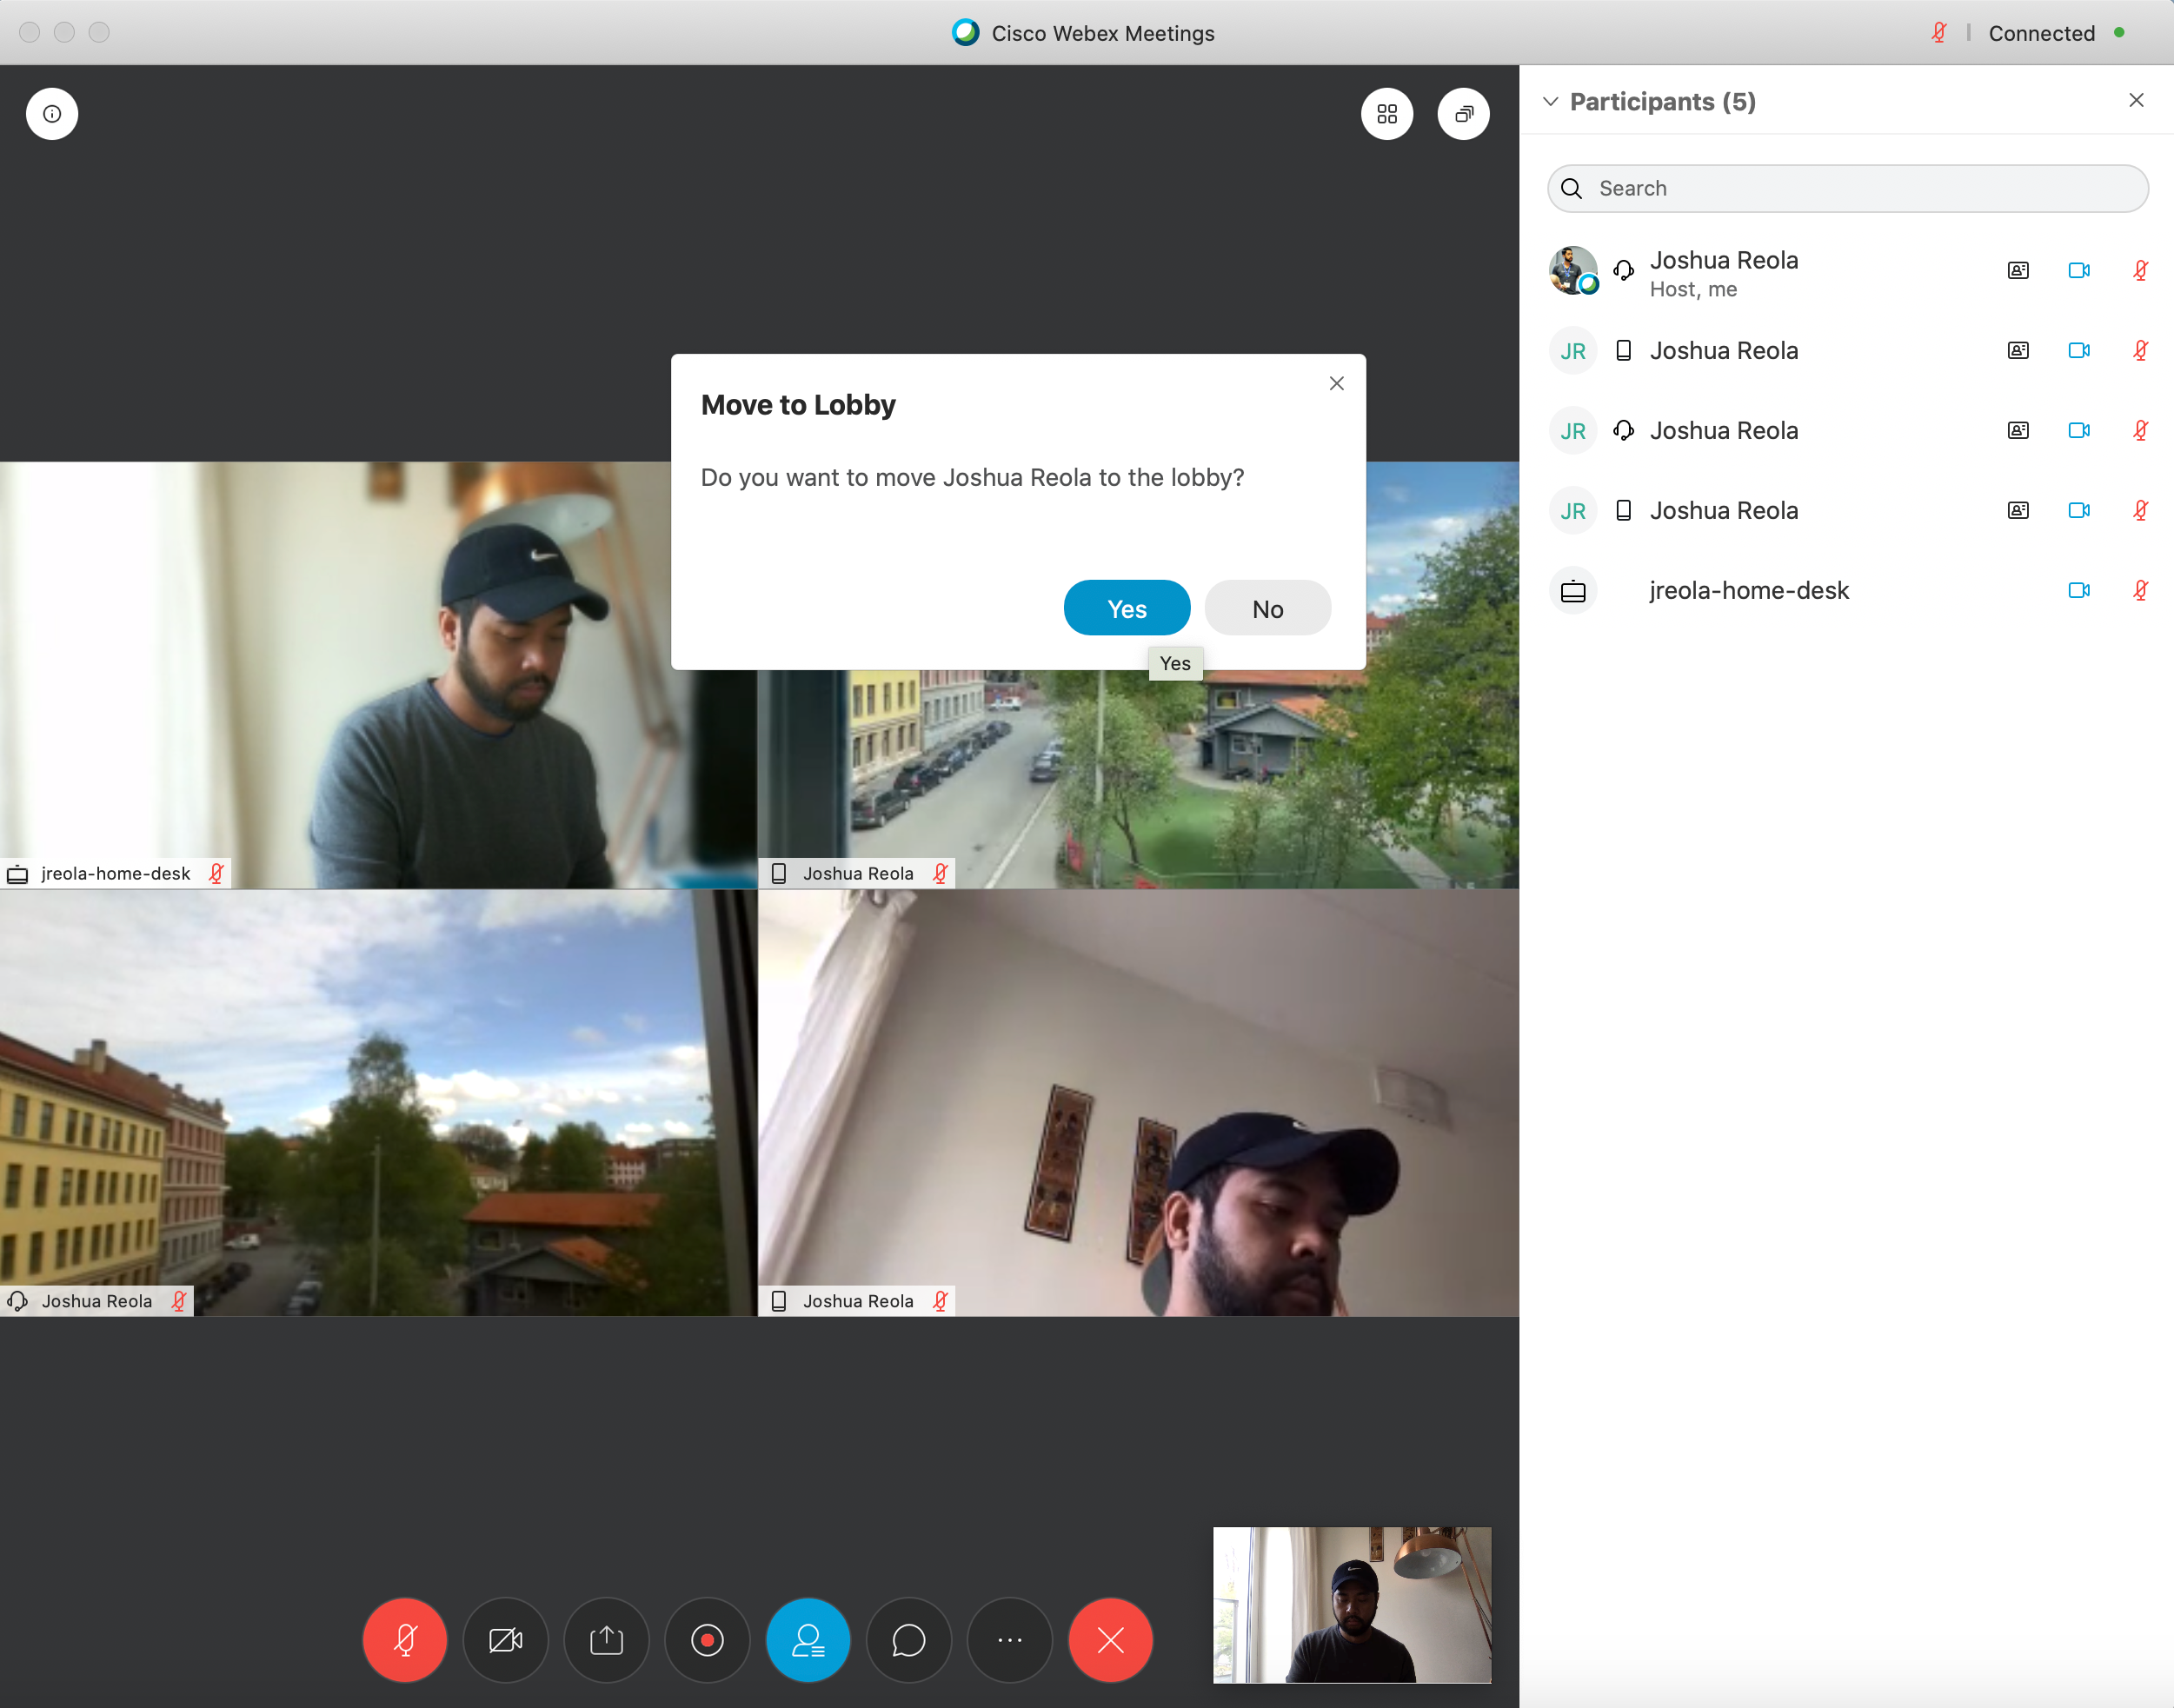
You can also move people into the lobby once they are done speaking by right-clicking on the participant name.
Move to the Lobby feature.
Étape 2. Leave the Host “Un-muted” in Webex. If you do not, then no audio will pass through OBS and to the other panelists. Also, you don’t have to worry about any noise being picked up as the physical microphone is not connected to the virtual driver.
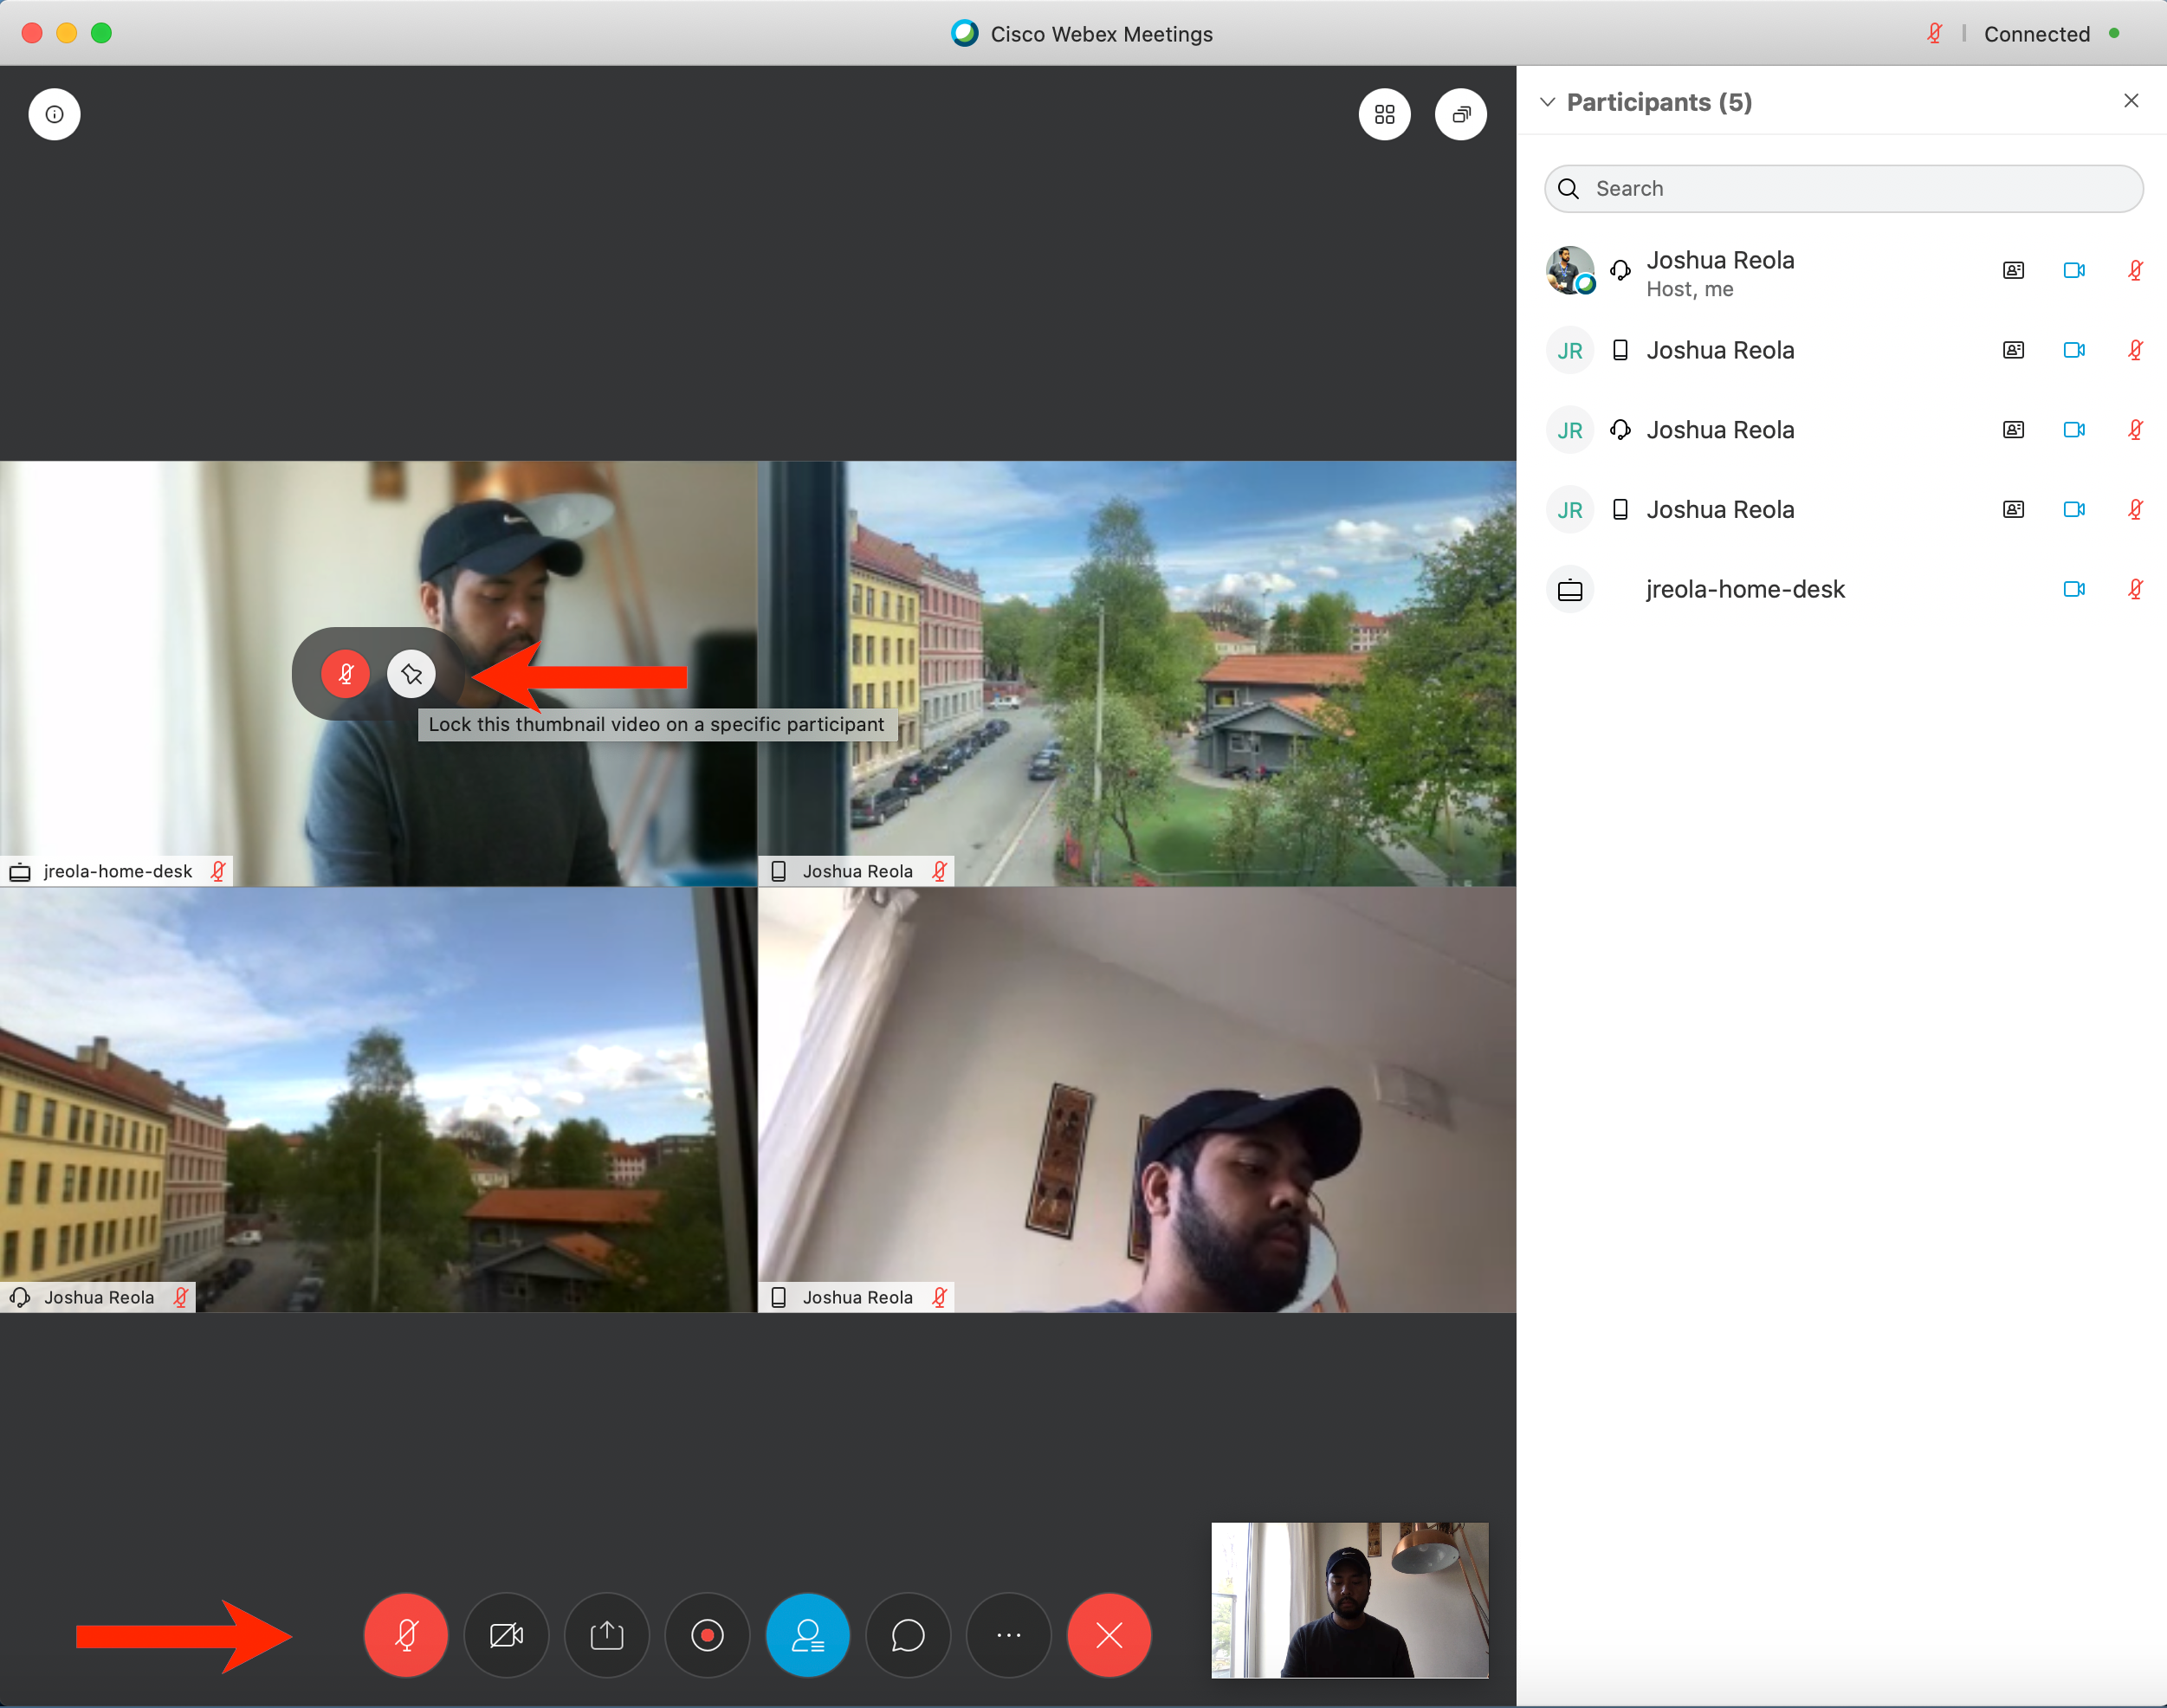
Unmute & Lock this thumbnail setting.
Étape 2. As you hover your mouse over the participant, you can select “ Lock this thumbnail video on a specific participant .” This option can lock the video focus of the main video on a specific participant, or the active speaker. Si vous êtes l’organisateur, vous pouvez déterminer la vidéo qui sera affichée pour vous et vos participants.
TIP: If you will be moving people in and out constantly or doing any of the above, then the Host privilege should be passed to another participant and you would leave Webex in full window mode for the OBS setup.
2. User 2+ — Panelists and virtual background
For your other users speaking on the live stream, the best hardware to use is a dedicated video device. I prefer using a Webex Room USB or what I’m using is a Webex Desk Pro as my dedicated SIP endpoint. It’s a 4K display that has a 12 MP HD camera, 71-degree field of view, 8 element microphone array with audio fencing with low audio latency, auto-framing, auto-focus, 3.1 directional speaker array, and overall fewer points of failures since I don’t need other external devices like hardware switchers, encoders, O/S and other applications running in the background found on a PC. Basically, think of the Desk Pro and Room USB device as a high-end dedicated webcam with a ton of advanced features. If you are using a laptop, make sure you have a headset. I have a Cisco Headset 730. It is boom less design coupled with adaptive noise cancellation and background noise reduction. If you don’t have a nice high-end headset, then a regular mobile headset can work very well too.
Virtual Backgrounds, Chroma Key: For your panelists’ that do not have access to a premium video conference unit, then a basic webcam or DSLR would work as well. With the USB functionality, you can use OBS Chroma Key, Manycam, or Snapchat’s Snap Camera to provide virtual backgrounds. These are some of the many applications that are out there, but this article won’t go into a deep dive into this.
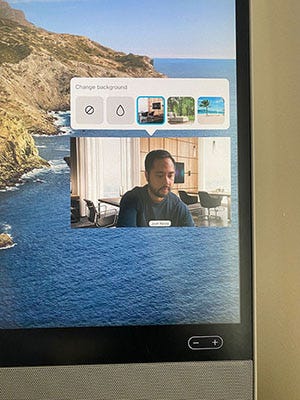
Webex Desk Pro with Virtual Backgrounds.
TIP: Note that when you’re live streaming using a software encoder, you’re already putting the computer’s CPU at additional load. Most virtual background software apps require extremely beefy CPUs like a quad-core 4th-gen Core i7 or 3GHz processors with 8 cores or more. In this article, I have my Cisco Webex Desk Pro with the built-in background filters for my stream. It won’t consume any CPU cycles on my laptop since all the work is done on the endpoints NVidia GPU chipset.
Manycam
Manycam is a live-streaming service and a program that allows users to use their webcam with multiple different video conferencing applications and video streaming applications simultaneously for Windows and Mac computers. In this article, I will just focus on the virtual background setup.
REMARQUE :With one of the latest Webex Desktop updates, a new “hardened” security compilation method on OS X was put in place so that only libraries that are signed by Cisco or Apple are loaded. This applies not only to Manycam but other third-party applications such as CamTwist, Ecamm, CameraLive, EpocCam, Snap Camera, etc. Since they are from third parties, the Webex Desktop app (for Meetings and Events) will not allow them to load. The way to bypass this is to use the browser version for Webex Meetings.
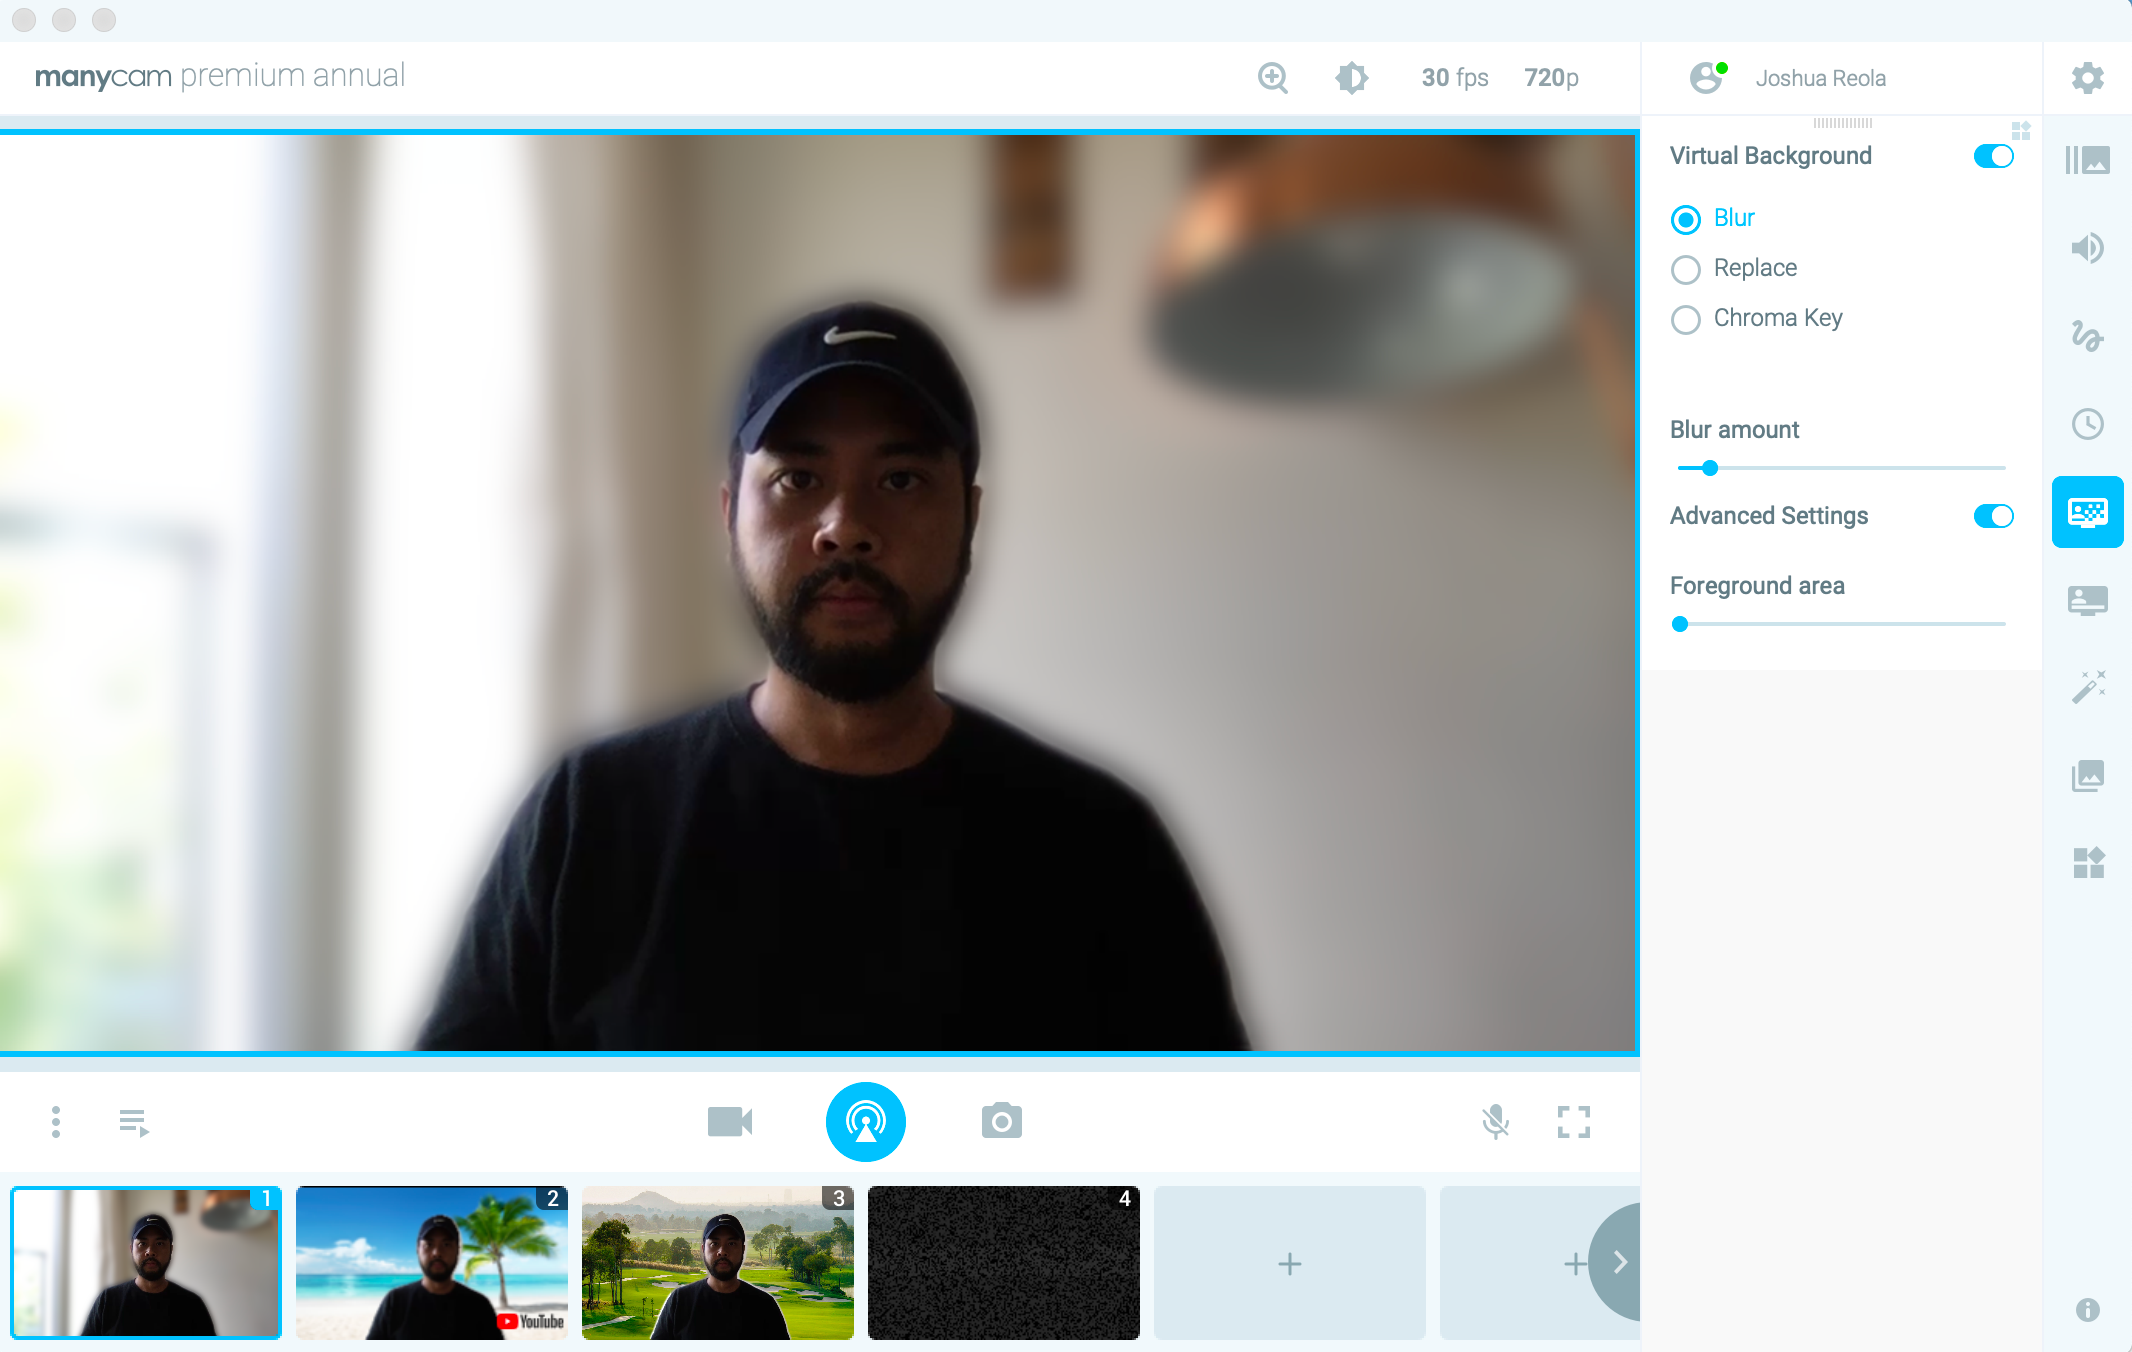
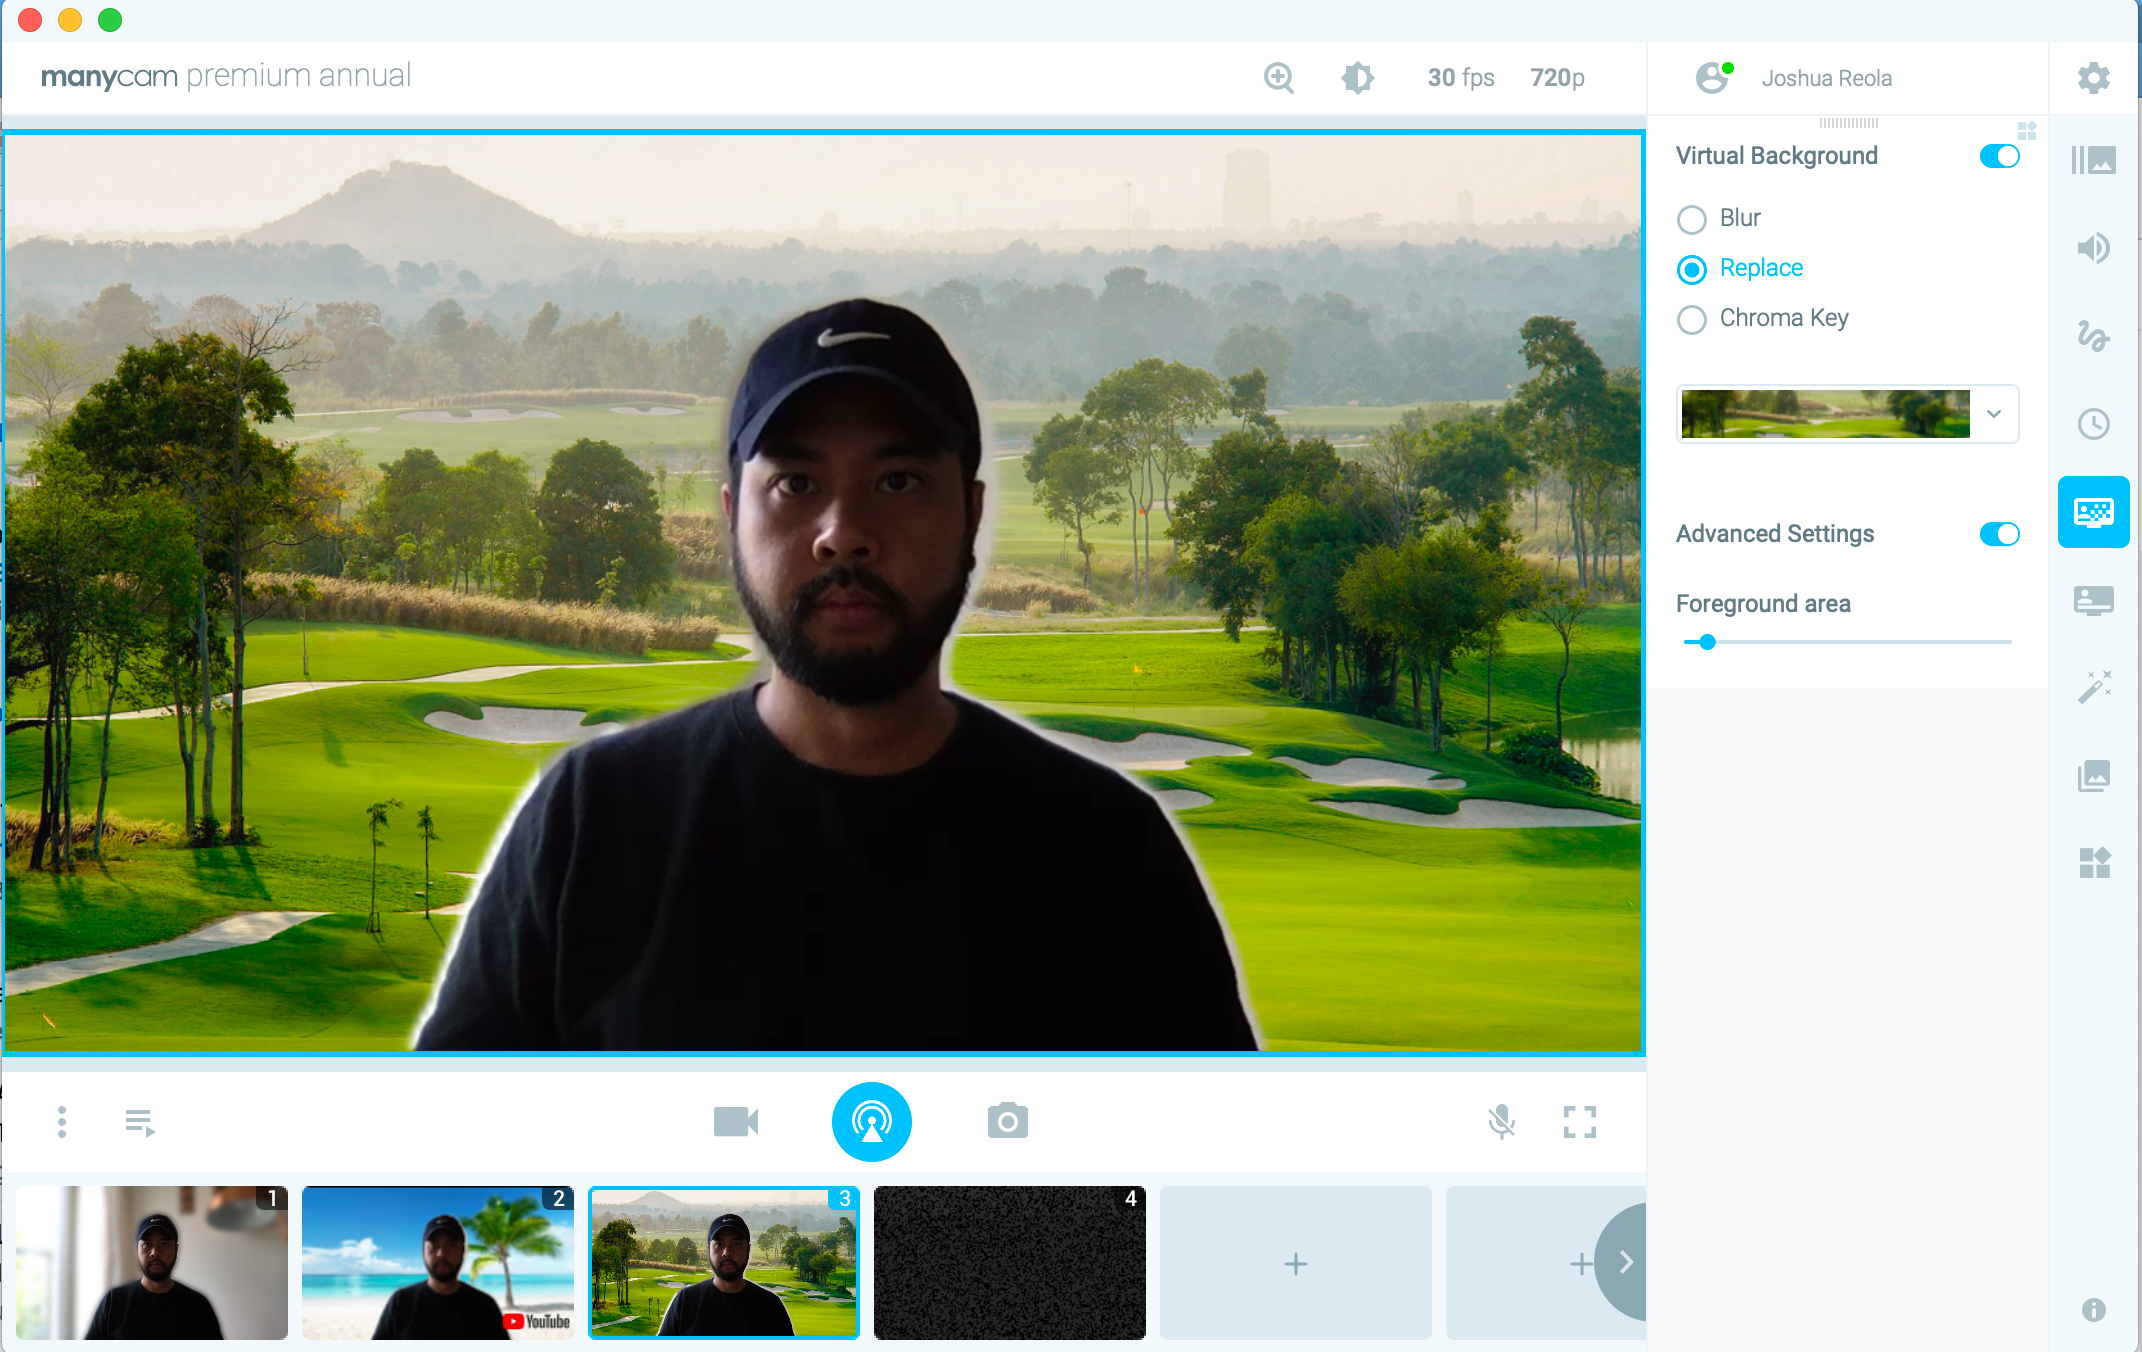
Étape 1 : Open Manycam and go to Presets and Add a Video Source -> Webcam Step 2: Go to Chroma Key -> (Toggle On) Virtual Background -> Blur or Replace to select your background in the drop-down window.
Background blur and Virtual background features.
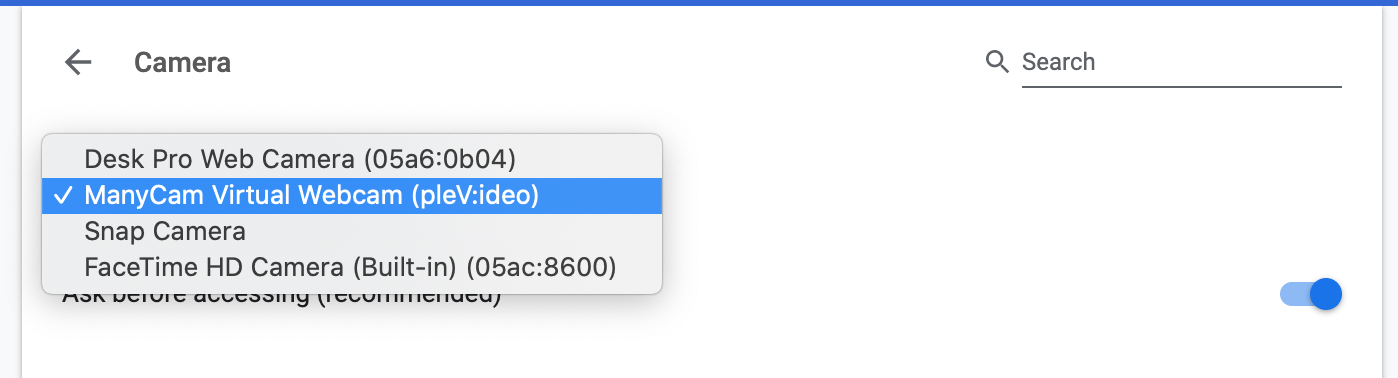
Étape 2 : Open your browser. Since I’m using chrome, so go to the toolbar and enter -> chrome://settings/content/camera and select ManyCam Virtual Webcam
Google Chrome camera settings.
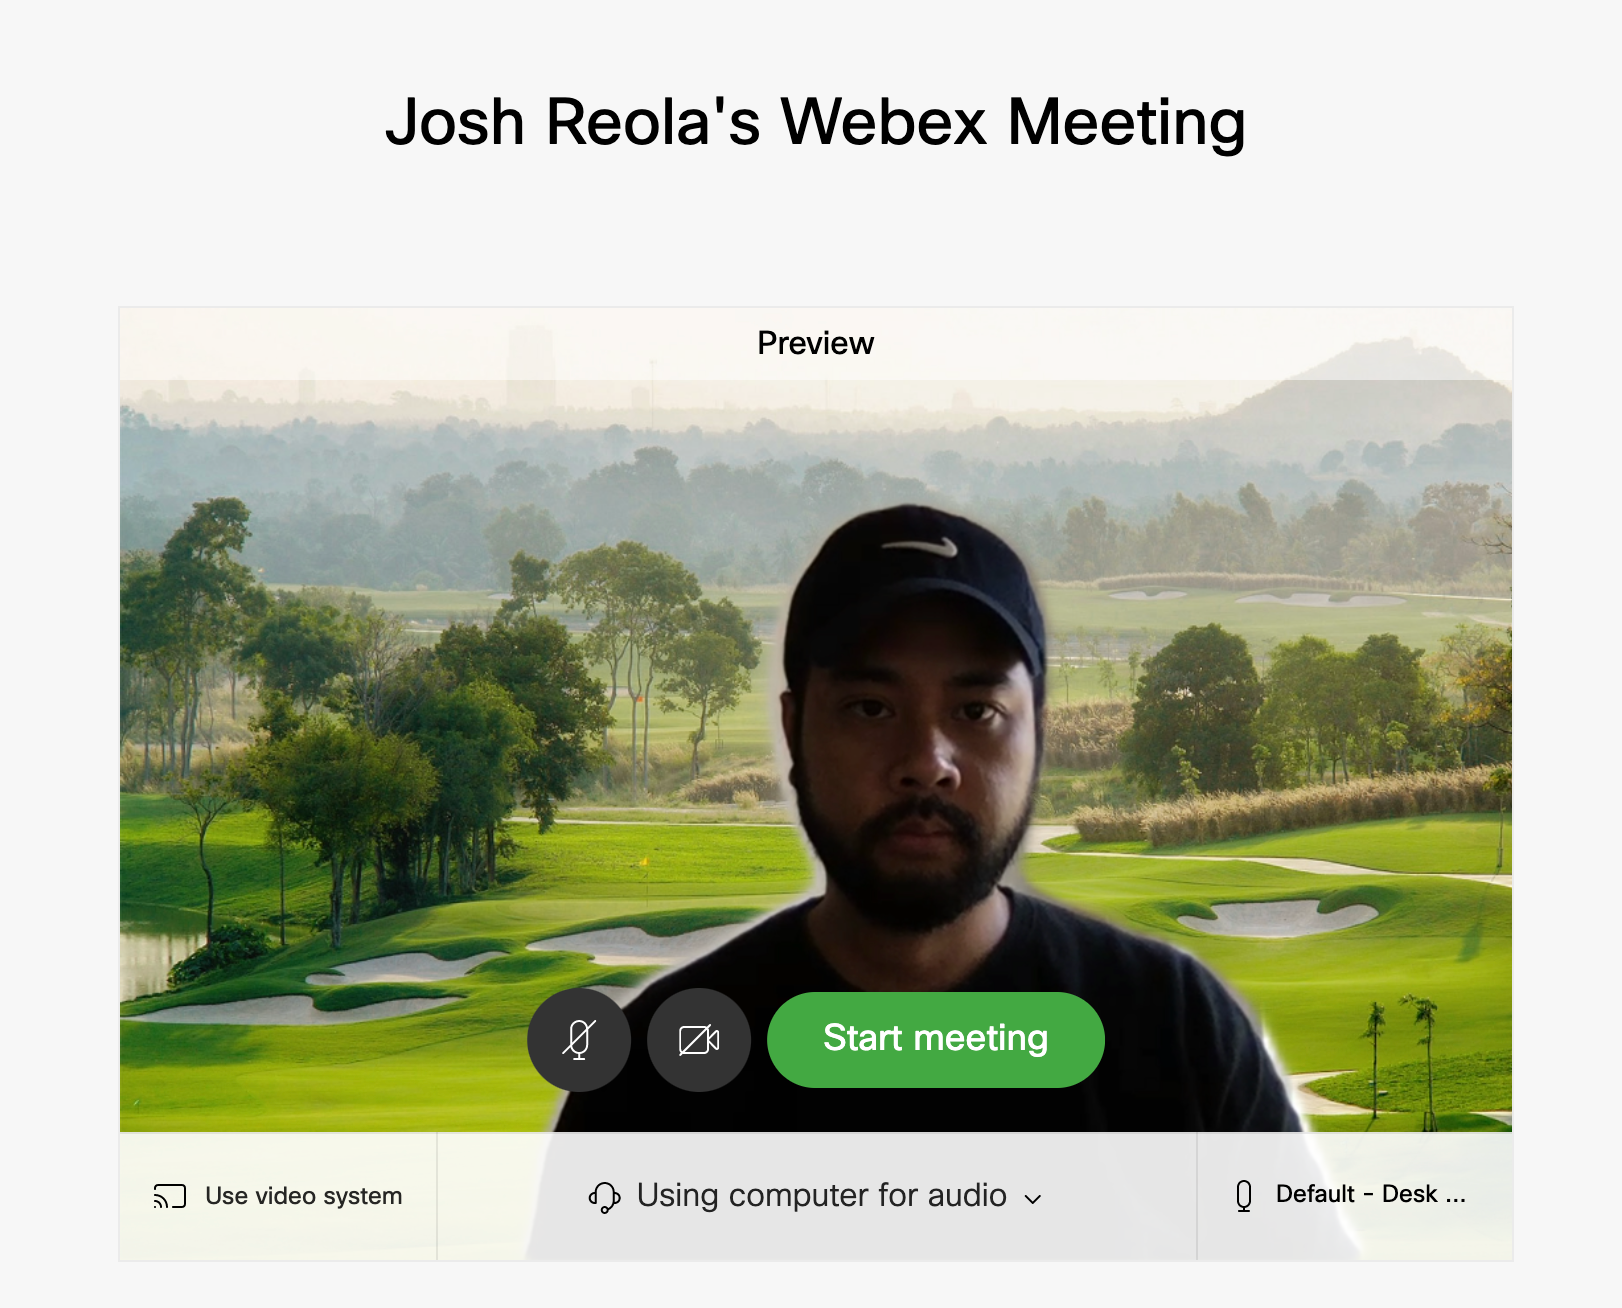
Étape 2 : Open up Webex in browser mode. Once you have set that up, you will now see the Manycam Virtual camera video sent to Webex Meetings.
Webex Meetings, browser mode with Manycam virtual background.
Étape 2 : Broadcast software setup
Section Topics 1. Admin — Webex Control Hub setup 2. Webex Direct Stream to YouTube 3. Loopback Audio Setup 4. Broadcasting Specs & OBS Setup 5. OBS: Audio 6. Audio Check 7. OBS: Grid View 8. OBS: Overlay 9. OBS: Direct Stream to YouTube
This section will be about User 1, the Host, as that machine will handle these configurations below. This section also demonstrates the “Direct Stream” YouTube use case and using OBS.
1. Admin — Webex Control Hub setup
Webex Control Hub With the video hardware in place, your Webex admin needs to enable the RTMP streaming services in the Webex Control Hub.
Enable Common Platform Settings and End-User Settings. (Gif)
Go to the Webex Meeting Sites -> Common Settings and then check off the services you want. Personally, I like to enable everything to give the user all the options. Here you can enable IBM Video Streaming, Facebook Live, VBrick Rev, and “ Other Streaming Services ” which is the RTMP option for YouTube, Periscope, and Facebook Workplace.
Next, you have to enable Live Streaming for the End User. Go to “ User ” and the person you want the service enabled for and click on “C isco Webex Meetings .”
Next, click on “ Advanced User Settings and Tracking Codes ”
Once here, click on “ Enable Live Streaming ”
End-User Streaming Test: Once the admin settings are completed, you can go test it out. Note that this is a “Direct Stream” setup.
Starting a live stream. (Gif)
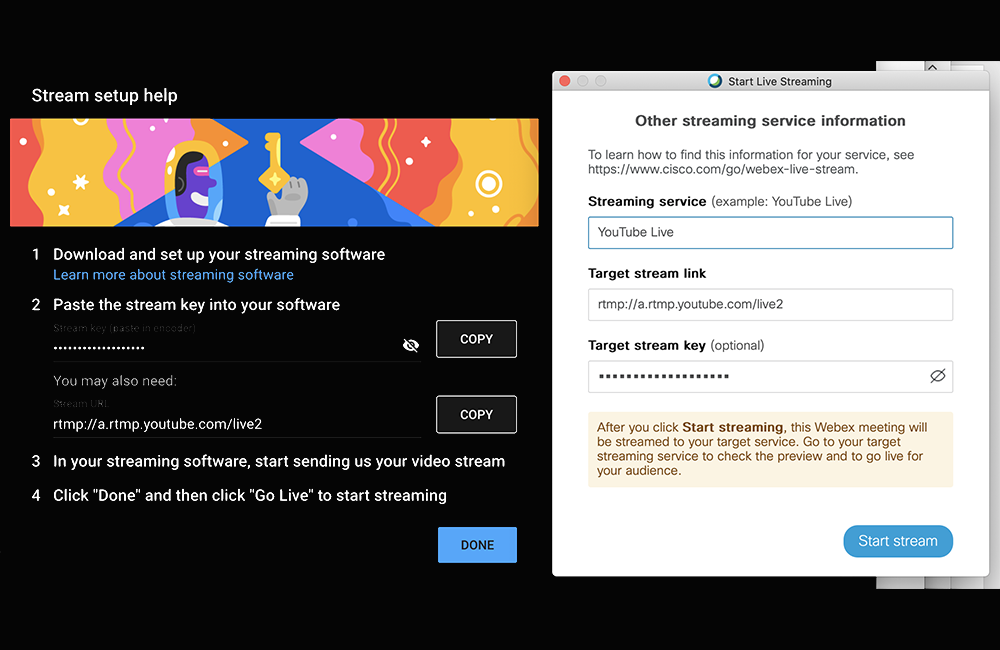
Start Webex Meetings and then go to “ Start Live Streaming .”
Then go to the streaming service you want to use. Here we will stream to YouTube which is found on “ Other streaming services .”
Finally, add the streaming service information in the fields below. The next section will outline how to stream to YouTube and what data to enter in the fields. We will come back to this section later.
2. Webex direct stream to YouTube
The YouTube Live module can be used to broadcast to both desktop and mobile devices. This section shows how to obtain the Stream Name and Stream URL from YouTube Live as well as set up the Custom RTMP account. Note that if this is your first time doing a YouTube live stream, your account may take up to 24 hours to be approved and provisioned.
Go to Stream -> New Stream -> Create Stream . Make sure to enter the appropriate information such as Title, Description, Public or Private, and other options for your use case. For this exercise, we will pick Private to test the broadcast. Once you click Create Event, YouTube saves the changes and you’re almost ready to stream.
YouTube Studio New stream setup.
Next, you will copy the YouTube RTMP information and go back into the Webex Streaming Meeting fields. Remember that the Stream Key is a “key.” Keep it private.
Copy YouTube: Stream Key -> Paste into Webex: Lien de diffusion cible
Copy YouTube: Stream URL -> Paste into Webex: Lien de diffusion cible
API Key from YouTube to Webex.
Everything is now configured. Vous avez presque terminé ! It’s now time to make sure that YouTube is receiving your live stream and that everything looks how you expect.
Preview the Live Stream: The YouTube Live Studio Event page is the best place to preview your video to see how it will appear when you go live. Note that the video preview is not available immediately after the stream is started. Depending on network bandwidth, it might take a few seconds to a few minutes after starting the stream until YouTube indicates that the stream signal is being received. Refresh the page at intervals to check.
When YouTube says the signal is Good, you know Webex is sending your video stream to YouTube.
Click Preview to prepare your stream for preview on the Live Control Room page; YouTube processes the stream for a moment.
Press play in the preview player to begin to play the event preview.
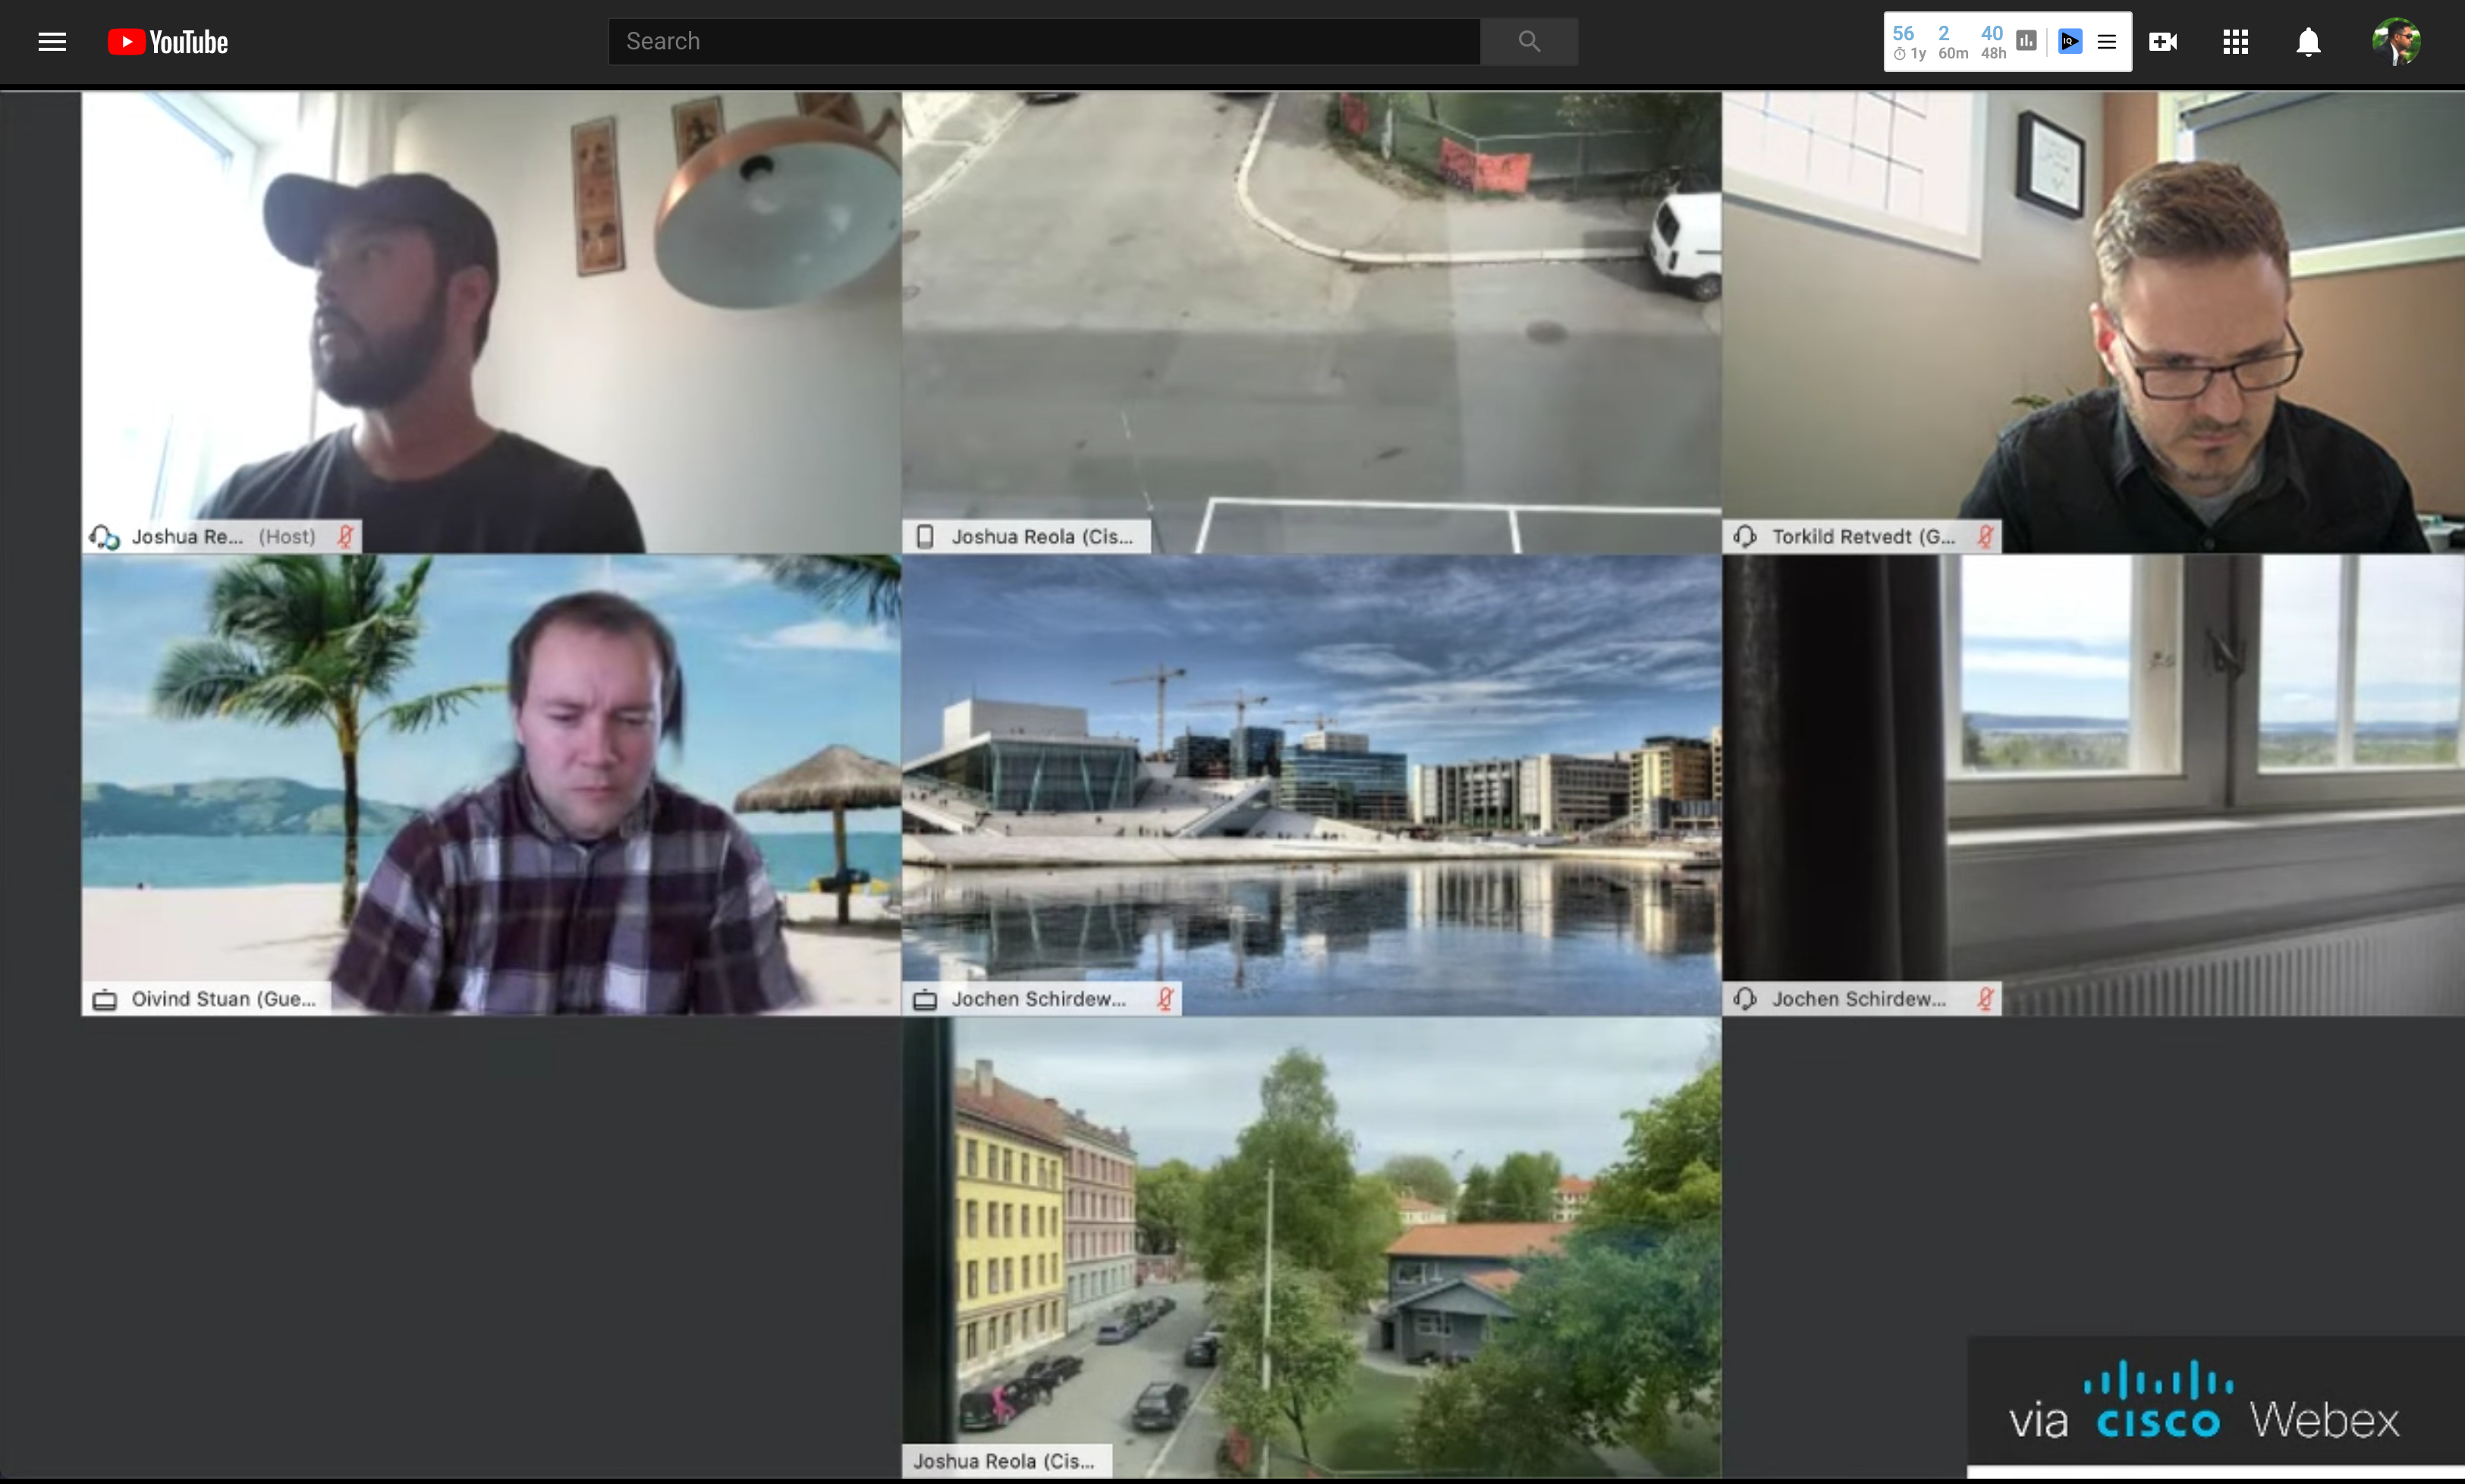
C’est tout. You started your first stream! Just double-check and verify the “Stream Status” section for any problems or warnings. You can see that the live stream also includes a “via Cisco Webex” overlay in the top left corner.
3. Loopback audio setup
Now on to setup Loopback which will be used to bridge the audio from Webex to OBS. From this section forward, you want to make sure Webex is running.
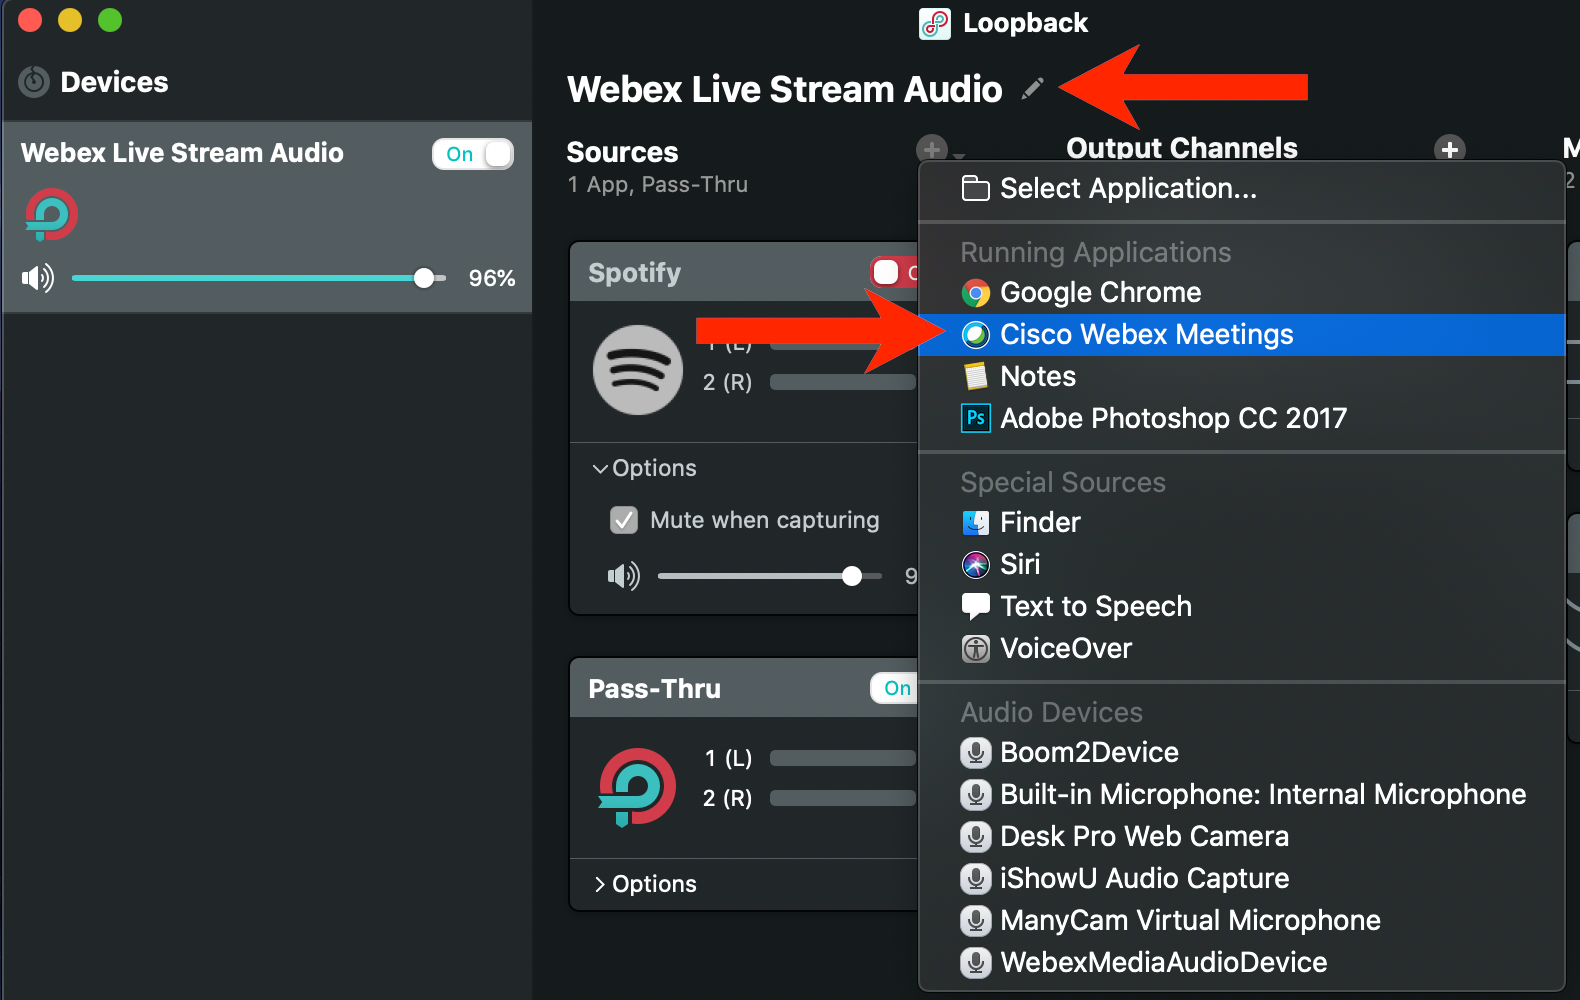
Étape 1 : Make sure the Webex Meetings application is open. Then add the Cisco Webex Meetings app by clicking on the “+” icon in the Sources area.
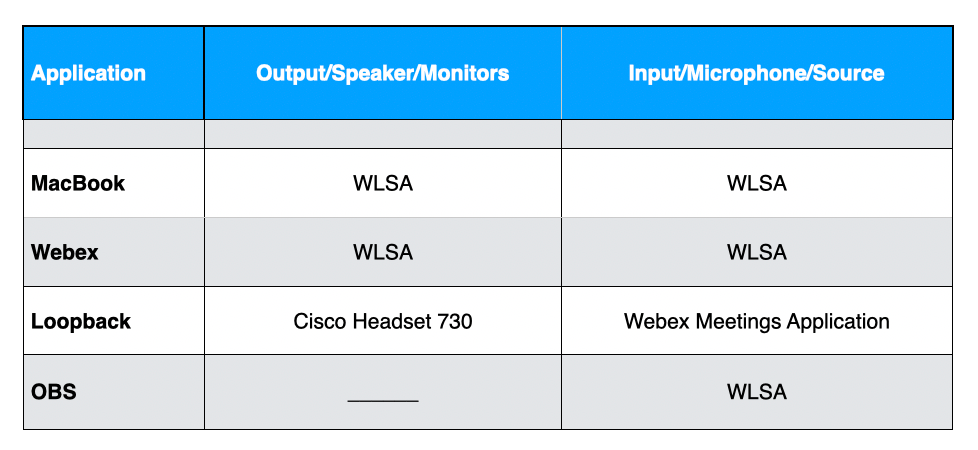
Étape 2 : Edit the driver’s name by clicking on the pencil or edit icon. Here, I named it “Webex Live Stream Audio” and this will be exposed into the systems device drivers as this name. Note, going forward I will call Webex Live Stream audio, WLSA going forward.
Add a Virtual Driver name and add Webex as a Source.
Étape 2 : Once the Meetings app is added, click the down arrow and un-check “Mute when capturing”.
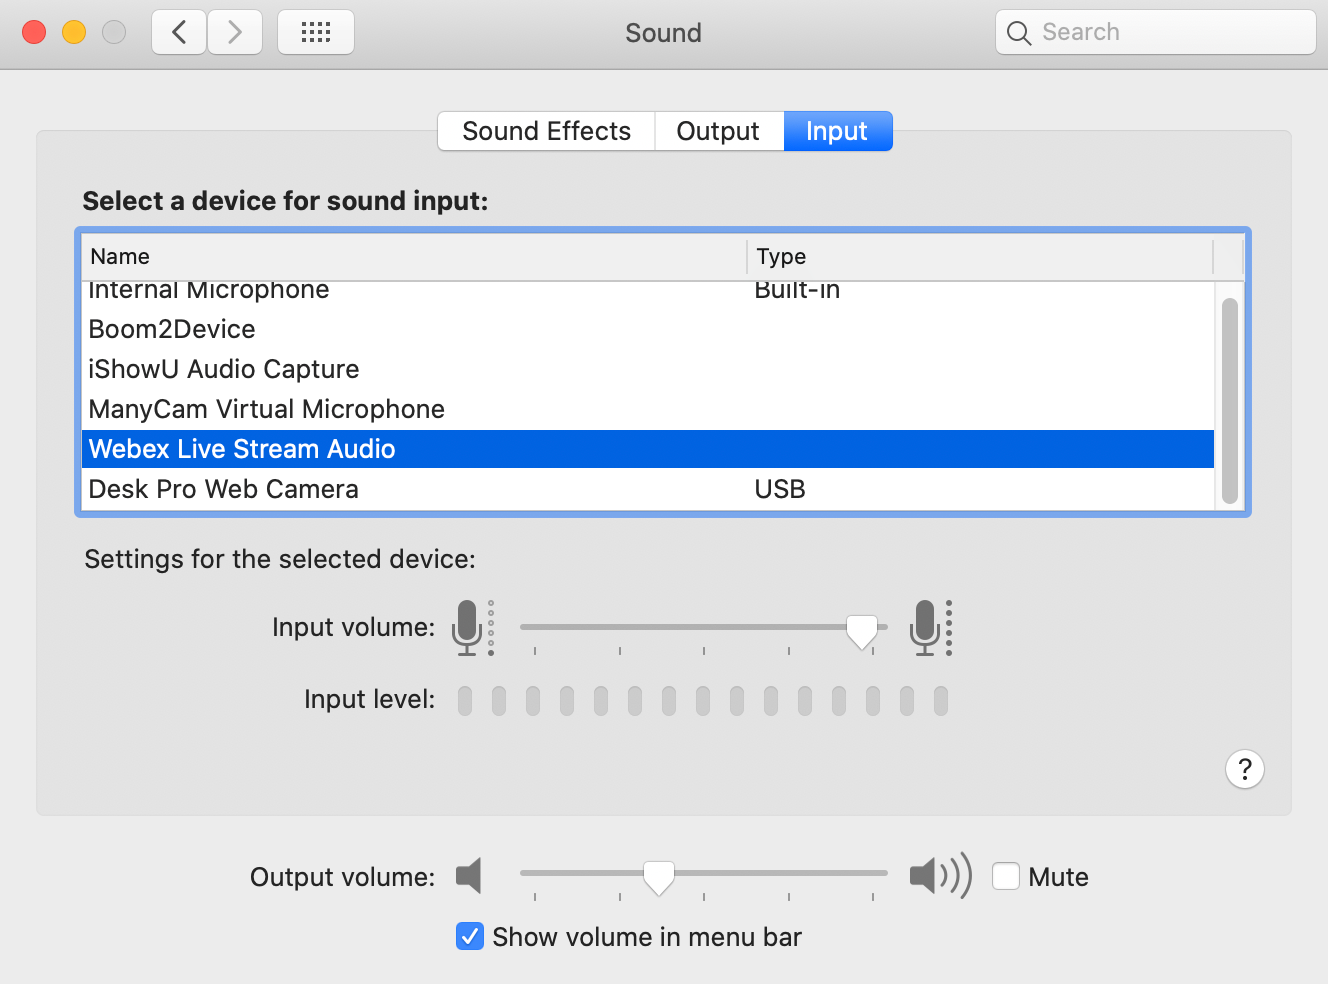
Étape 2. Then go to your Mac. System Preferences -> Sound -> “Input” as well as “Output”. You will now see “Webex Live Stream Audio”. Make sure to select this for both.
TIP: Webex is optimized for speaking. If there is any other noise like a guitar or music, Webex will think it is background noise and will try to remove it. So if you want to stream from Spotify, just stream a podcast.
4. Broadcasting specs & OBS setup
OBS is a switcher, compositor, and renderer. There are OBS plugins that do a ton of cool stuff with the right support applications and has a steep learning curve. What I’ll share is just a tip of the iceberg of what OBS can do, but for now, we will just stick to a big use case, which is the audio setup, overlay and grid view.
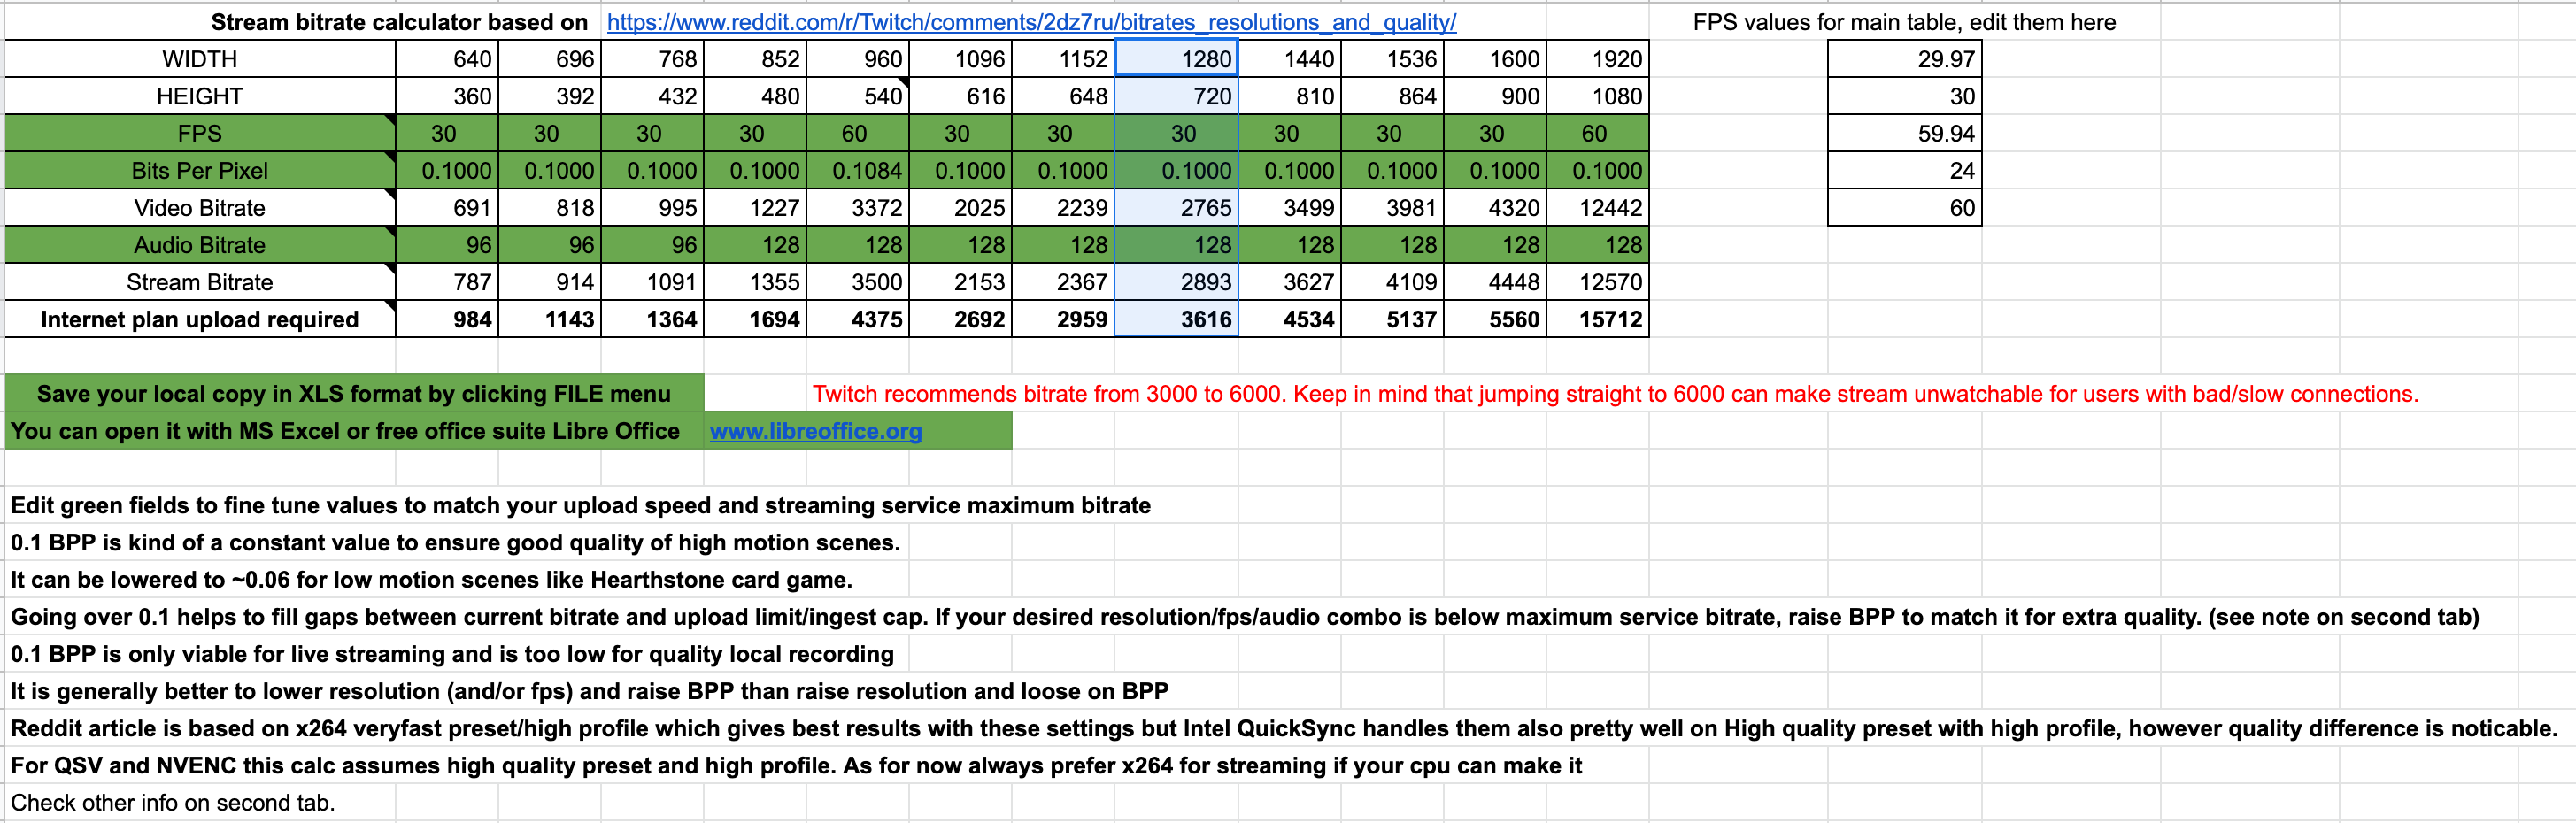
First, to have a stable stream and avoid dropped frames, the information below will help you choose your encoding, resolution, bitrate, and framerate settings. These tweaks will provide the right balance live stream, internet speed, and your computer’s hardware. Here is a great article on the OBS forum with their Stream Bit Rate Calculator that you can calculate for your own broadcast.
OBS Stream Bit Rate Calculator.
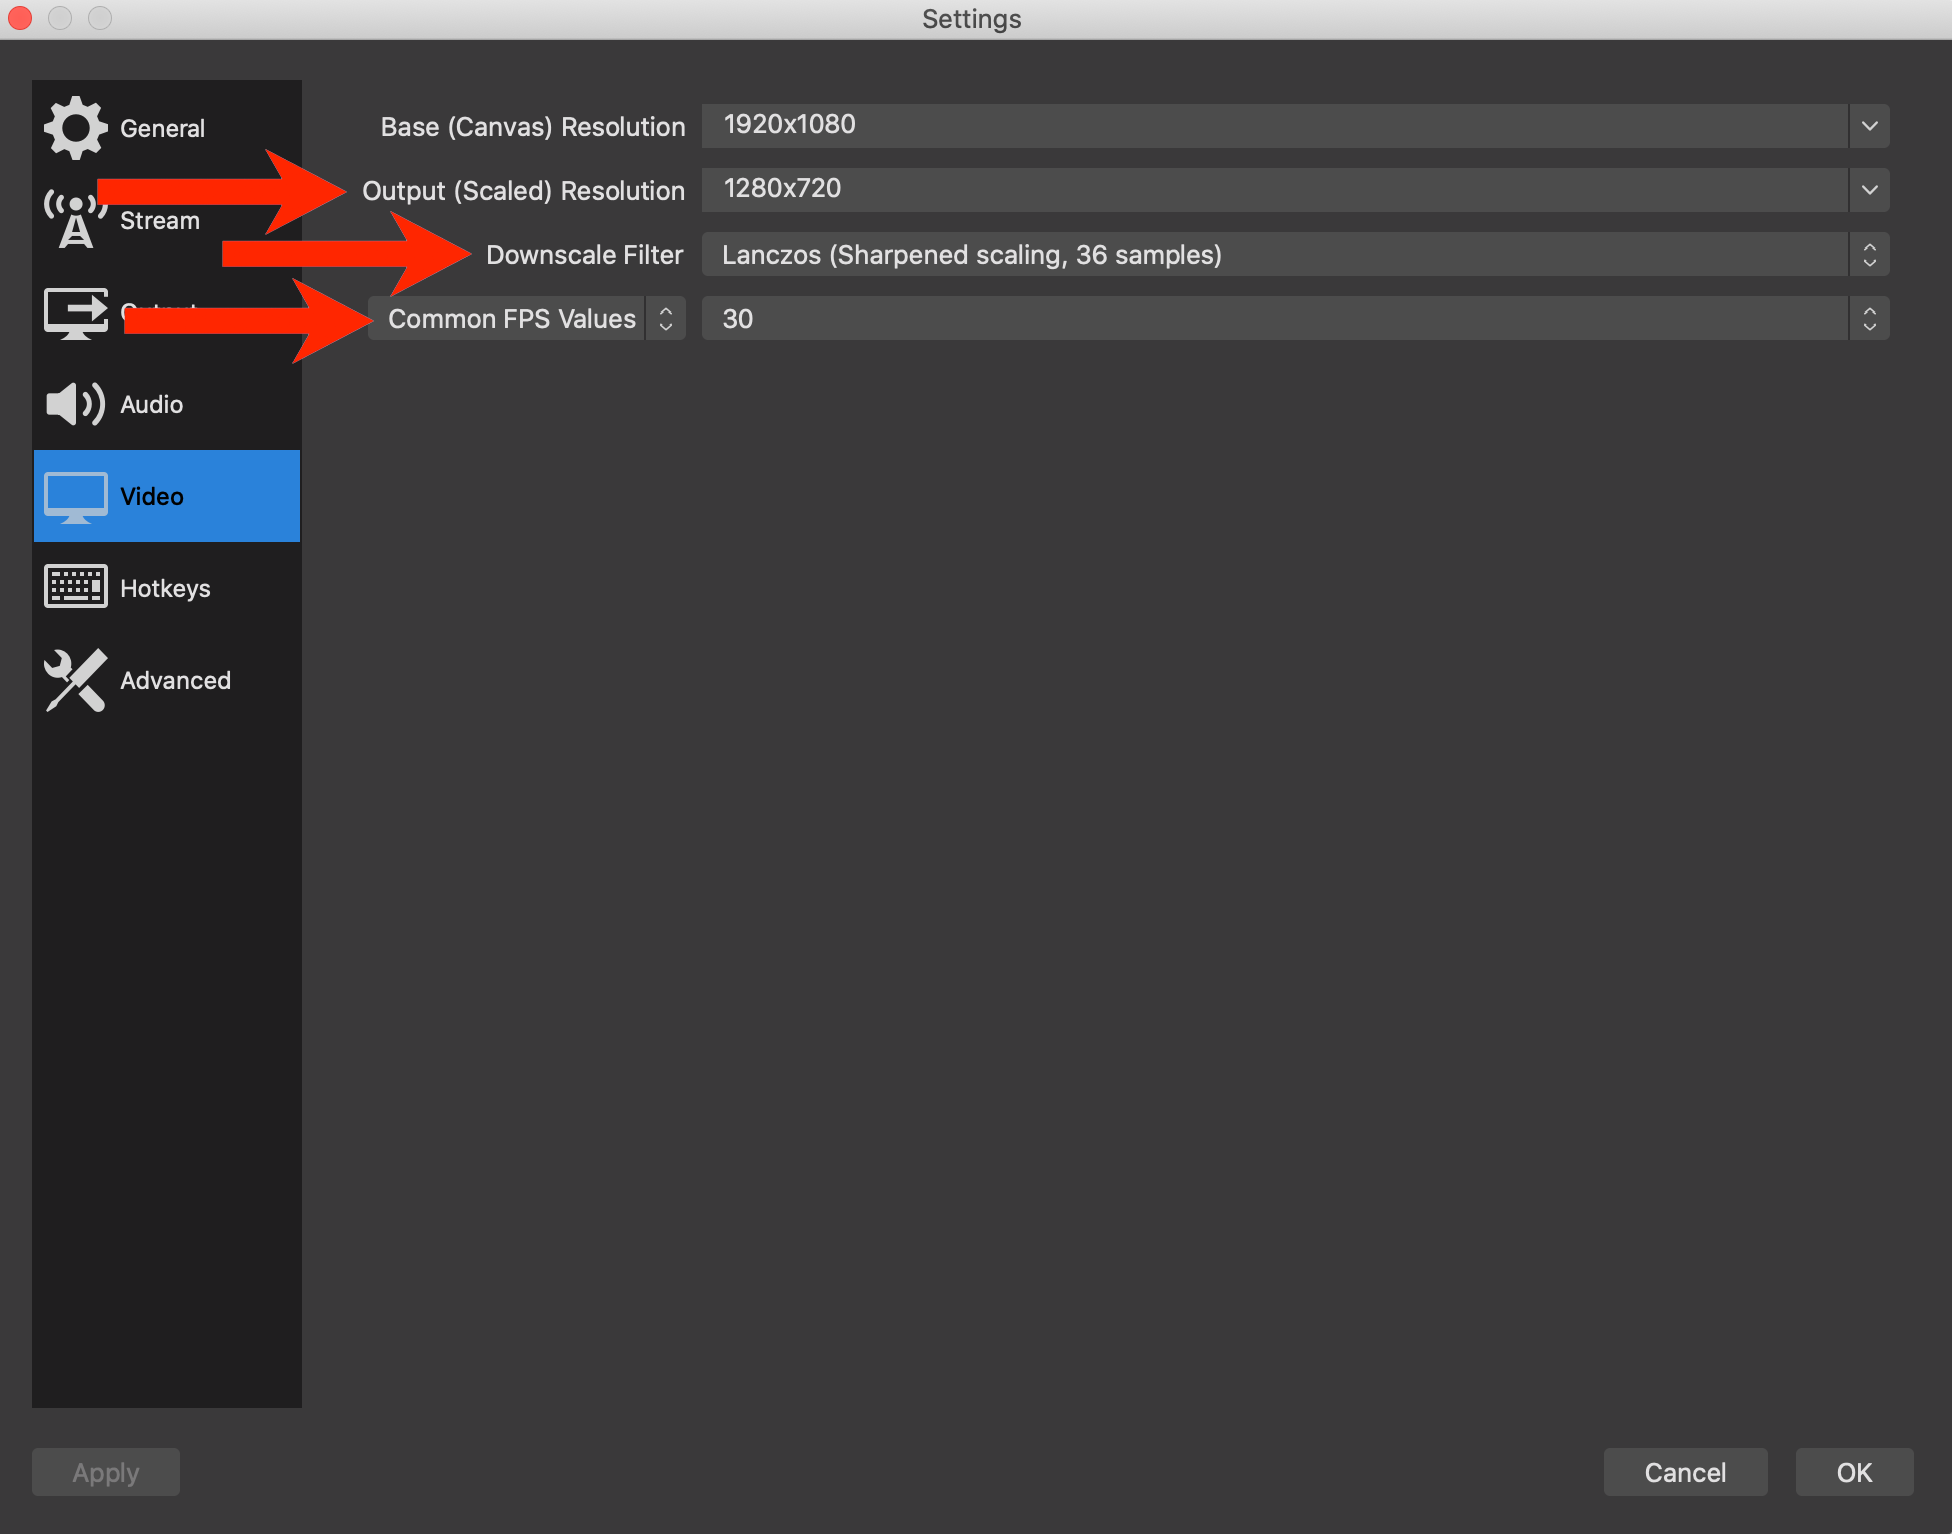
I used a 2017 Macbook Pro, 2.8 GHz Quad-Core Intel i7 for this setup. Based on my Speedtest results and x264 specs. This is what I entered into OBS.
Étape 1 : Go to Settings -> Output Mode -> Advanced:
Now that Loopback’s drivers are installed, let’s now configure OBS.
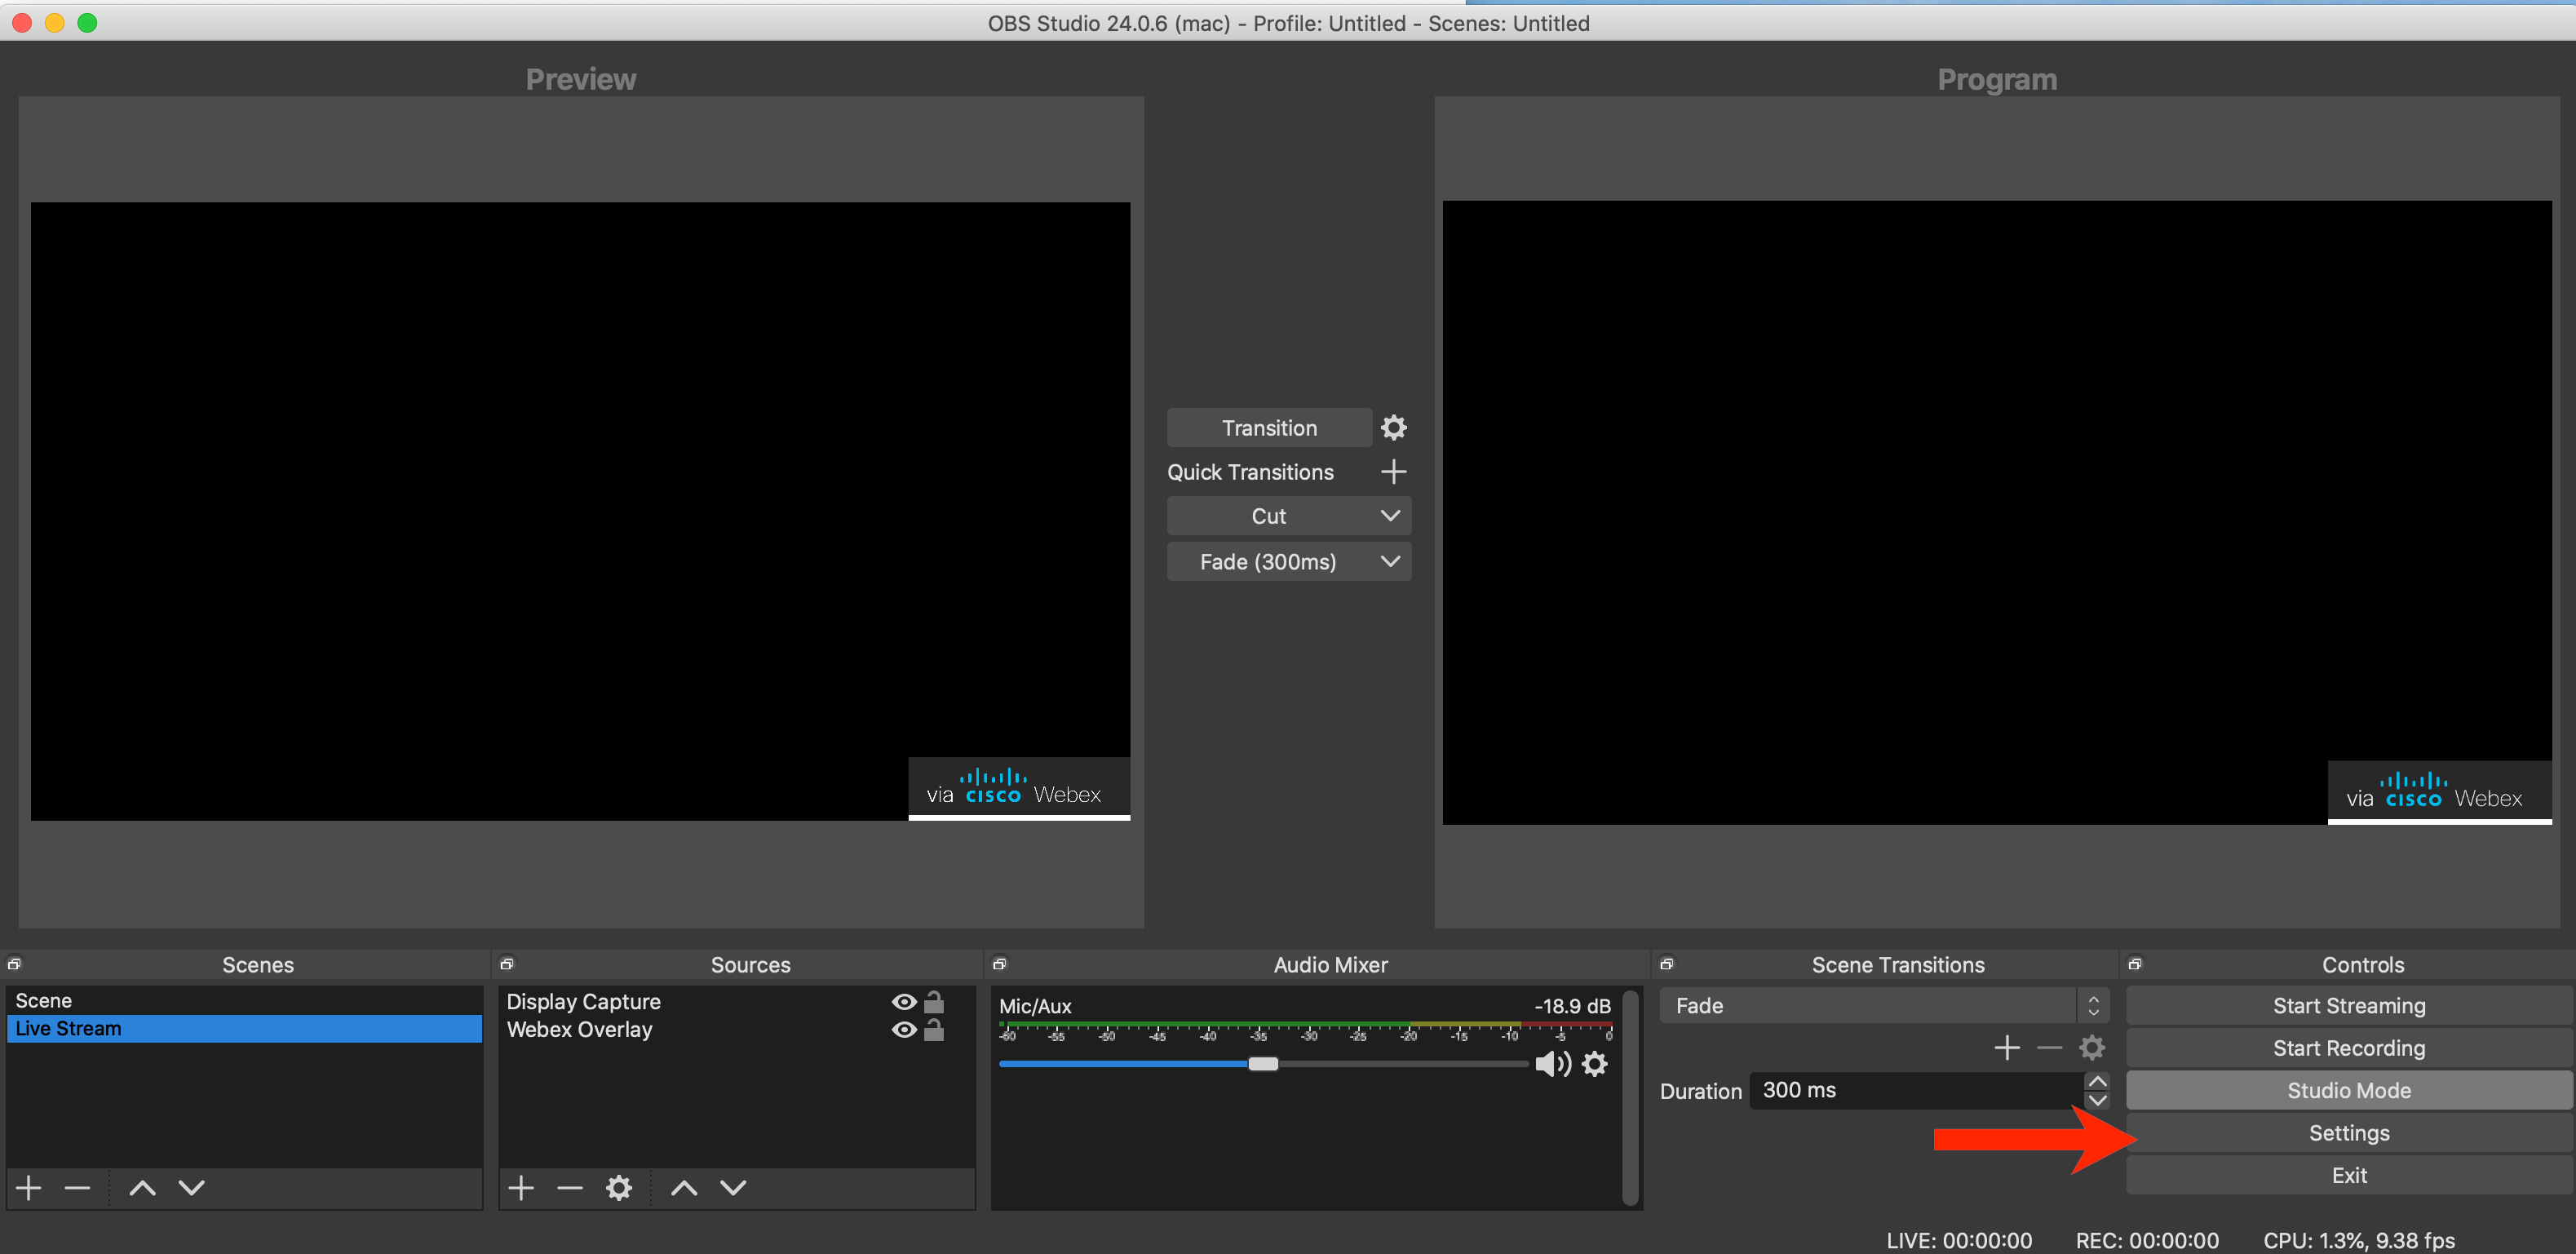
Étape 1 : Open OBS and go to Settings. By default, OBS isn’t in Studio Mode. This is the view you are seeing below. You will have two screens. The right screen will be the active scene for your Webex meeting. The left screen shows a preview of the editable scene. There is a Transition button in between the two screens. You can choose the Transition button to edit a scene before you show it to your audience.
OBS in Studio Mode & Settings button.
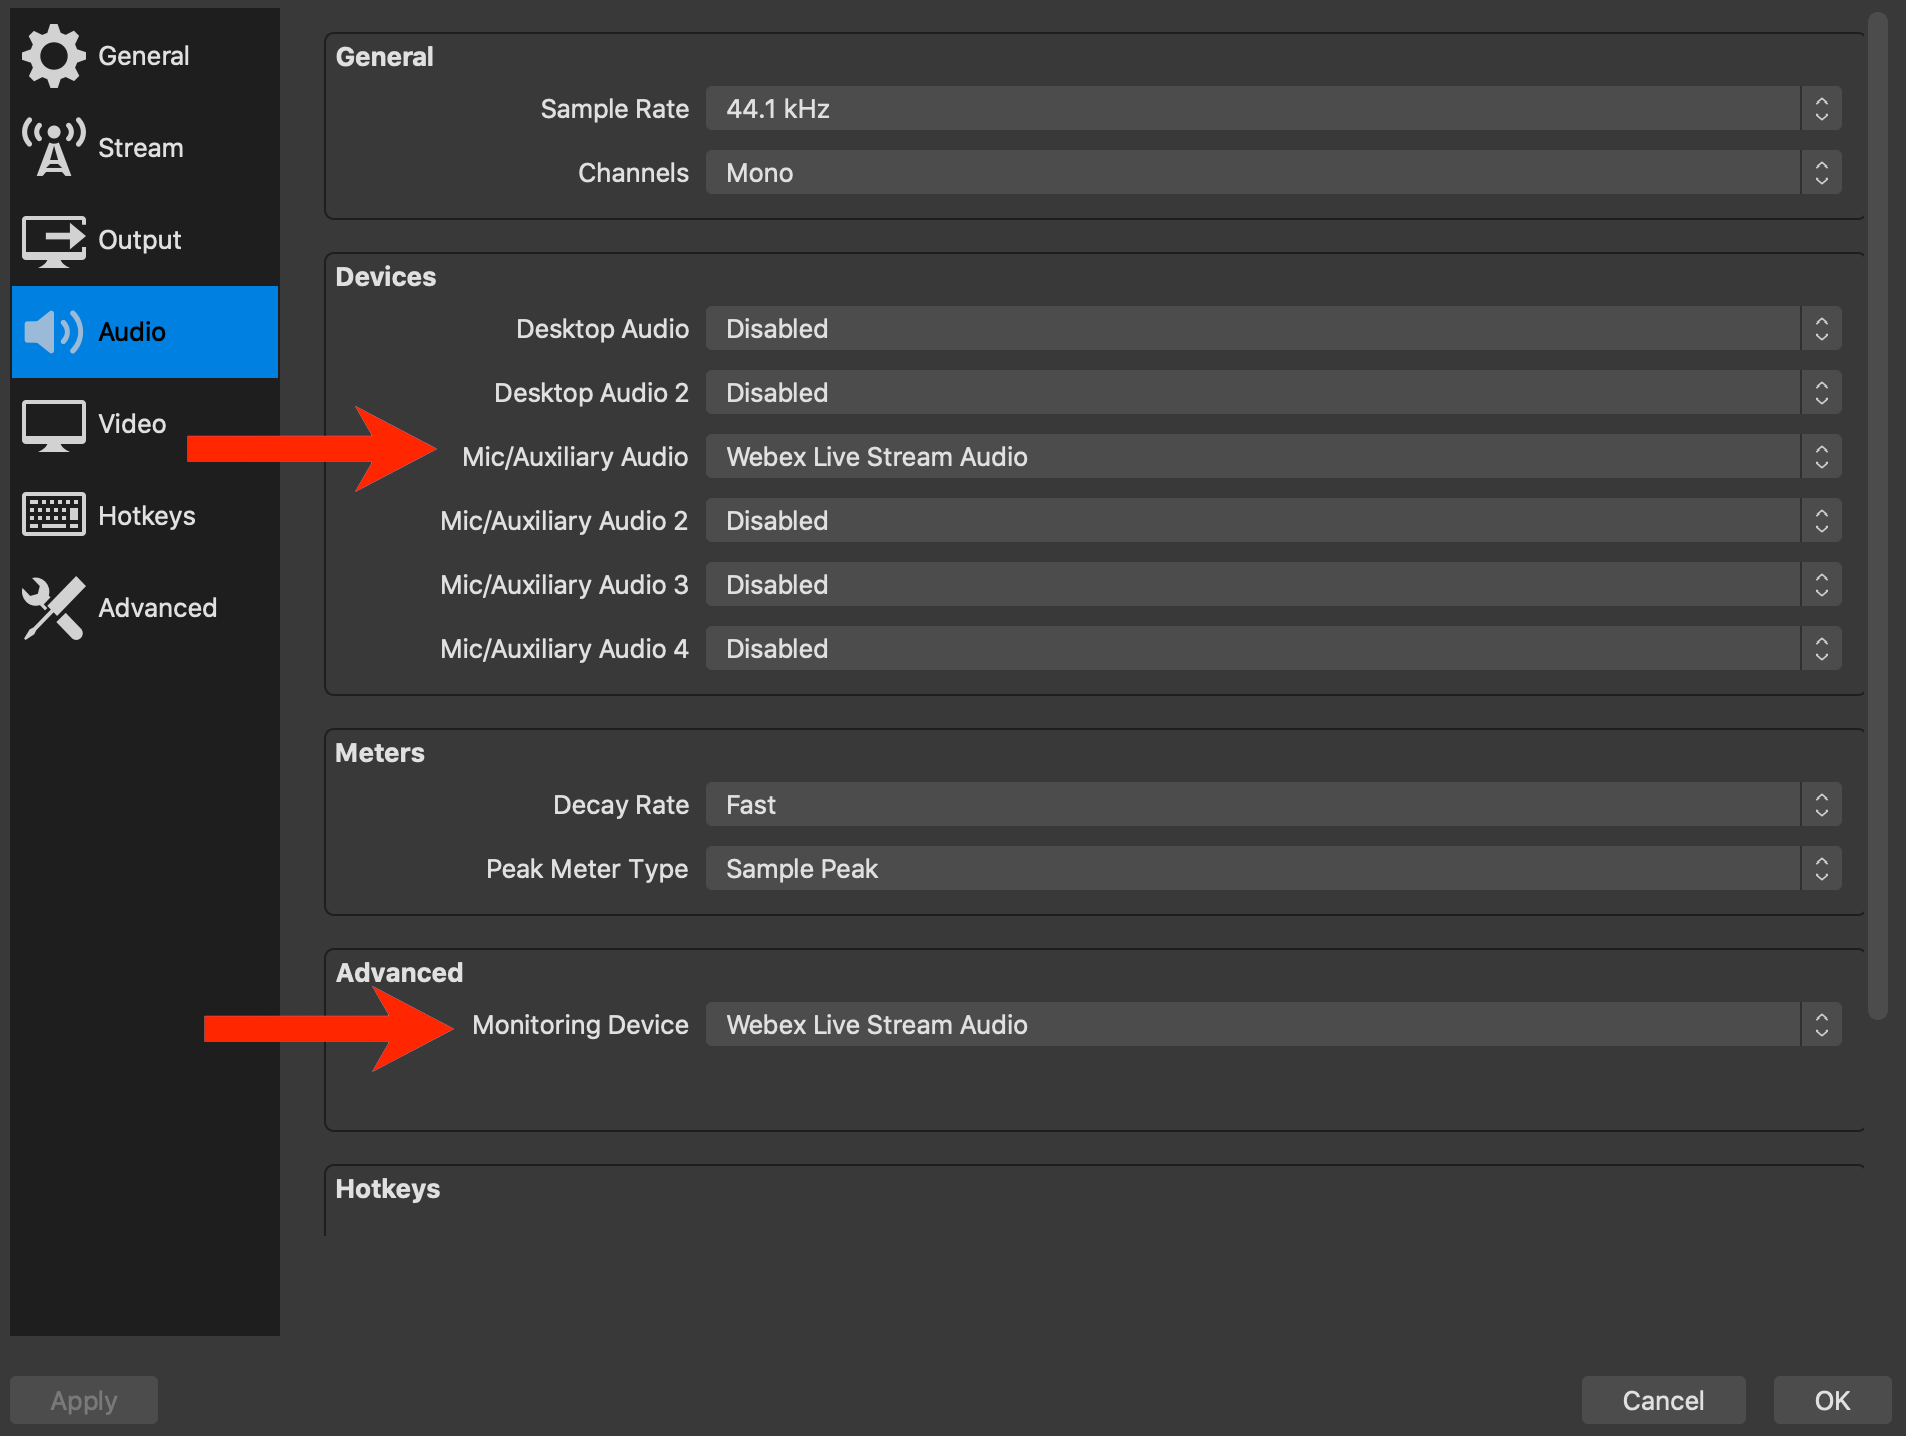
Étape 2. Select WLSA at: Audio -> Devices -> Mic/Auxillary Audio -> Webex Live Stream Audio and Advanced -> Monitoring Device -> Webex Live Stream Audio.
6. Audio check
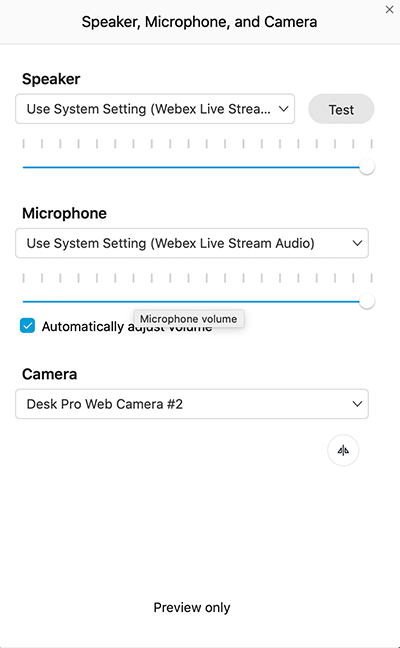
With Webex running, make sure you set the Speaker and Microphone to WLSA.
Audio WebEx—Aucun paramètre.
To close out the audio setup. Remember that there at least four different applications to configure to make sure that audio from Webex is streamed to OBS and to YouTube.
7. OBS: Affichage par grille
Let’s now set up OBS to capture Webex Grid View.
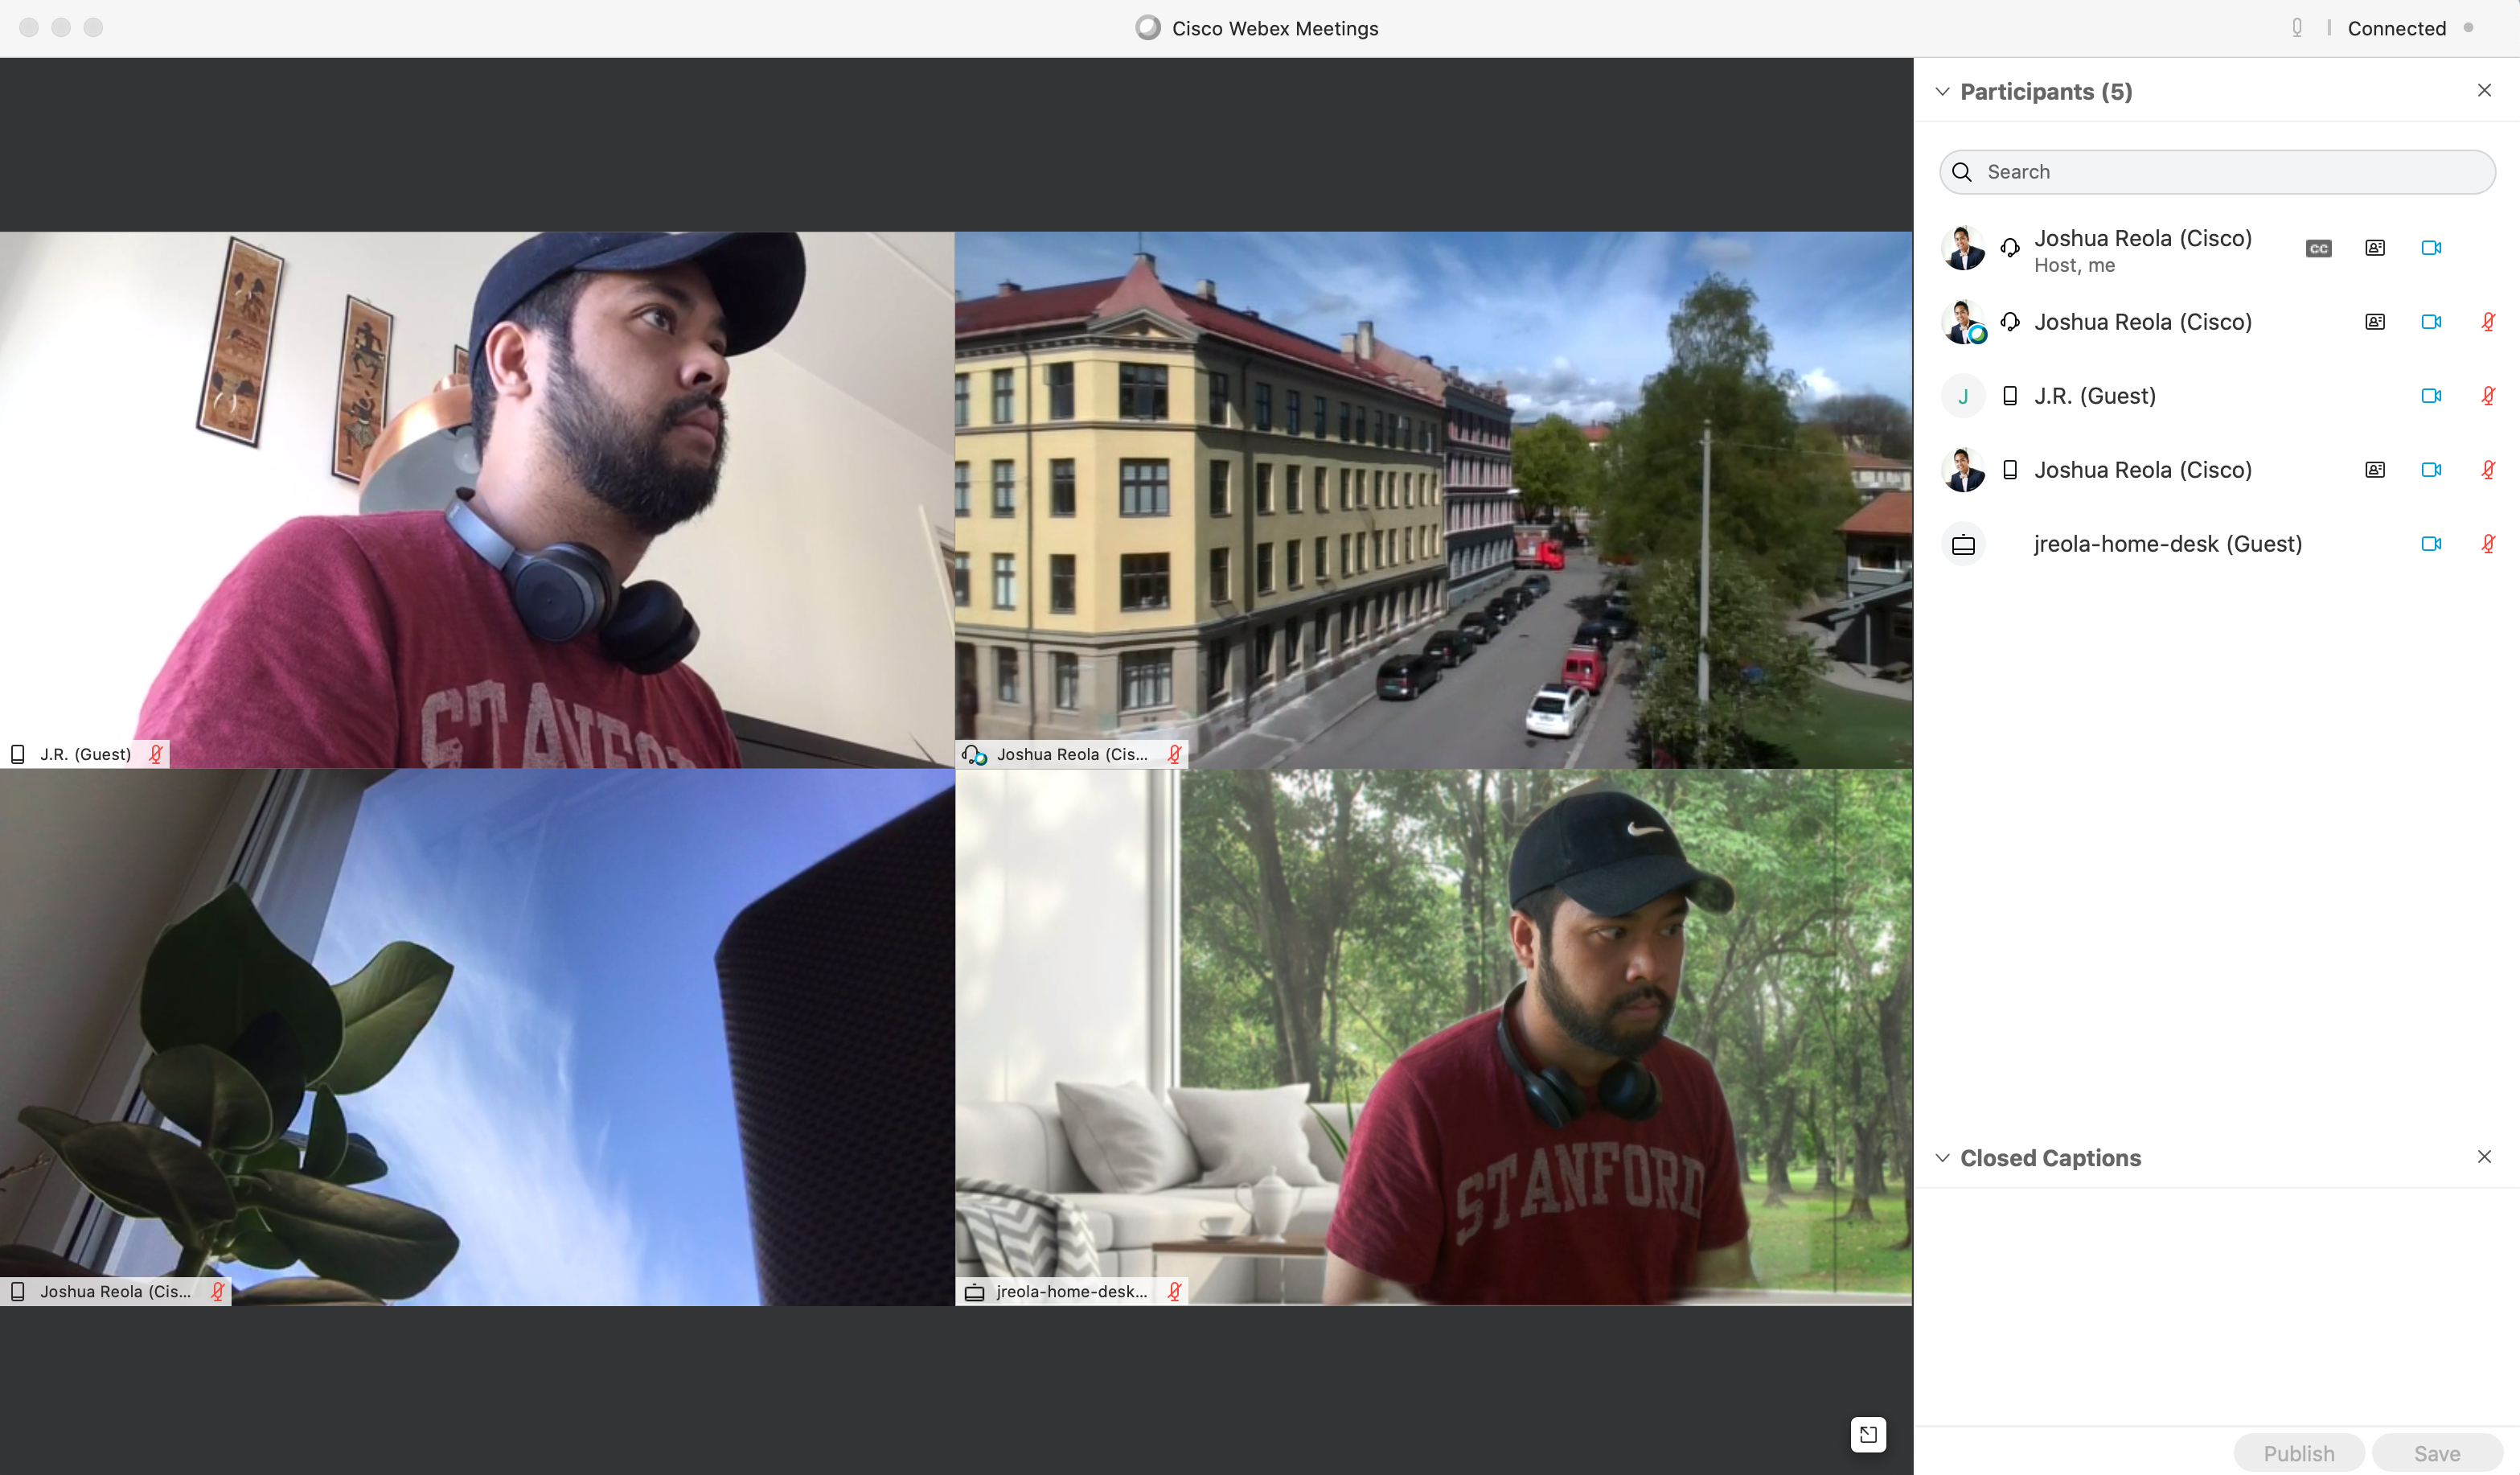
Étape 1 : Once we add users to the call, we can enable Grid View in Webex Meetings.
Grid View toggle.
Grid View in 2×2 format.
With Webex now showing grid view, you need to open and configure OBS to stream this format out.
Étape 2 : Open OBS. Étape 2 : Go to Sources , click the “+” button, and select “Display Capture” and create a Name if you like and click “OK.” Note that using the “Display Capture” which provides the best streaming results with minimal latency vs. the“Window Capture” option in OBS. Étape 2 : Select the Display where Webex is on. I have a dual-screen setup so I select Display “0”. Étape 2 : Go to Crop -> and select “To Window”. Étape 2 : Next go to Window -> look for “Window: [Cisco Webex Meetings]” and select OK. You can now see that OBS is only capturing Webex and there is a red box on the black screen. The black screen is the area that will be captured and sent to your streaming platform.
Display Capture settings.
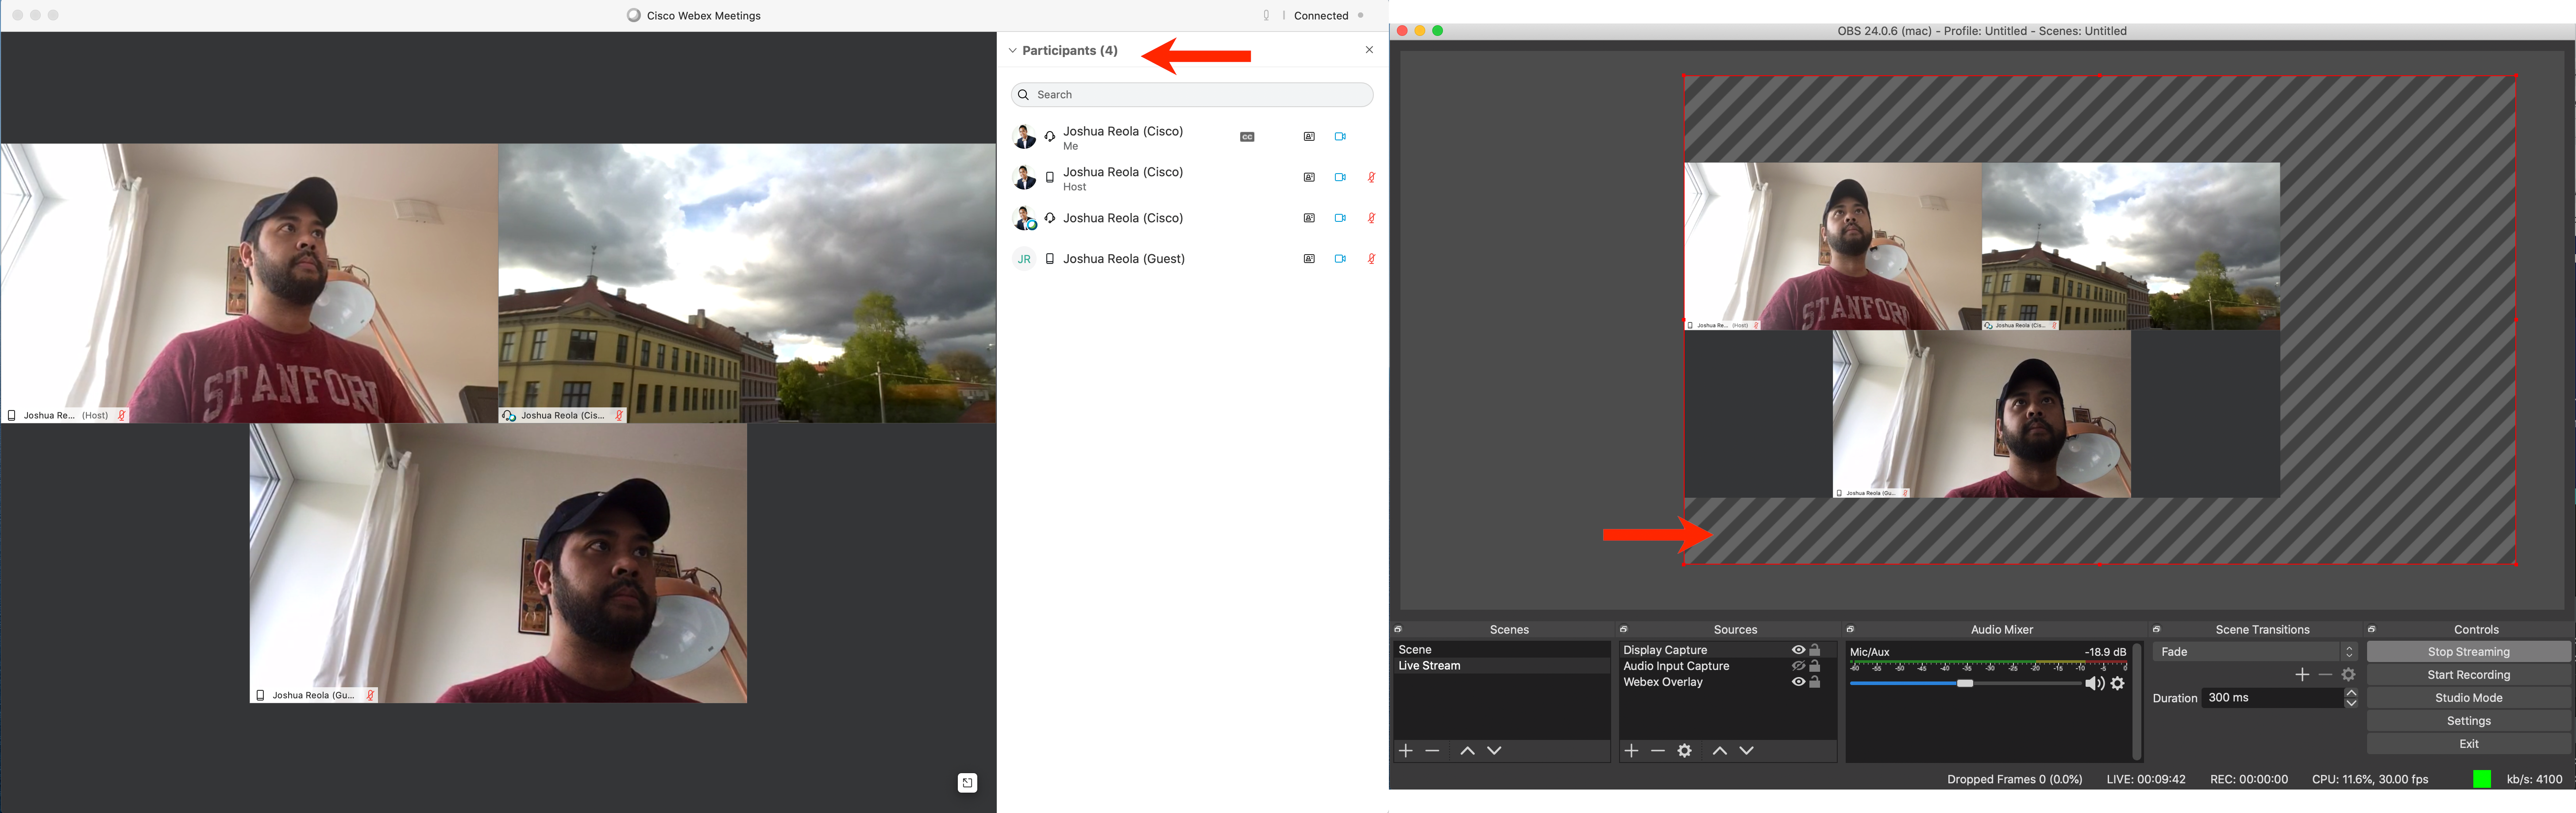
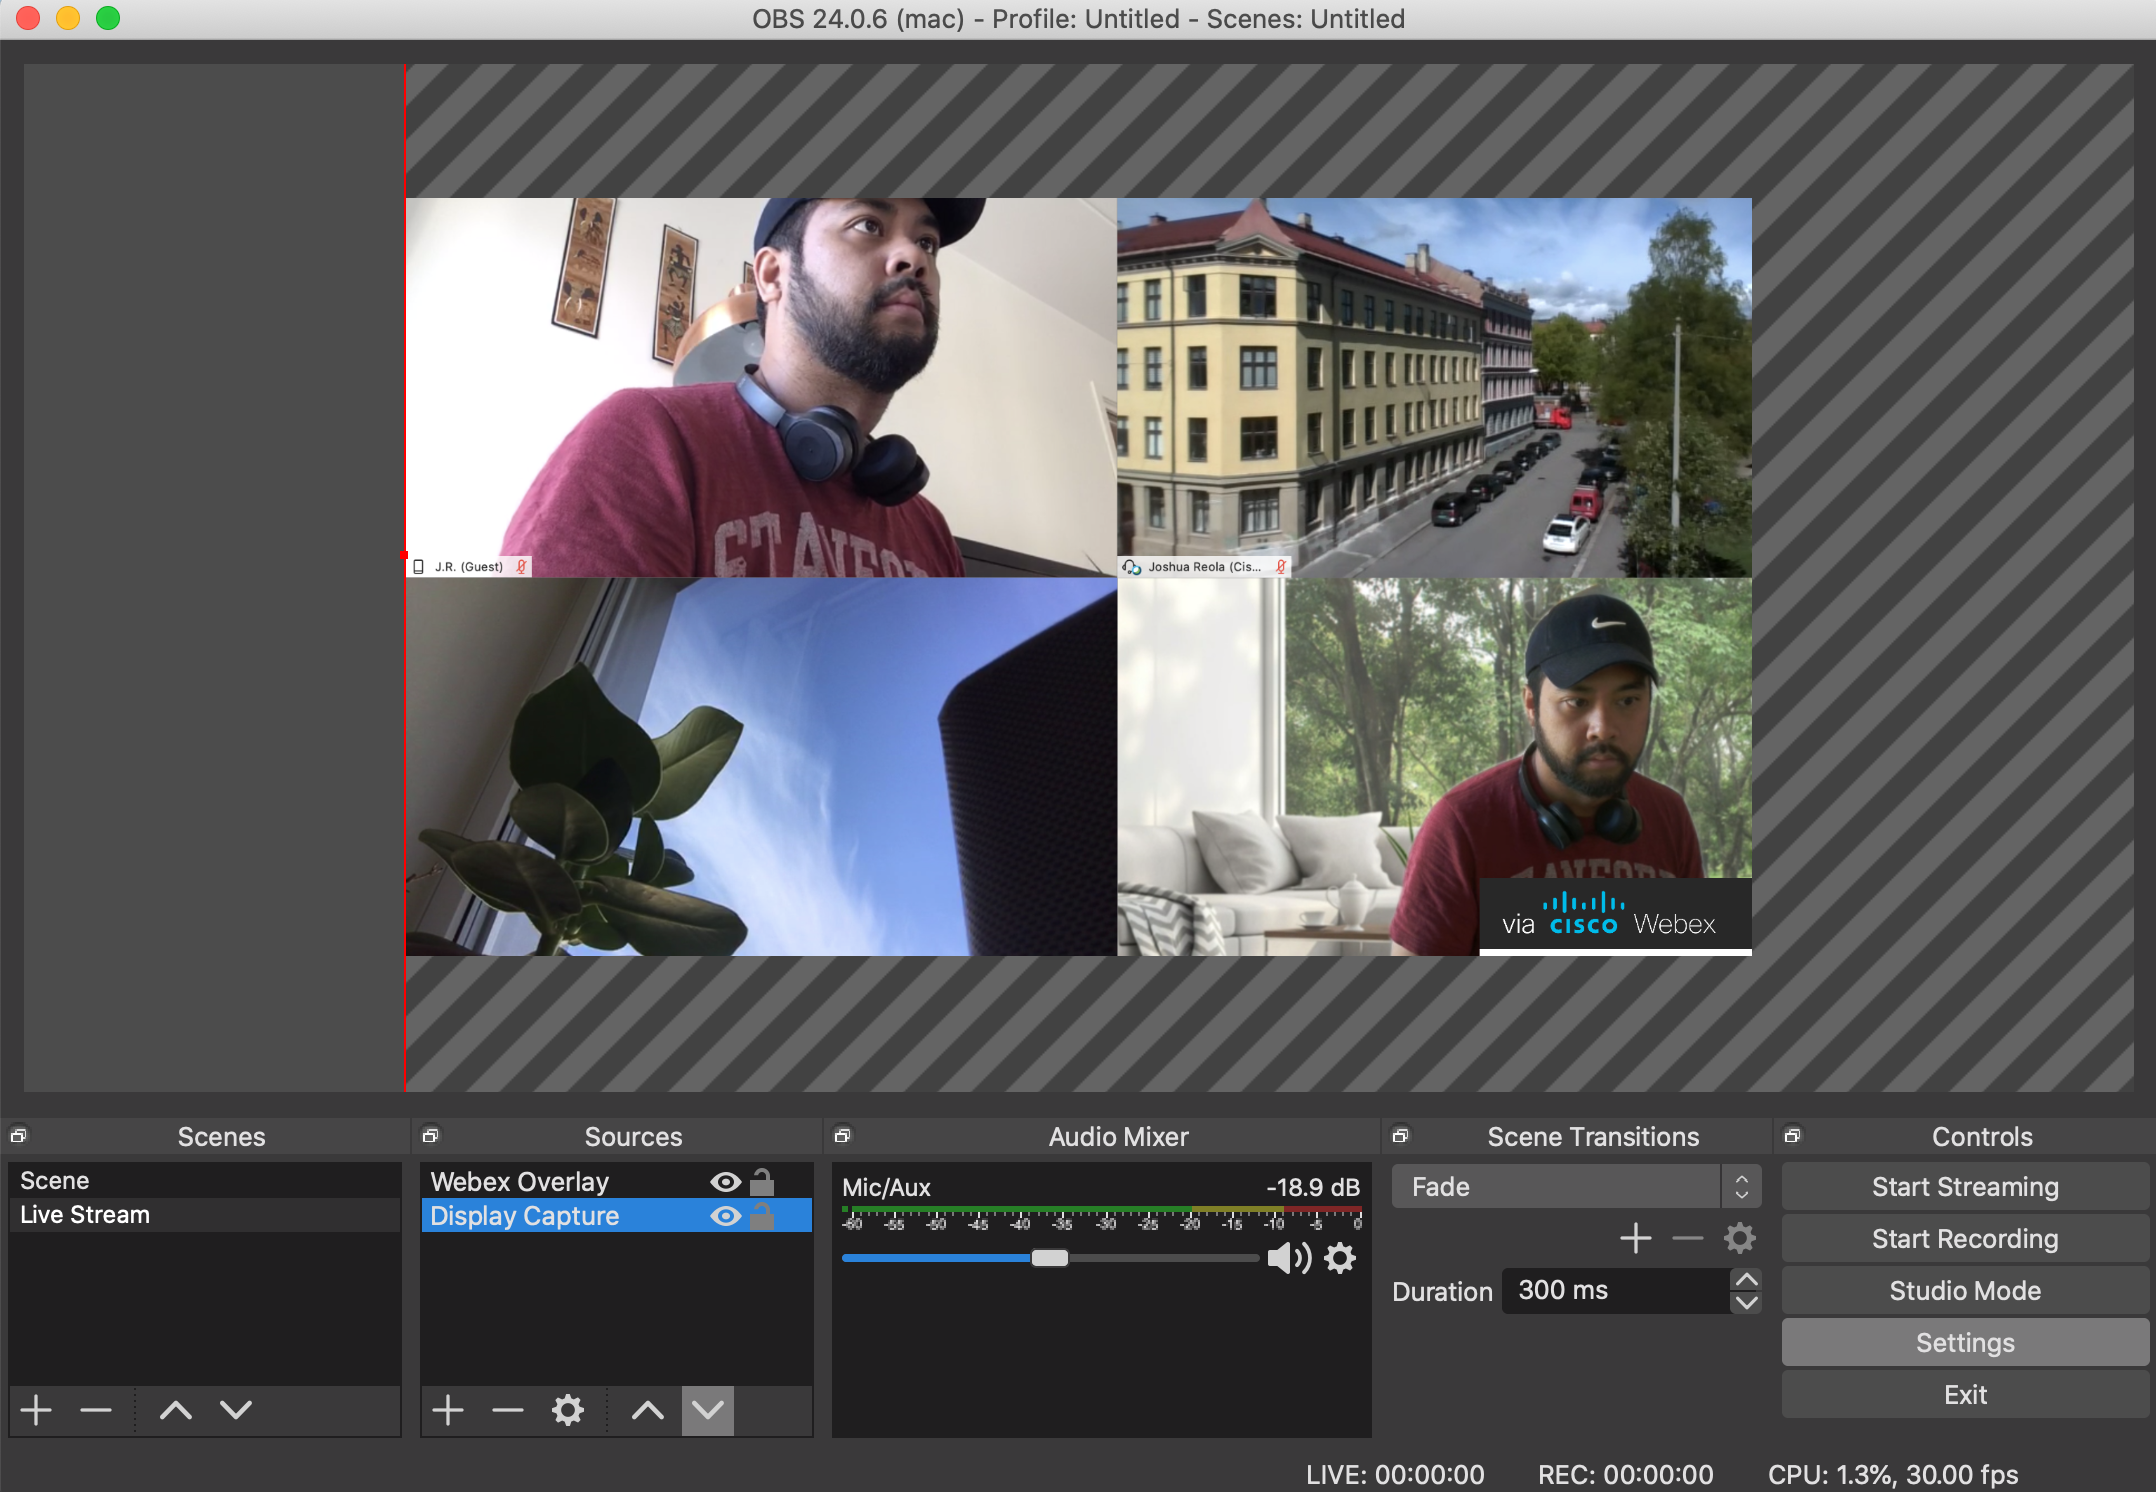
Étape 2 : With OBS open and now with users and the screen resized, you can see that it is capturing my desktop. On the left side is Webex Meetings and the Participants list open shown by the red arrow in Figure 1 below. Étape 2 : In the OBS picture below, you can drag the window you want to broadcast by selecting the red borderlines in the right picture in Figure 1.
In Figure 1, you will see OBS only capturing the grid view. Obviously, you don’t want to share the Participants list. You will see with the red arrow that the rest of the Webex Meetings window isn’t being, meaning it won’t be part of the broadcast. This enables you as a host, to control the participants during your live stream. Overall, you just want to share the video.
Figure 1. Webex Meetings being captured in real-time in the OBS in Window Capture view.
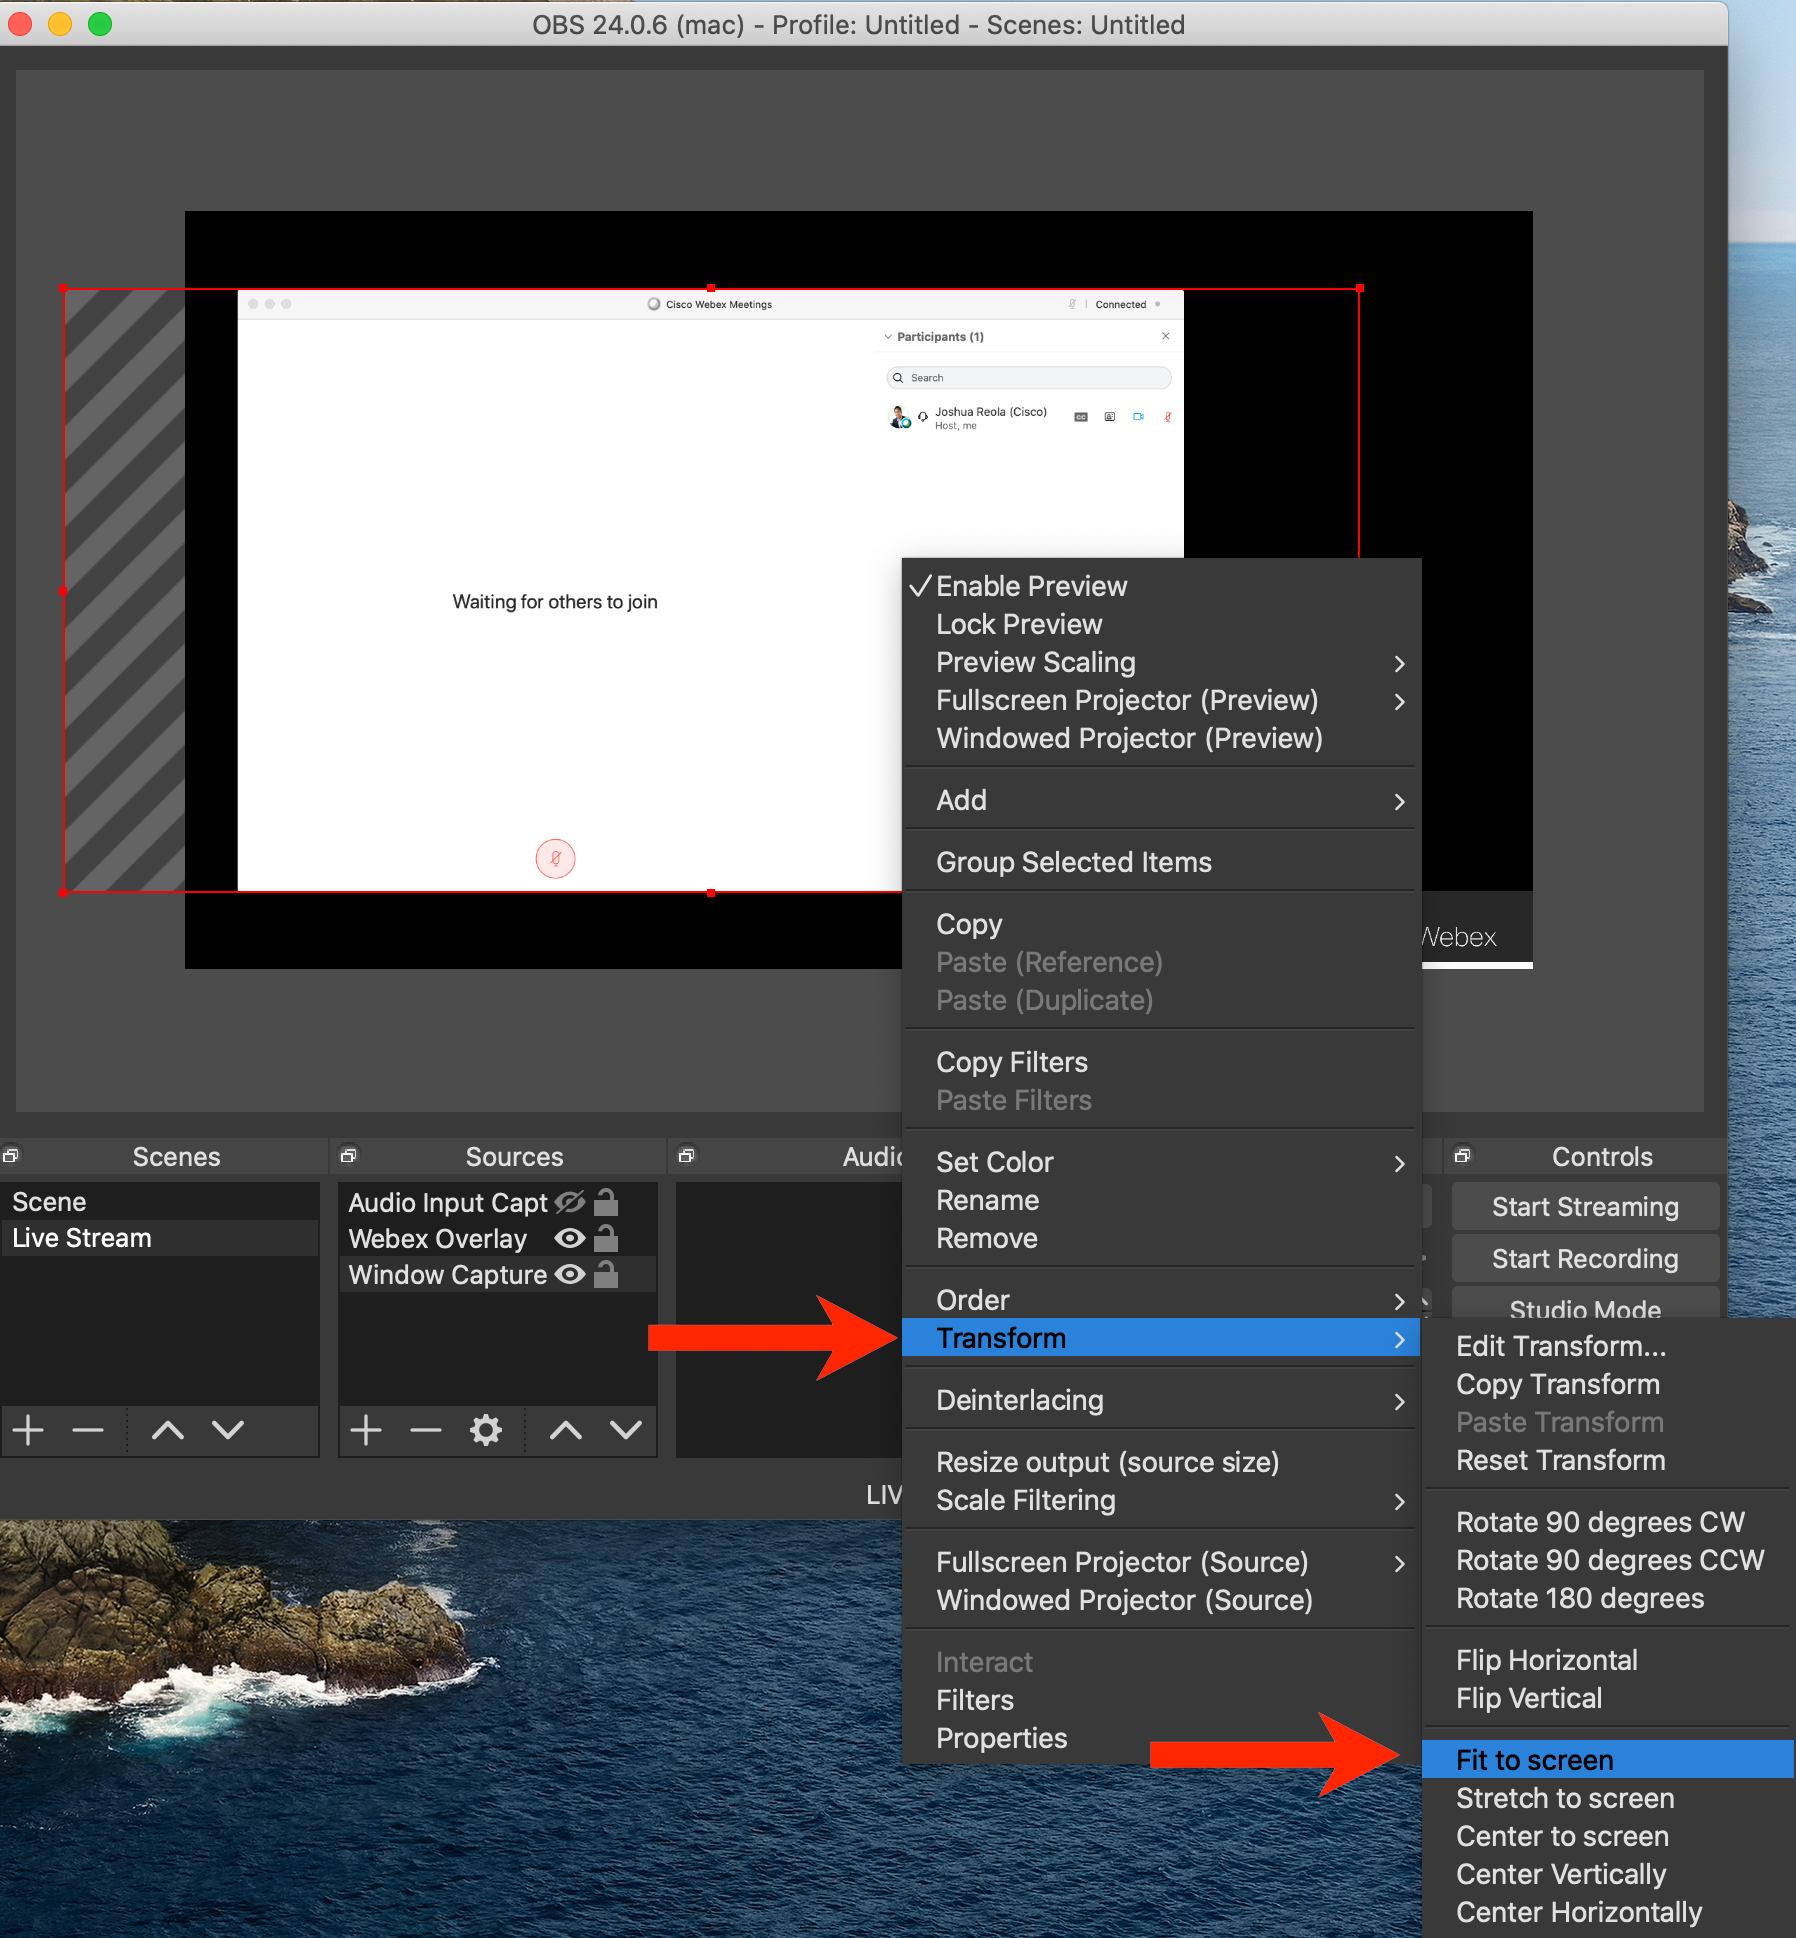
Astuce : Depending on your setup, you can change your video layout and learn to use the “Fit to Screen” option. To access this feature, Right-click window you want to select and go to “Transform” -> “Fit to screen.”
8. OBS: Overlay
To set up an overlay or watermark image. Go to Scene -> “+” icon -> and give it a name like “ Live Stream ”
Next, we will add an image. For this example, I will use a “via Cisco Webex” overlay.
Go over to the next box, Source -> “+” icon -> Create New -> and give it an image name.
Next, you can resize and move your overlay to where you want it to appear on OBX for the live stream. Here, I placed the logo in the top left corner.
Scene Setup, Source Overlay, and image resize. (Gif)
Étape 2 : Make sure to bring the image to the front. Right-click on the image by going to “Order” -> “Move Up.”
Overlay image “move up” feature.
Once complete, you can now see the overlay with Webex Grid View.
Grid View + Overlay.
9. OBS: Direct stream to YouTubeStep
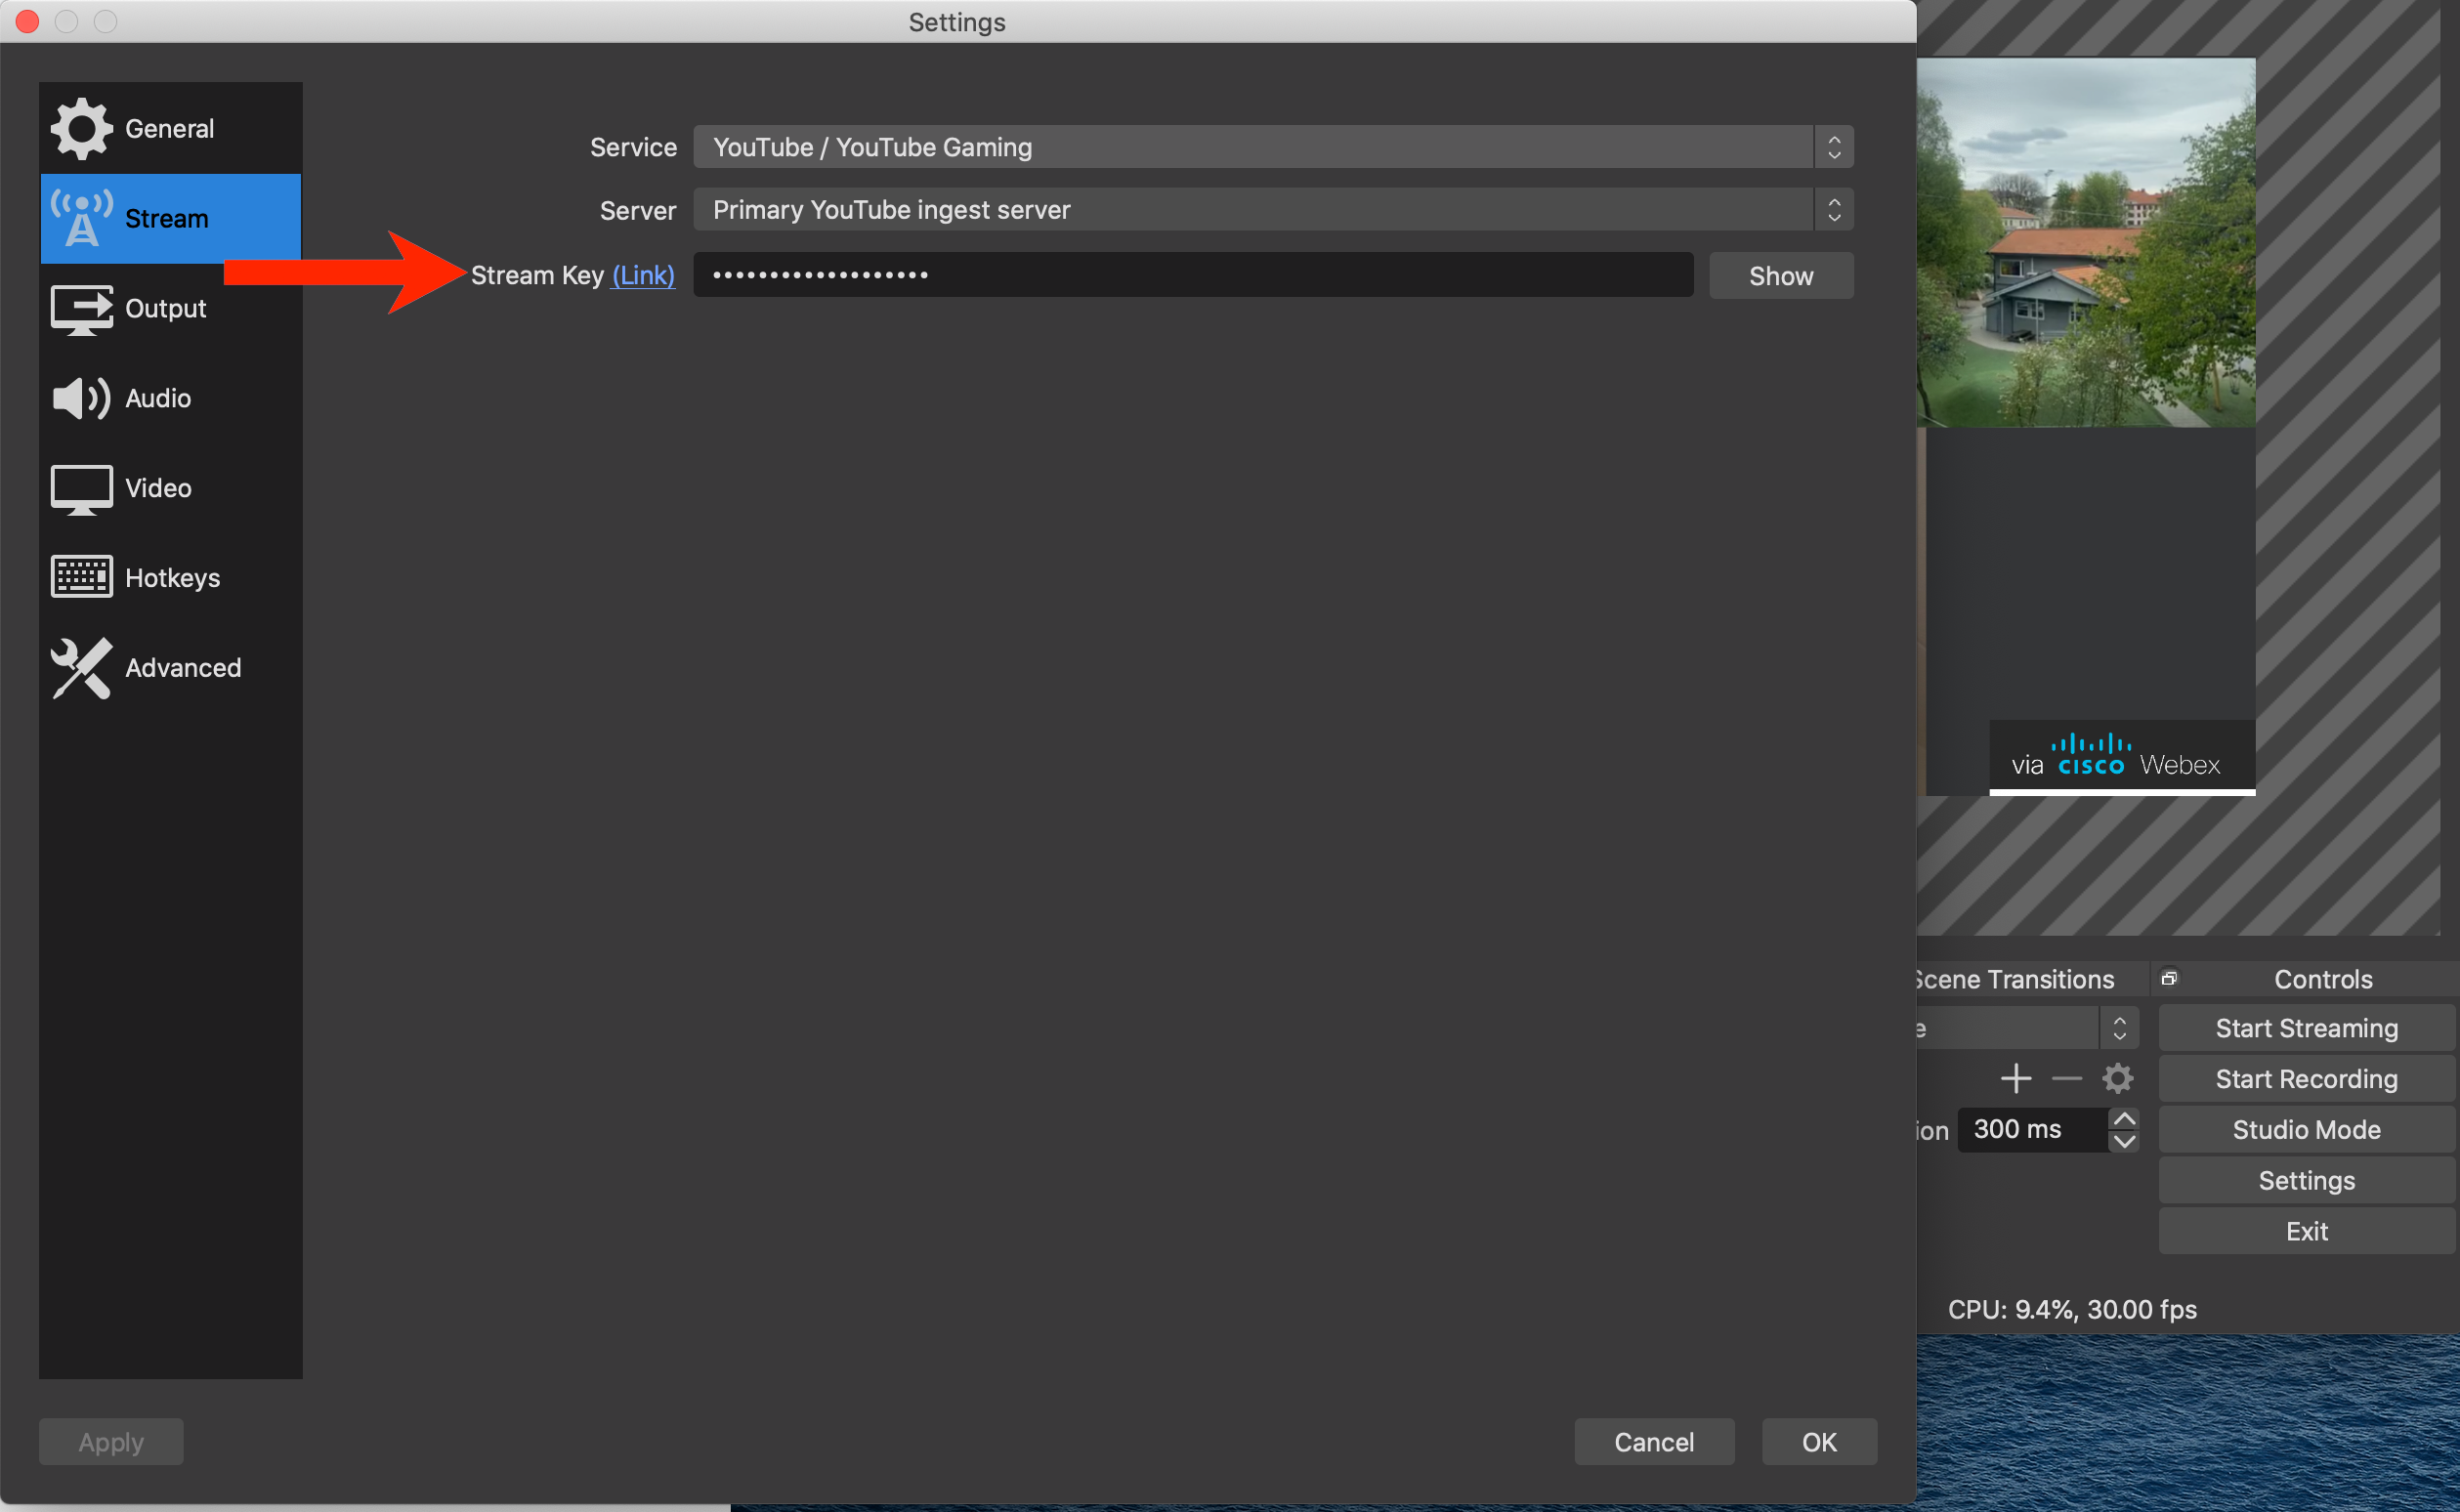
Étape 1 : Finally, enter your YouTube API Key and click OK.
OBS Stream Settings for YouTube.
Viola! Congratulations on your first Grid view with an overlay live stream. Click “Start Stream” to begin streaming!
YouTube Studio Live Stream.
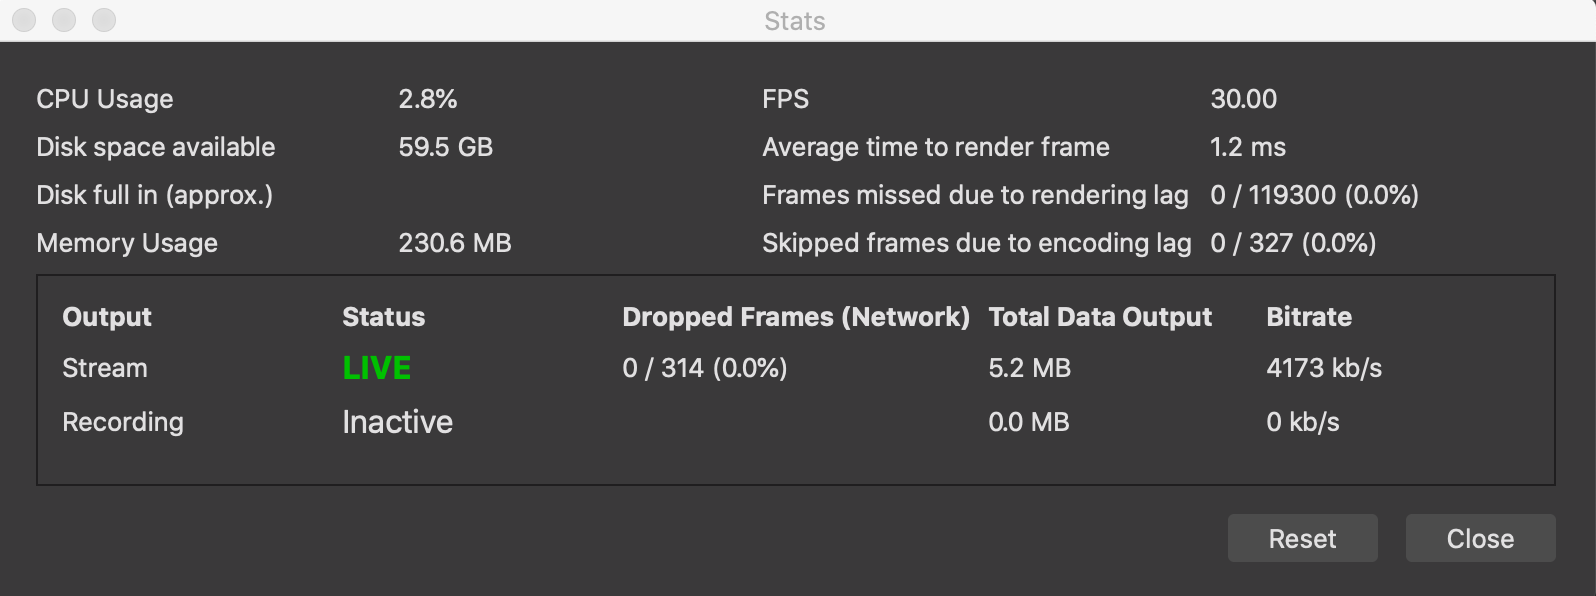
TIP: To ensure a smooth stream, check the stats in OBS to make sure there are no dropped frames. Allez à : View -> Stats.
You will want Dropped Frames to be at 0%, this is the number of frames that you have dropped total. If frames are dropping that typically means you are over tasking your computer or internet. If you’re dropping frames, you can try setting your “CPU Preset” in OBS’ Output settings to something faster.
You will want to keep your CPU to be less than 80%. If this reaches 100% it can result in dropped frames. You can try setting your “CPU Preset” in OBS’ Output settings to something faster if this is an issue.
There are several articles online that can help you tweak these settings.
This section will cover streaming using REC.VC, OBS, and OBS with Restream. As mentioned before, each application purpose based on your use case.
1. REC.VC: Grid view & single stream
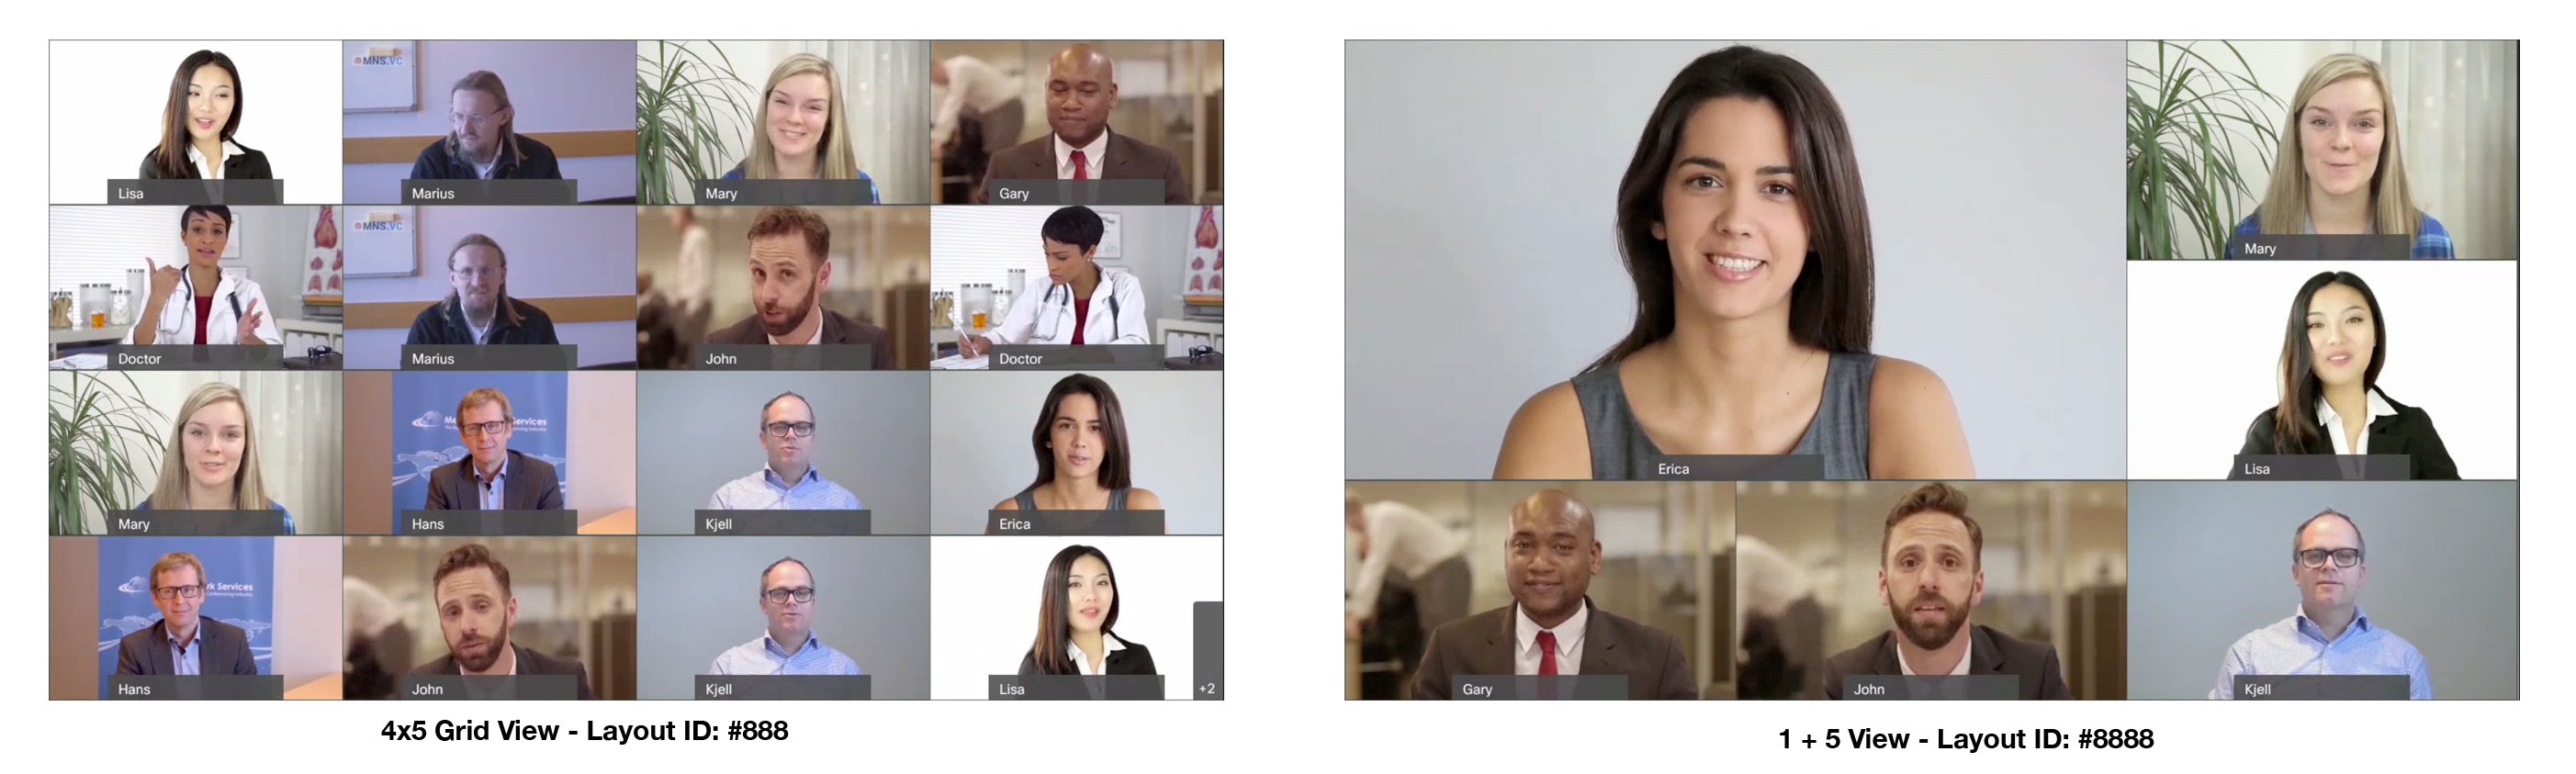
The platform from MNS.VC is the simplest and quickest way to stream up to a 5×4 layout directly from Webex Meetings and even Webex Events. This can be hosted privately on REC.VC or publicly live-streamed to third-party RTMP destinations including Facebook, Workplace, and YouTube.
REC.VC captures the video, audio, and content by being a SIP/H.323 video participants in the Webex session. How does this look like? Take, for example, seven people are in a meeting with REC.VC. From your endpoint, you will only see 6 people and not yourself (unless you activate self-view). It is the same with REC.VC, it is just another endpoint receiving the video composition from Webex, excluding itself. Below is an example of the formats you can achieve.
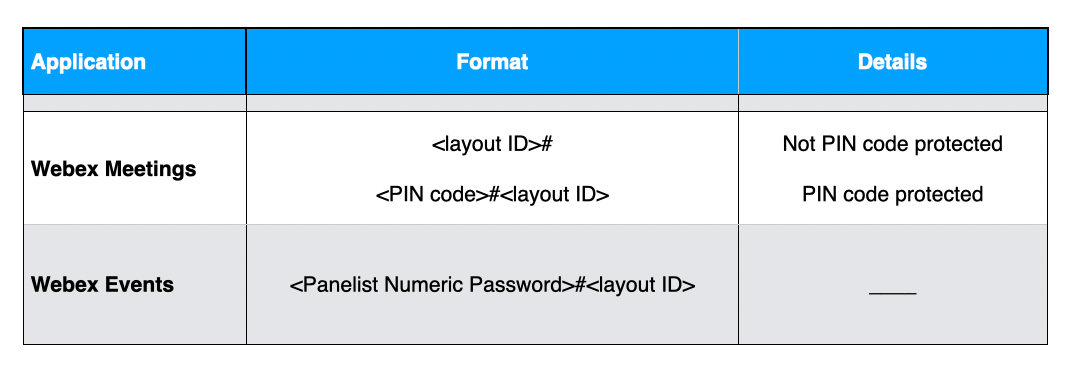
Étape 2 : In the REC.VC user interface, enter your video address (SIP or H.323 URI) of the meeting. In the PIN field, enter the PIN with the format you want. The video composition can be preconfigured to one of the other Webex Video Layouts.
Étape 2 : Go to Source -> Video Conference.
Étape 2 : Toggle “Stream” to “On”
Étape 2 : Enter the RTMP URL from YouTube.
Étape 2 : Go to studio.youtube.com and find your RTMP stream URL and Stream Key and copy them into the RTMP URL of REC.VC.
REC.VC RTMP setup.
Étape 2 : Enter the video address (SIP/H.323 URI) in the Source Address.
REC.VC Source & PIN configuration.
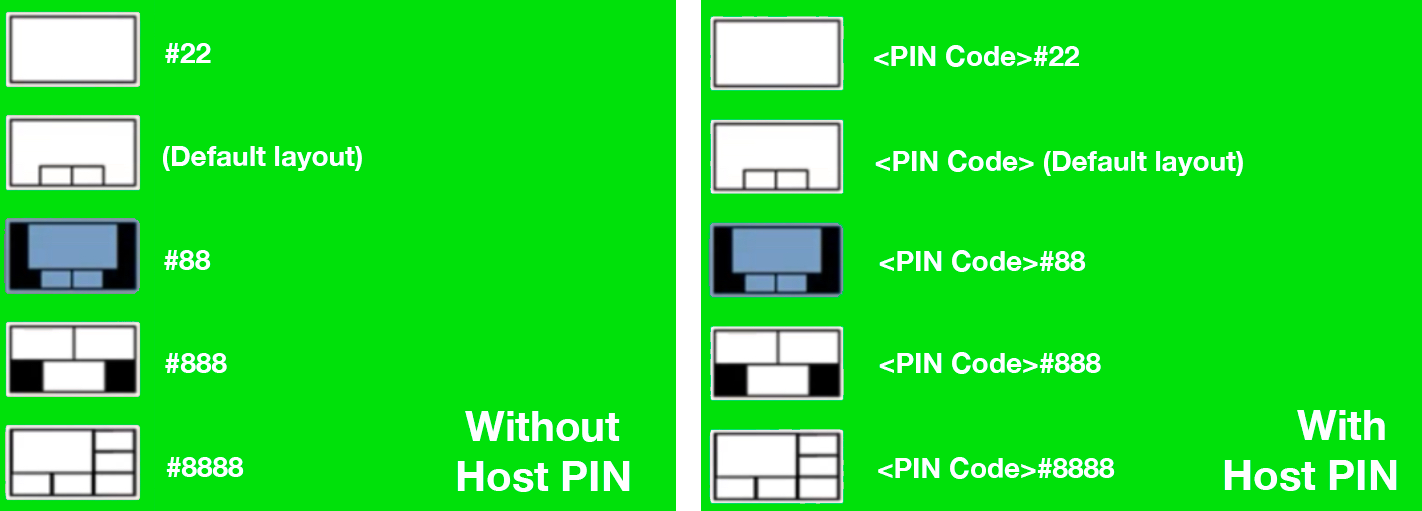
Étape 2 : Figure out your streaming format. Enter the PIN for the layout you want to achieve.
REC.VC PIN format.
Video layout setup via PIN codes.
Étape 2 : Cliquez sur le bouton OK.
Étape 1 : Go back to YouTube to check your steam. You will have to wait a few seconds to see it start.
The video layouts covered in this post is when content is not shared in the video meeting. If you want to share content, you can learn more here.
Finally, if you want to stream to multiple platforms simultaneously, that is possible with REC.VC by just adding another REC.VC SIP participant in the meeting.
TIP: For those with a dedicated Webex Rooms device, check out this cool live stream, One-Button-to-Push Macro from MNS.VC that uses a Touch10 to start a YouTube broadcast.
2. Restream.io: OBS & multi-stream
Restream is another cloud application that allows you to broadcast Webex on as many streaming platforms as you want simultaneously, including LinkedIn, Facebook, and YouTube. Once you have everything in Section II set up, you can now begin this multi-stream.
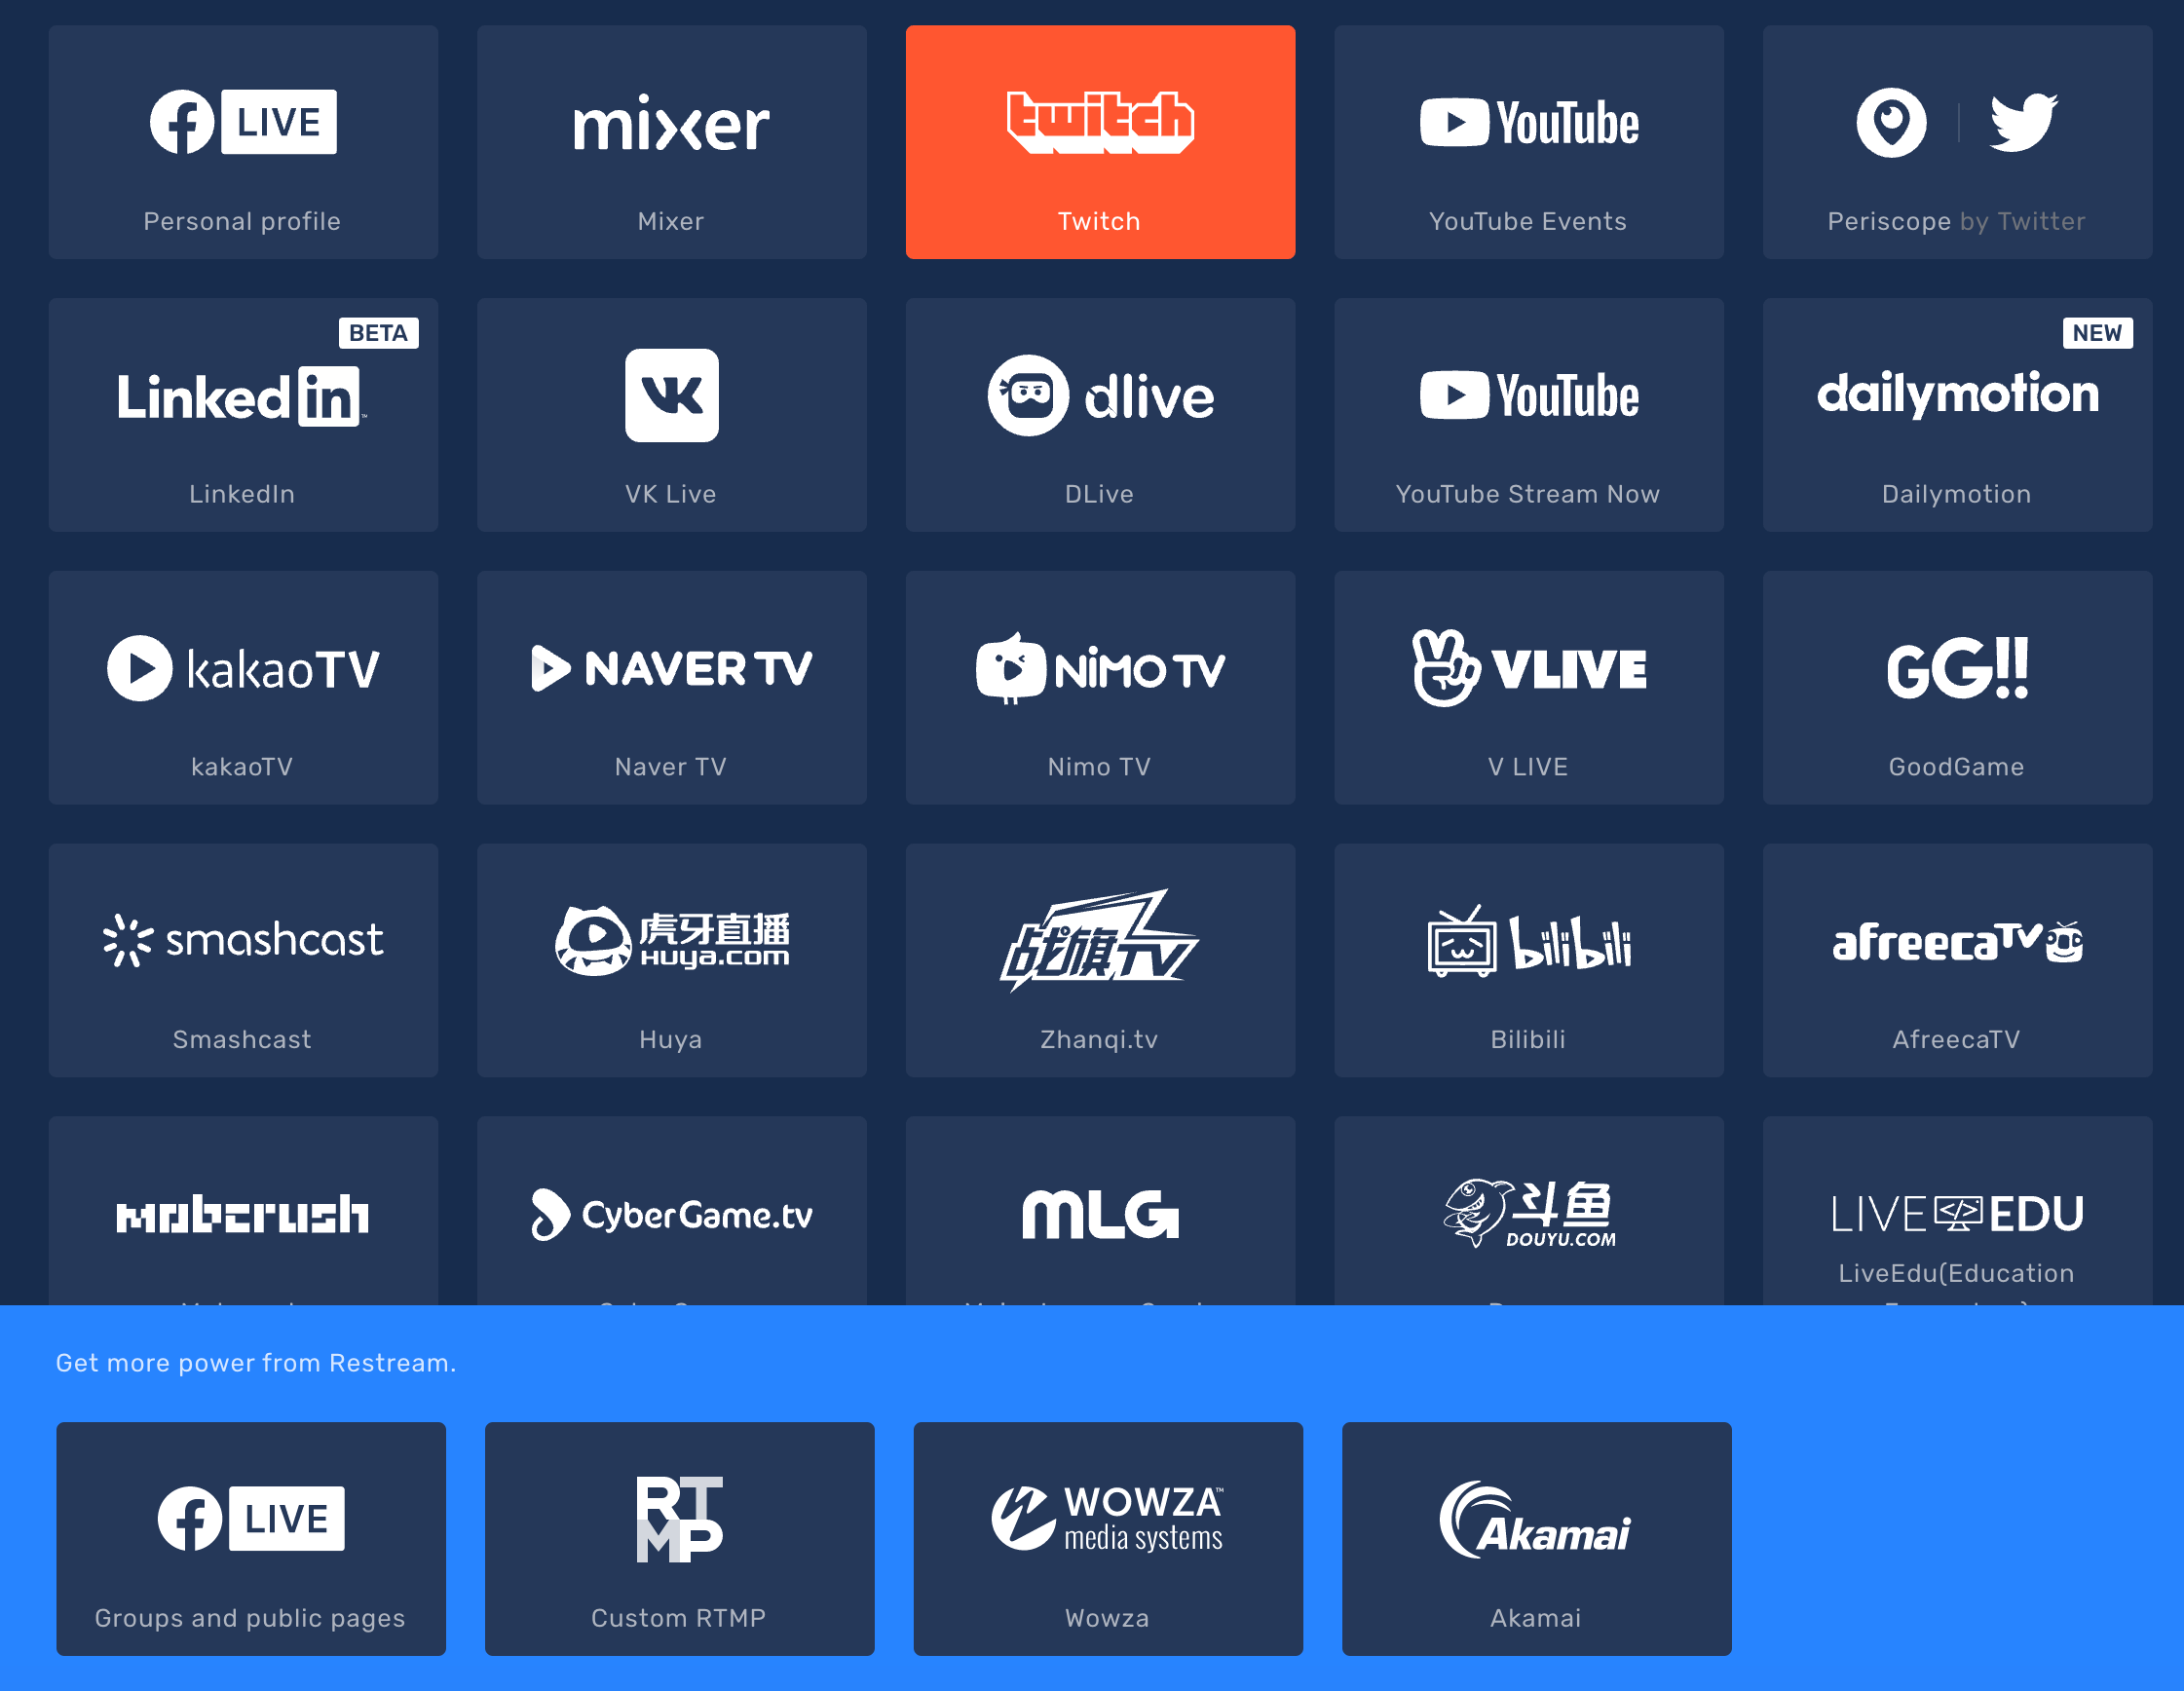
Étape 2 : Set up the streaming platforms you want. You will have to authenticate to these services.
Intégrations de flux
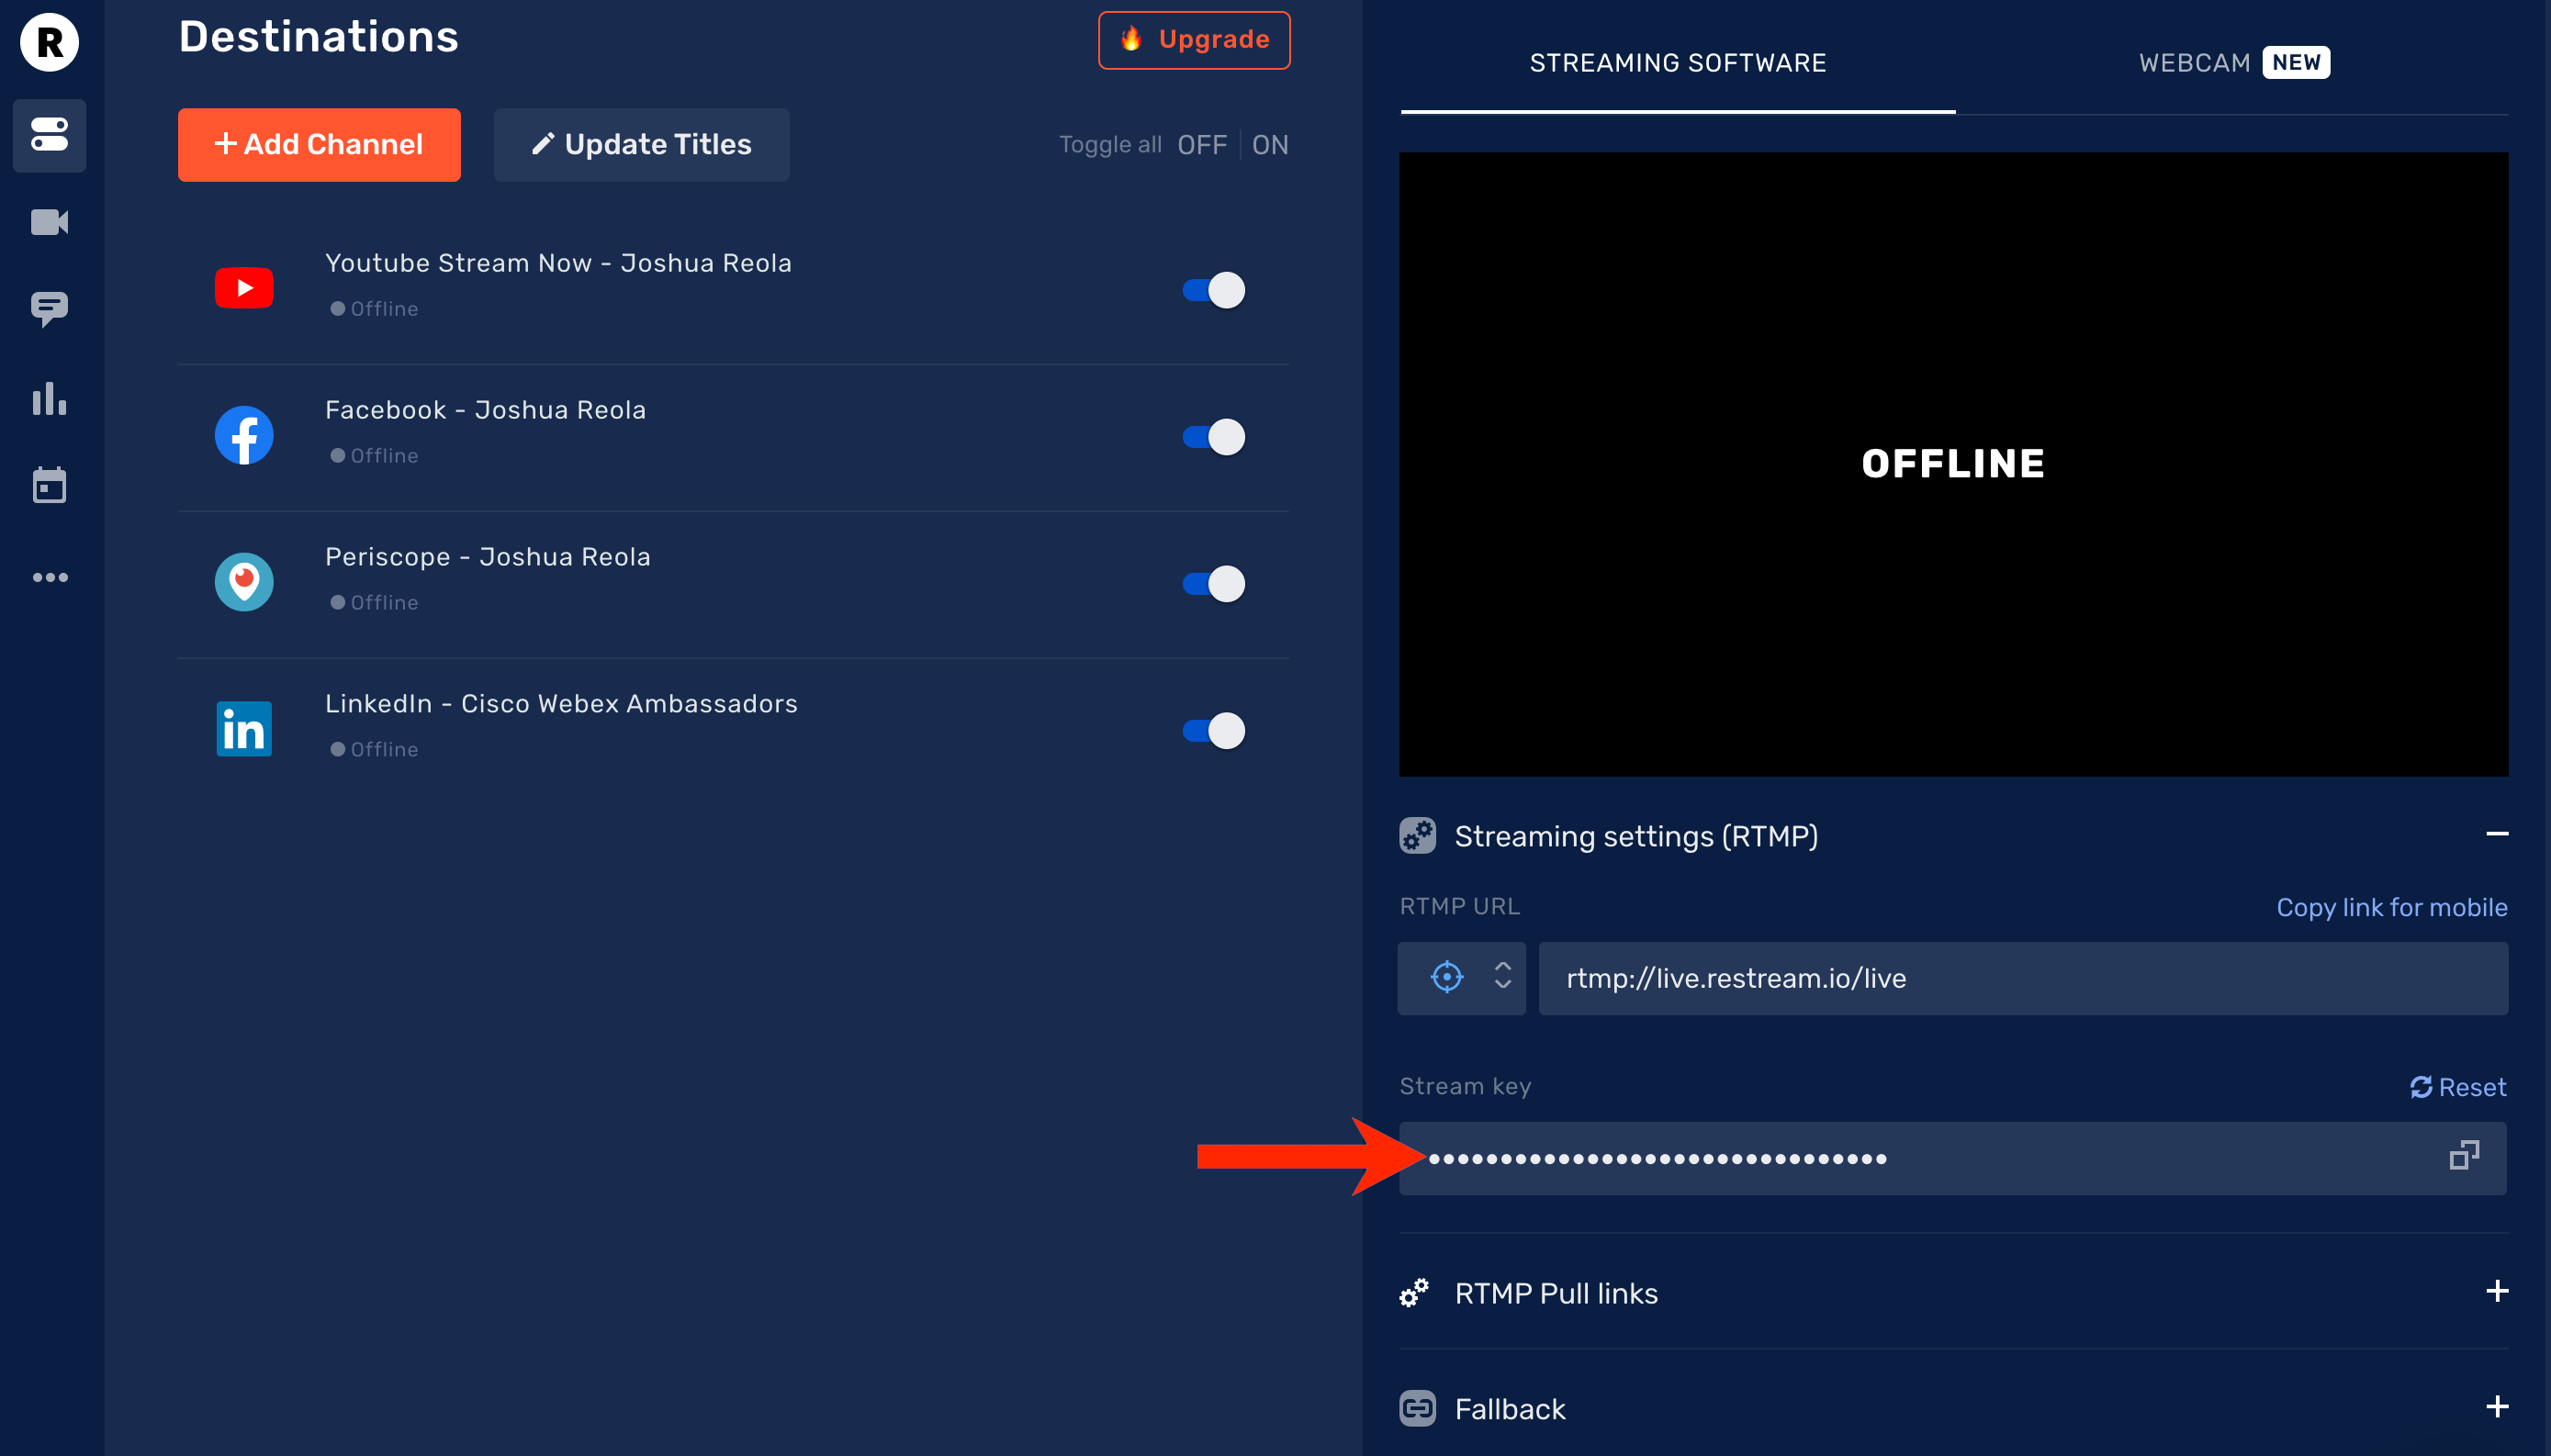
Étape 2 : Once you enable the streams you want. You will also copy the Stream Key and paste it into OBS.
Étape 2 : Open OBS and go to Settings -> Stream -> Restream.io — RTMP and Paste the key and click OK.
OBS & Restream.io stream key setup.
Étape 2 : Once you are back at the main OBS Studio window, go to Start Streaming to begin your stream.
Start Streaming with OBS.
Now you’re all set! Your stream is seamlessly delivered to all your connected platforms.
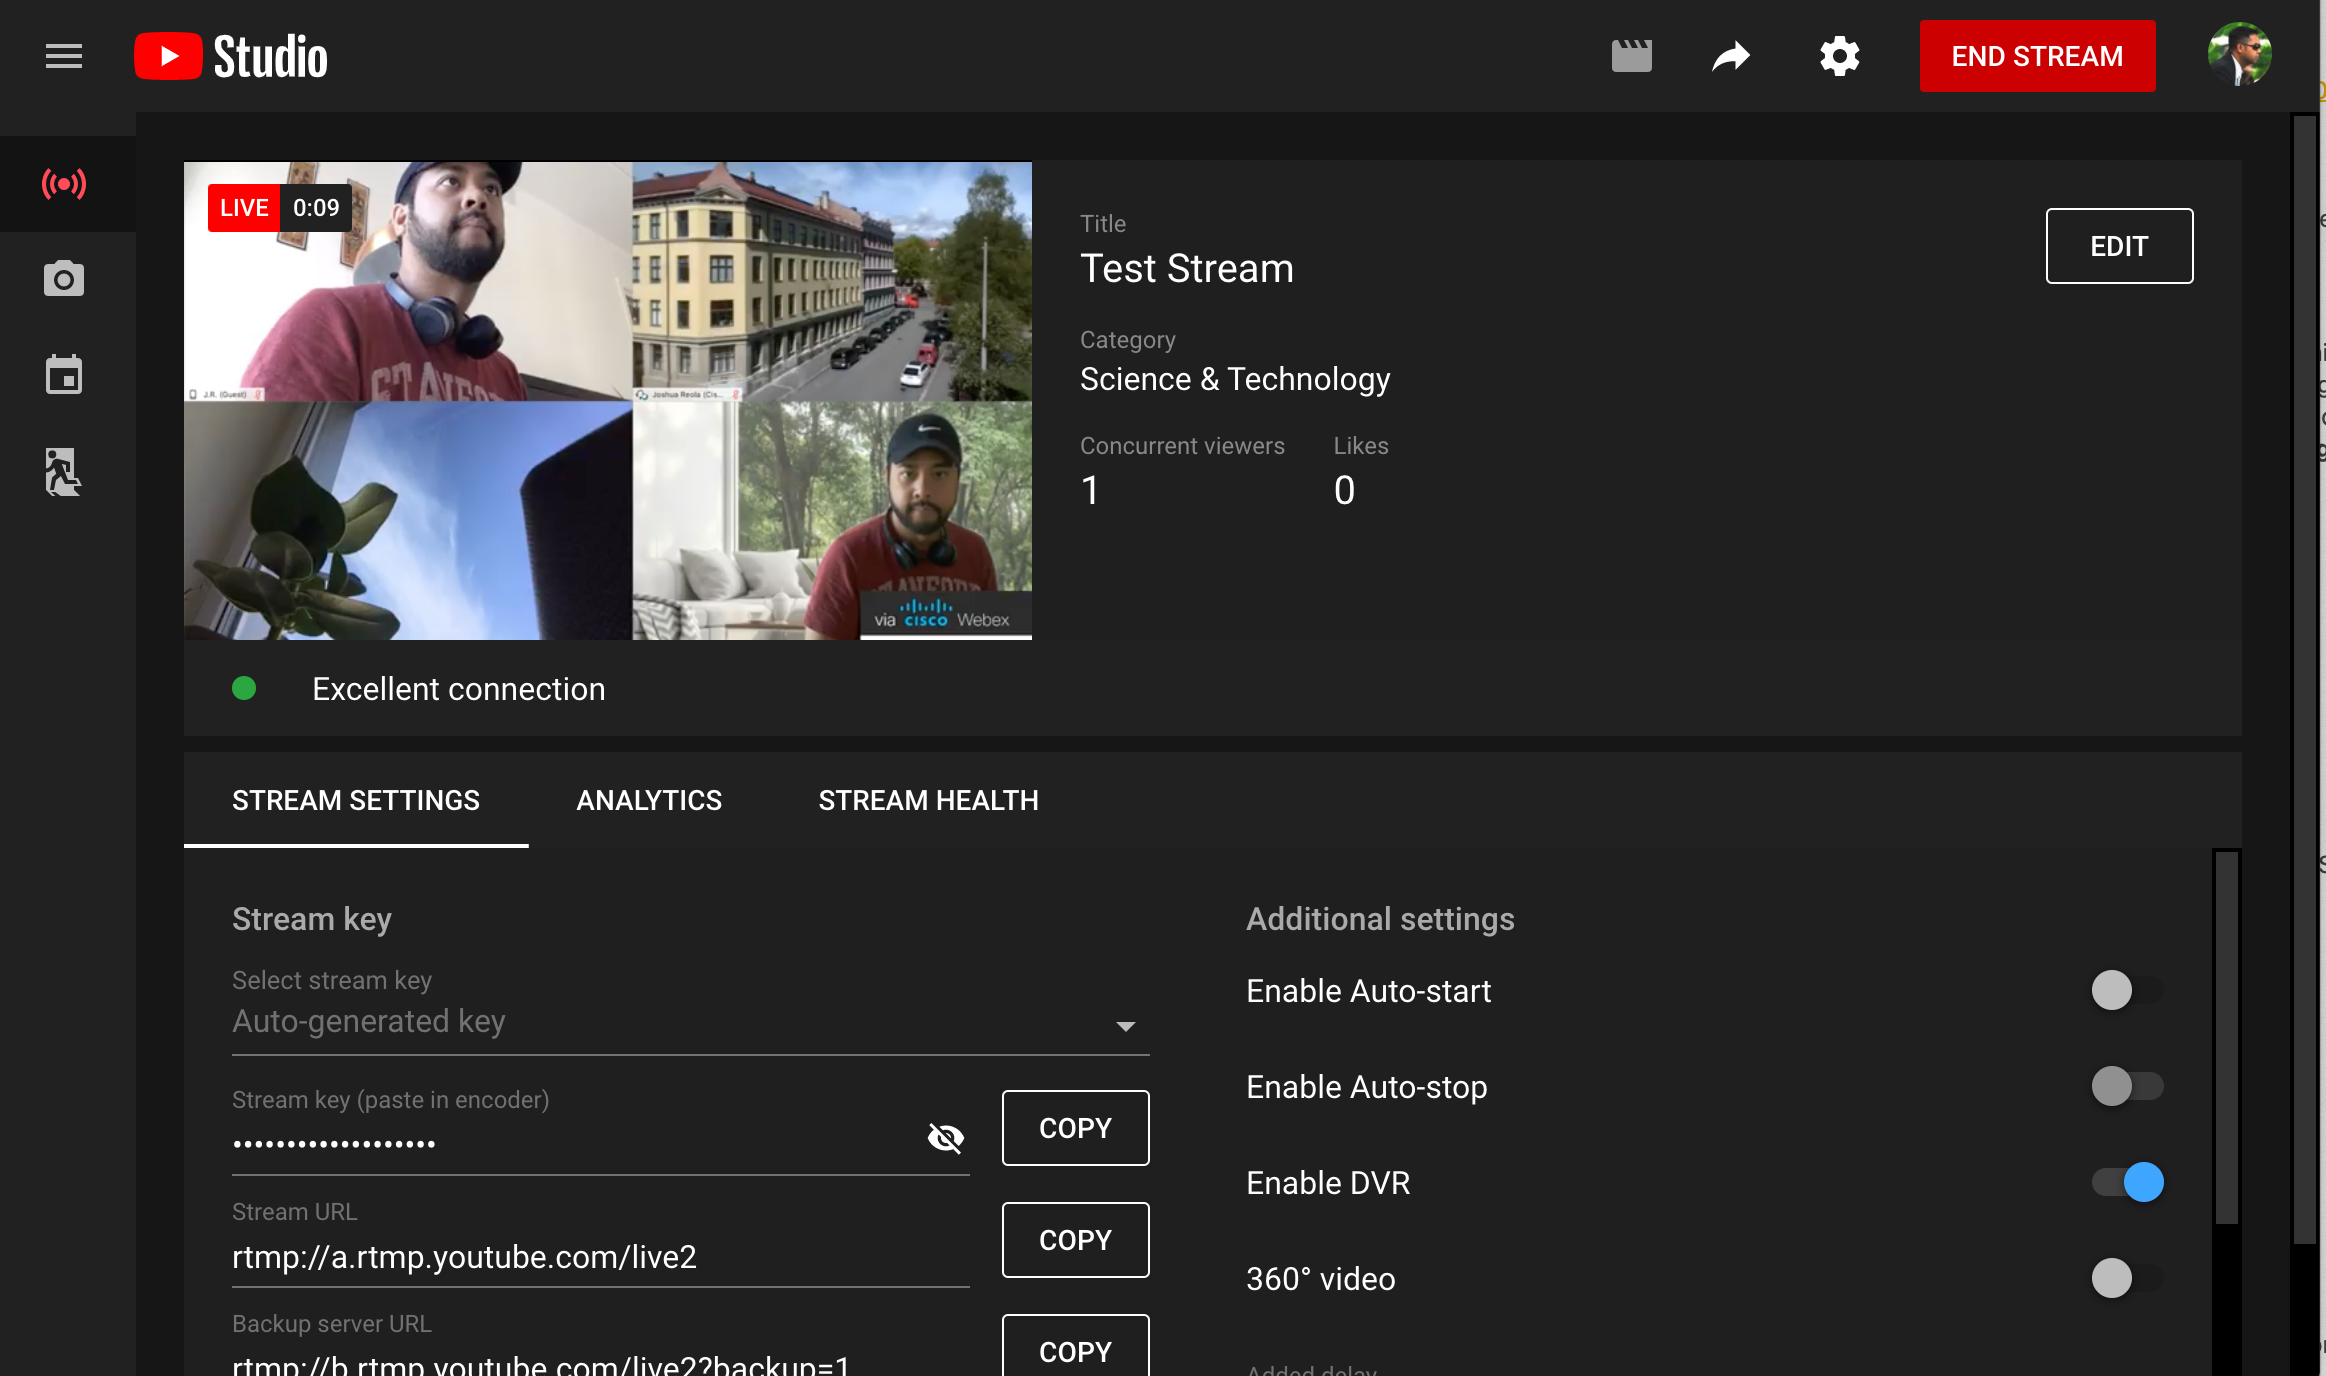
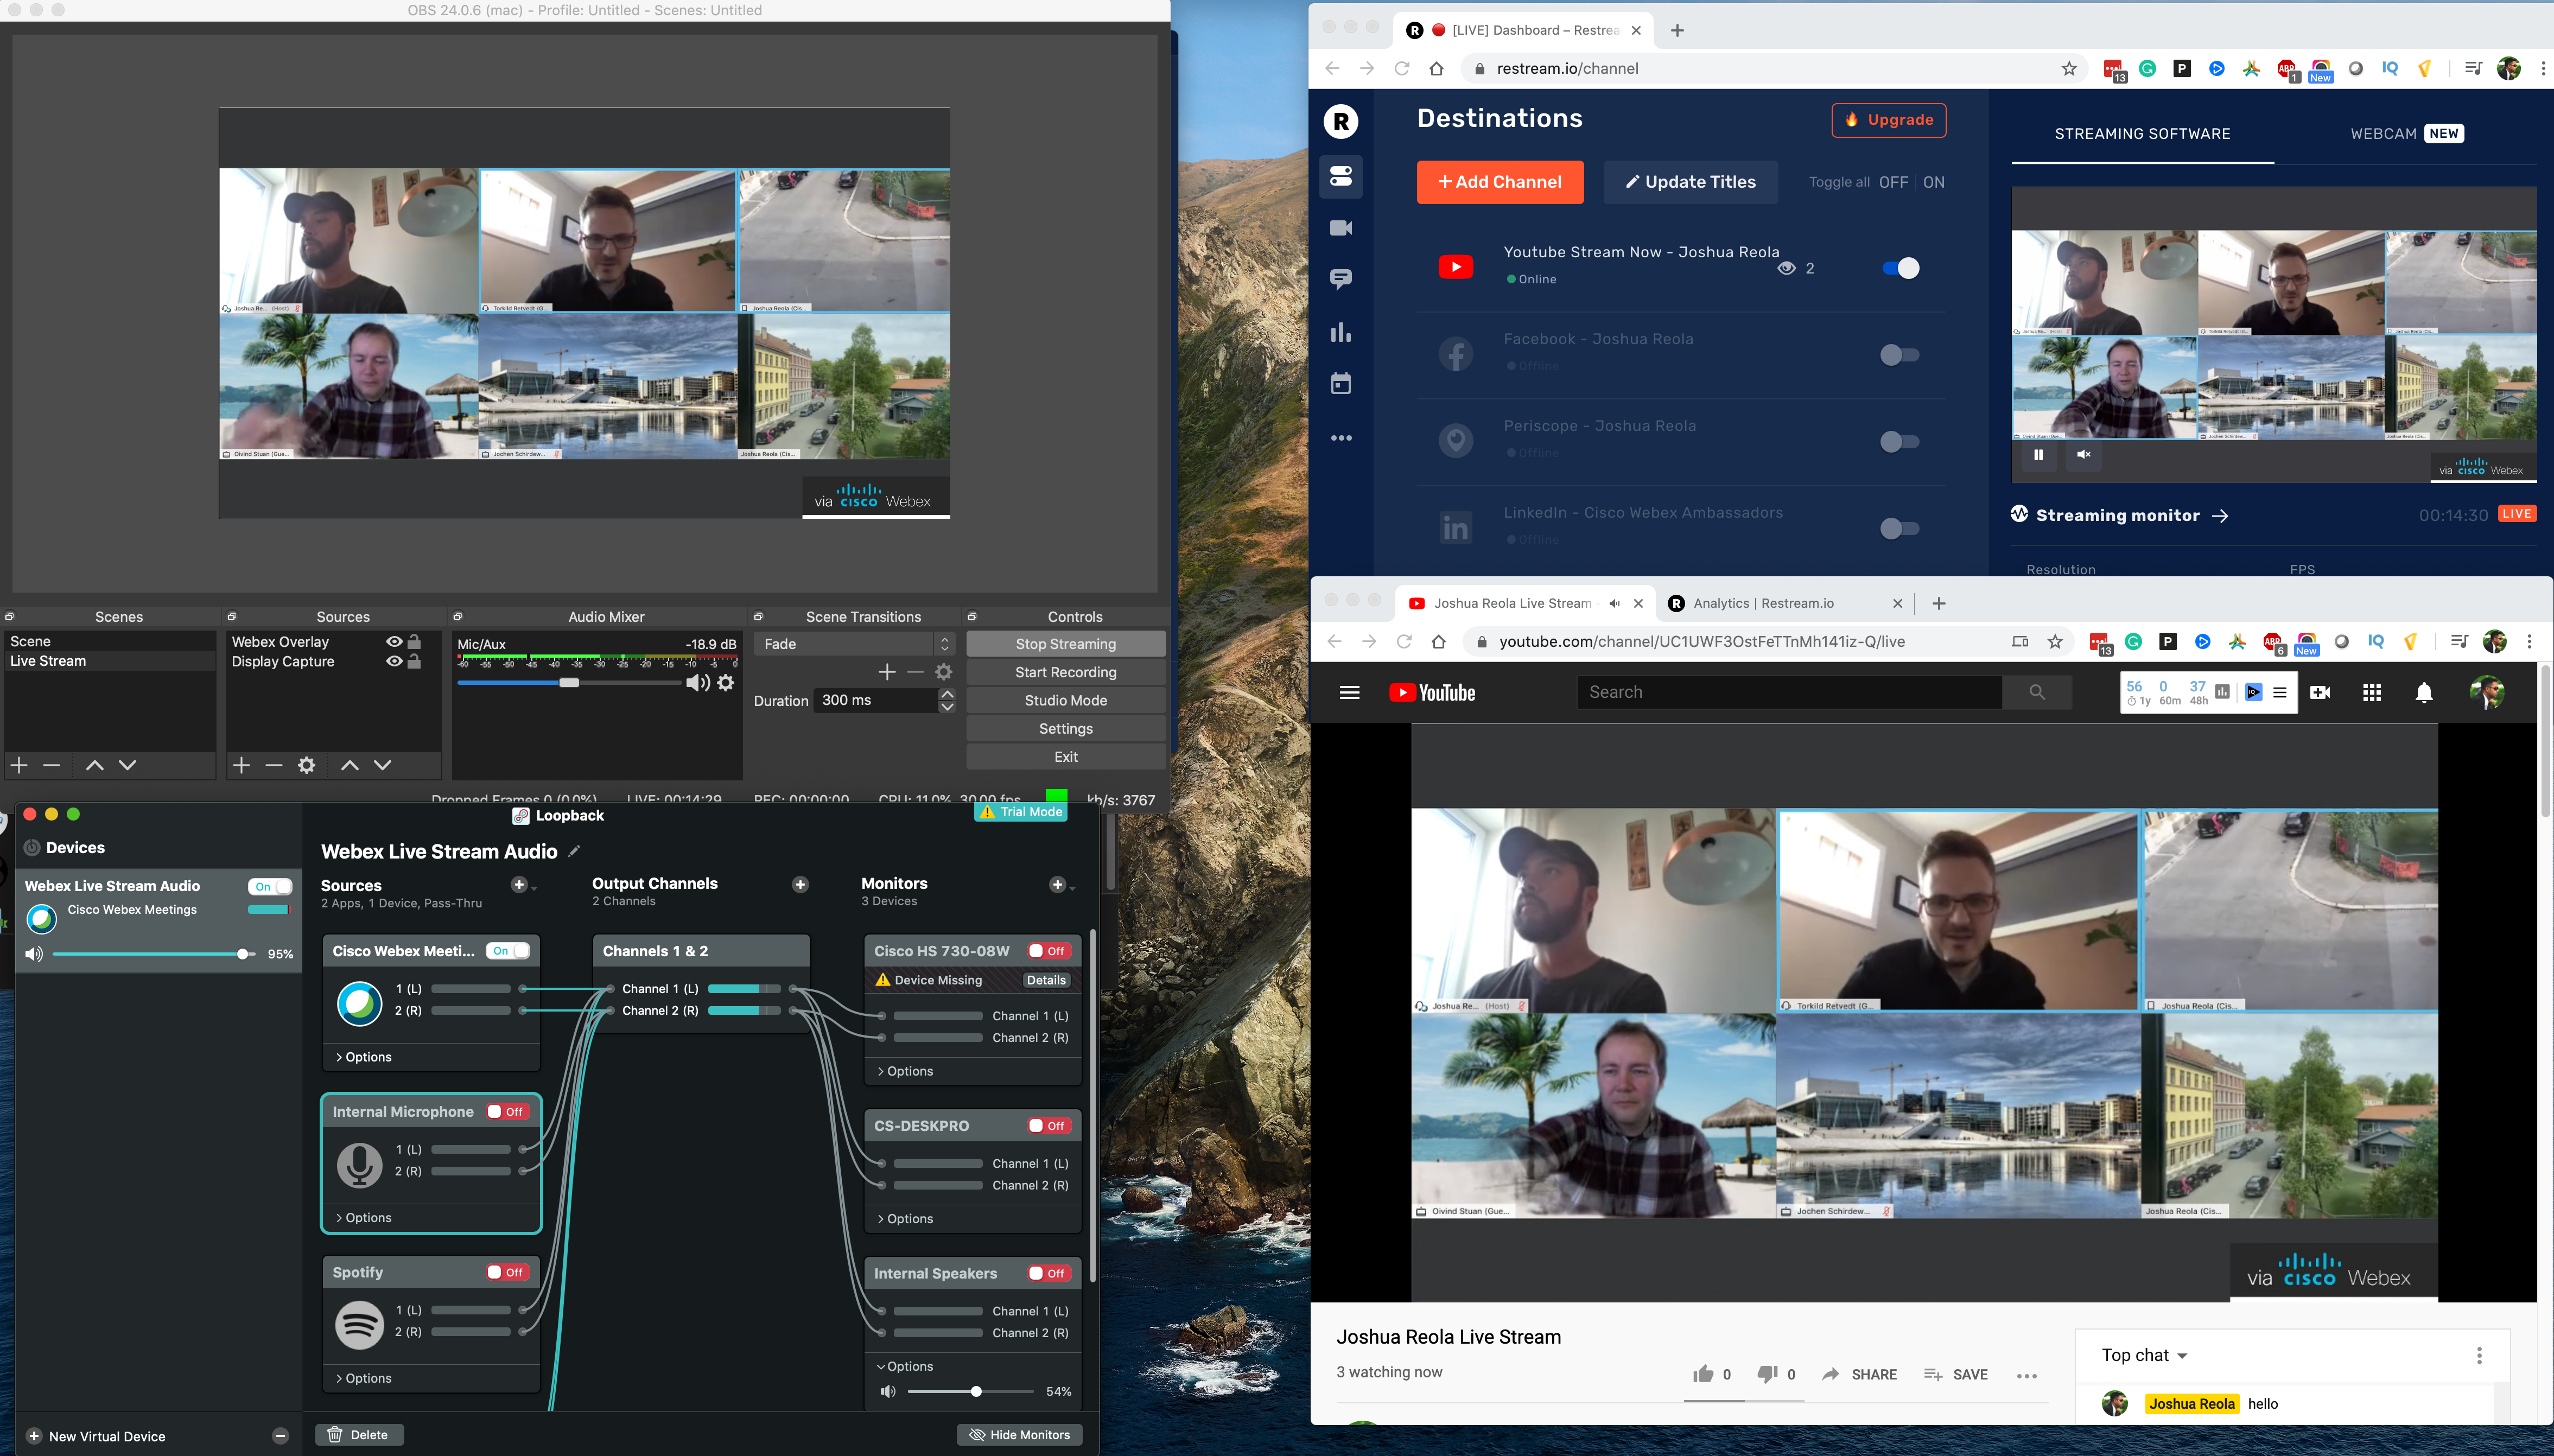
Below you will see all the applications working together to stream to YouTube. Congratulations and welcome to the world of broadcasting!
Studio Dashboard: The final product stream to YouTube.
Conclusion
Don’t be overwhelmed. You can do this! Just practice and experiment. Once you have all this configured and setup, to execute another live stream only takes <5 minutes. Streaming can be confusing at first, but it’s not as hard to learn. These techniques can add some variety and creativity to your live stream and these are just the basics. It doesn’t have to be expensive and too difficult to set up, although every bit of effort you put in will show in the final product.
Happy streaming!
If you have questions, leave a comment. If you find this article helpful, please follow me on here and share this blog! 👍
Have additional questions or want to learn more about Webex? Join the Webex Ambassador Community on Webex Teams and sign up as a Candidate and be a part of a global community of over 2,700 champions.